Intro
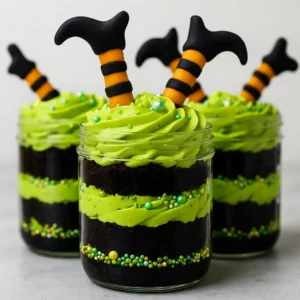
Halloween desserts should be playful, colorful, and just a little bit spooky—exactly what witches’ brew Halloween cake jars deliver. These single-serve jars are filled with rich chocolate cake, vibrant green buttercream, and festive sprinkles, then topped with fondant witch legs that look like they’re diving right into the cauldron. Each jar feels like a personal party in a cup, combining fun decoration with decadent flavor. Perfect for kids’ parties, classroom treats, or a grown-up Halloween bash, witches’ brew Halloween cake jars are as fun to assemble as they are to eat, making them a must-try for this spooky season.
The Story Behind Witches’ Brew Halloween Cake Jars
There’s something extra exciting about Halloween baking—it’s one of the few times of year when desserts can be both whimsical and dramatic. Witches’ brew Halloween cake jars capture that spirit perfectly. The idea is simple: layers of soft chocolate cake paired with swirls of green buttercream, sprinkled with bright pops of color, and finished with playful fondant witch legs sticking out the top. The result looks like a witch has tumbled straight into her bubbling brew, and the jars themselves feel like little cauldrons filled with sweetness.
The first time I made these cake jars, I realized they were more than just a dessert—they were a centerpiece. Guests couldn’t help but laugh when they saw the upside-down witches perched on top of each jar. Kids were fascinated, leaning in to check the details of the striped fondant legs and curved little shoes, while adults were just as charmed by the creativity. And once everyone dug in, the layers of chocolate cake and buttercream stole the show.
Part of the magic is that these cake jars are customizable. You can play with the sprinkles, change the buttercream color, or even swap in different cake flavors. But no matter how you tweak them, the witch legs make them instantly recognizable as a Halloween treat.
They also make serving easy. Because each portion is assembled in its own jar, there’s no need for slicing or plating—guests just grab a jar and a spoon. It’s the kind of dessert that brings fun to the table while still delivering on flavor. Witches’ brew Halloween cake jars prove that sometimes the most memorable treats aren’t the most complicated—they’re the ones that tell a story while making people smile.
How to Make Witches’ Brew Halloween Cake Jars
Making witches’ brew Halloween cake jars is a fun project that combines baking, decorating, and a little bit of crafting. The process begins with the cake itself. Start by creaming butter and sugar until fluffy, then add eggs in stages for a smooth batter. Mix in the dry ingredients—flour, baking powder, cocoa, and salt—alternating with milk. Once the vanilla is folded in, bake until the cake is rich and springy. After cooling, the cake will be cut into circles that fit perfectly inside the jars.
While the cake bakes, prepare the buttercream. Whip softened butter until smooth, then blend in powdered sugar and vanilla. A touch of milk or cream makes the texture silky, while a few drops of electric green food coloring give the buttercream its signature spooky shade. Load the frosting into a piping bag with a star tip, ready to swirl into each jar.
The most eye-catching part of these cake jars is the fondant witch legs. Roll orange fondant into strips, add black fondant stripes, and attach little black shoes shaped from more fondant. It’s a playful step, but it’s worth the time—once the legs are assembled and dried, they transform the jars from simple desserts into full Halloween spectacles.
To assemble, start with sprinkles at the bottom of each jar, pushing some to the sides so they show through the glass. Add a round of cake, then pipe in a layer of buttercream. Repeat the layers, finishing with a generous swirl of frosting and a shower of sprinkles on top. Finally, poke holes in the frosting and insert the witch legs so they look like they’ve toppled into the jar.
The result is a dessert that’s festive, delicious, and guaranteed to make your Halloween table unforgettable.
Witches Brew Halloween Cake Jars
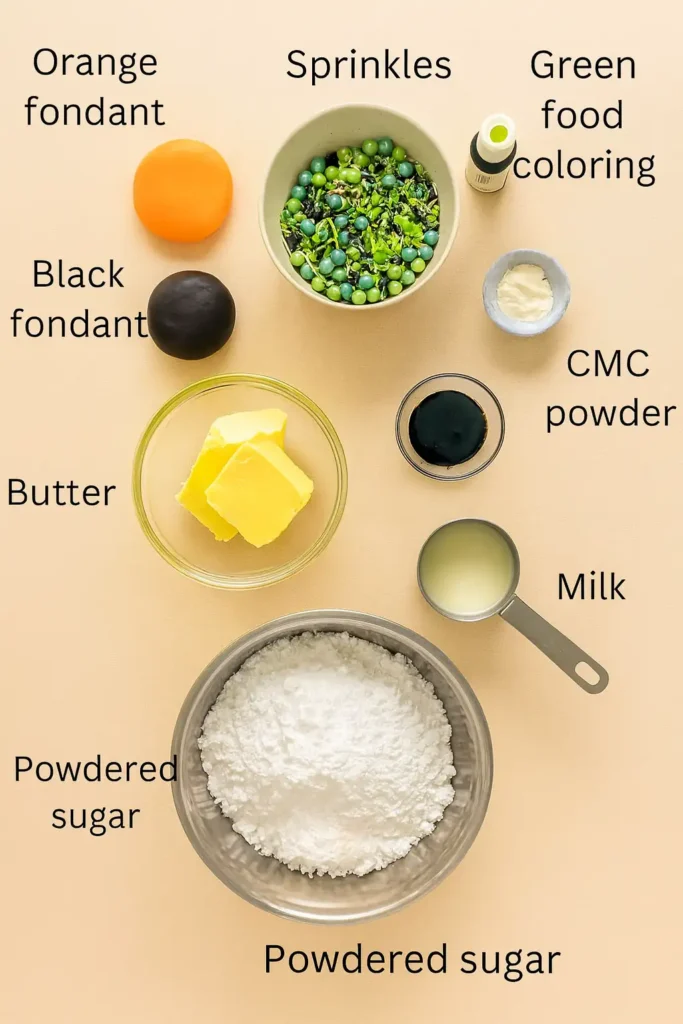
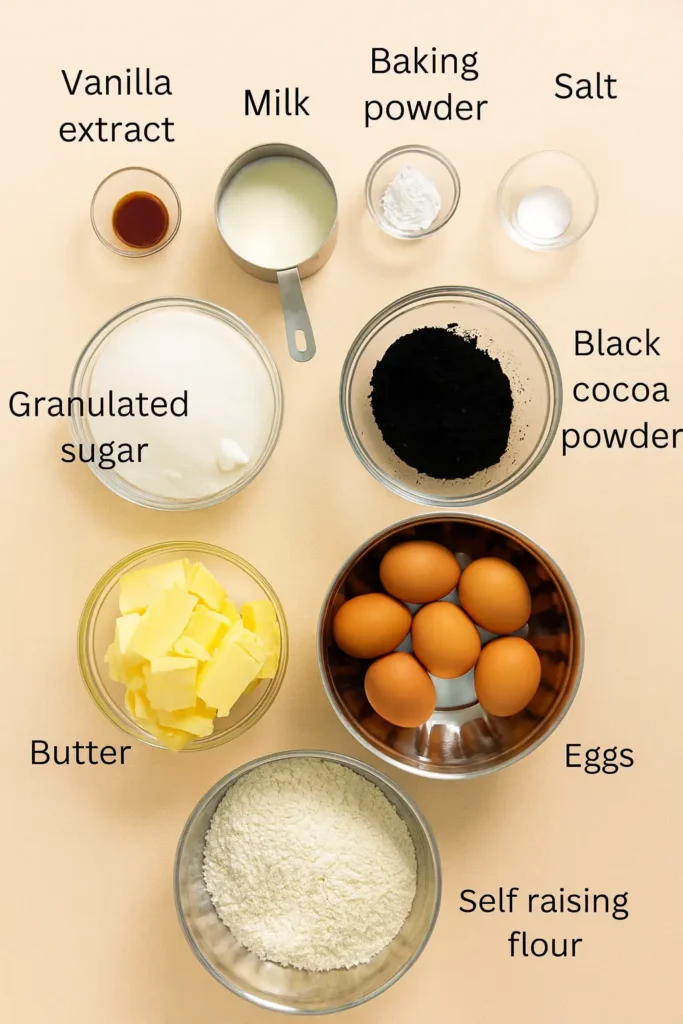
Ingredients
- Cake
- ▢330 g self raising flour
- ▢360 g granulated sugar
- ▢360 g butter
- ▢6 eggs
- ▢30 g unsweetened black cocoa powder
- ▢1½ teaspoon baking powder
- ▢½ teaspoon salt
- ▢90 ml milk
- ▢2 teaspoon vanilla extract
- Buttercream frosting and Decoration
- ▢400 g butter salted
- ▢800 g powdered sugar icing sugar
- ▢1¼ teaspoon vanilla extract
- ▢2 tablespoon milk or cream optional- if the buttercream is too stiff
- ▢Electric green food coloring a few drops
- ▢250 g Orange fondant
- ▢200 g Black fondant
- ▢1 tablespoon CMC powder
- ▢Sprinkles
Instructions
- The Witches’ Black and Orange Fondant Legs
- Knead half a tablespoon of CMC into orange fondant. Knead until it becomes soft and pliable. Roll the fondant into a long strip (approximately 5mm in diameter) to make the witches’ long orange legs. (See note 2)
- Cut the strip into 10 cm lengths. Repeat the process until you have 18 of these. Keep the strips covered in a container to prevent them from becoming dry as you work on them. (See note 3)
- Next, roll the black fondant into a long thin strip (with an approximate diameter of 2mm to 3mm). This will form the black stripes on the orange legs. It is not necessary to add any CMC to the fondant. For easy handling, make the strips in lengths of 25cm to 30cm and roll more as you finish using them up.
- Dampen the cake decorating brush (see Note 4) and brush it on the orange fondant legs where you wish to place the stripes. Start from one end, leaving about 1 cm space.
- Attach the black strip to the dampened area and carefully cut off the excess.
- Use your fingers to smoothen and adjust as necessary. Repeat the process until you have 5 black stripes on each leg for all the 18 legs. Keep the legs covered while you are working on the others.
- The Black Fondant Shoes
- Knead the remaining half tablespoon of CMC into the remaining black fondant. Knead until soft and pliable and make 18 balls (approximately 2 cm in diameter) (See note 5).
- Roll each fondant ball into a short sausage. Do this one at a time, keeping the rest covered in a container.
- Pinch the bottom of the sausage to make it pointy. This will form the heel of the shoe.
- Next, push the right-end of the sausage upwards. Press it down slightly to make it thicker and fatter. This will be the top part the shoe.
- Next, pinch the left-end of the sausage flat and curl it up slightly. This will make the pointy end of the witch shoes. If the shoe appears to fat, press it down lightly.
- To make the opening for the shoe, use a small ball tool or any rounded object to make a round dent large enough to insert orange fondant leg. (See note 6).
- Attaching the Shoes to the Legs
- To attach the shoes to the legs, use a damp brush to lightly moisten the insides of the rounded hole in the shoes. Gently attach it to the leg and press it lightly with your fingers to secure it well.
- Set the leg (with the shoe attached) on a flat surface to allow the shoe to secure firmly. Repeat the above steps until all the shoes are completed and attached to the legs. Let the legs rest overnight until they are dry and firm.
- The Cake
- Preheat oven to 170℃. Grease and flour one 9-inch square cake tin. Set aside.
- Cream butter and sugar until light and fluffy (on medium speed) for approximately 2 minutes. Scrape the sides and bottom of the bowl half way through.
- Add the eggs, two at a time, beating well after each addition.
- In a separate bowl, measure the flour, baking powder, cocoa powder and salt. Mix with a hand whisk until well combined. Sift the flour mixture into the creamed ingredients in 3 batches. Alternate each batch with milk and fold well. Finally, fold in the vanilla extract.
- Transfer the cake batter into the prepared cake tin and bake for 45 to 50 minutes. Test the cake at least 5 to 10 minutes before the baking time is up by inserting a skewer or cake tester in the center of the cake. The cake is baked if the skewer comes out without any wet batter and the top of the cake springs back when pressed lightly.
- Remove the cake from oven and let it rest in the tin for 2 to 3 minutes. Loosen the sides with a butter knife and turn it onto a wire rack. Use another wire rack to turn it again to face upwards. Let the cake cool completely before frosting.
- Buttercream Frosting
- Place the butter into a large bowl. Cream until it is soft, smooth and creamy.
- Add in the sifted powdered sugar. Mix with a spatula to moisten it before using the electric mixer to whip the buttercream. This will help prevent the sugar from flying all over when you turn on the mixer.
- Add vanilla extract and beat again until it is well combined and the buttercream is all smooth. Add the milk if the buttercream is too stiff at this stage.
- Add a few drops of green food coloring and mix thoroughly (see Note 7). Transfer the buttercream into a piping bag fitted with large star tip (tip 1M).
- Assembling the Halloween Cake Jars
- Level the top of the cake (if not level) and then slice it into half horizontally.
- Use the round cutter (or one of the cake jars) to cut out 9 circles from each cake layer (see Note 8).
- To assemble the Halloween cake jars, drop a spoonful of sprinkles to the bottom of the jar (see Note 9). Push them to the sides so that they are visible from the outside.
- Next, gently push in the first cake layer into each jar.
- And then pipe the first layer of buttercream into each jar, starting from the sides towards the center. Add more sprinkles, but only on the sides such that they are visible from the outside.
- Top with another layer of the chocolate cake, followed by a final layer of buttercream. Pipe the buttercream into a large swirl.
- Top the cake jars with more sprinkles, this time all over the top instead of just the sides.
- Finally, use a long wooden skewer to make 2 holes in the cake jar. Poke the witch legs into the holes to complete the witches’ brew Halloween cake jars.
Notes
Instead of rolling with your hands, you can use a fondant smoother. It helps create smooth strips without any finger marks or dents (image 2).
When working with fondant in humid environment, fondant has a tendency to become sticky and saggy and will not firm up even after leaving it to set overnight. Adding CMC powder helps. Working in an airconditioned room also helps to set them firm. Another option to deal with humidity is to insert lollipop sticks into the legs. To do this, roll the orange fondant into a long rope and then flatten it lightly (make sure the width is sufficient to wrap around a lollipop stick. Dampen the stick (with a damp brush) and wrap it with the flattened fondant.
The traces of water from the damp brush act as a glue for the fondant. However, applying too much water will cause your fondant to turn soggy and the color to bleed. When using the brush, dip it in water and then wipe it lightly in a kitchen towel before applying to fondant.
Keep the balls covered in a container as you work on them one by one. If you find them a little dry, knead again until they become smooth.
The first shoe will take a slightly longer time to make, but once you get used to the steps, you can make them at a much quicker rate.
Start with a little food coloring and mix well before adding more until you reach the desired color for the buttercream. Gel food colors are very concentrated and only require a small amount to be used.
Plan how you will cut the circles before cutting them to ensure you have enough space for 9 on each cake layer.
Adding the sprinkles to the bottom of the jar is optional. I did it because my jars were not flat at the bottom (they were slightly higher in the center) and the sprinkles were a nice way to fill the gap on the sides. Nutrition Calories: 1299.9kcal | Carbohydrates: 158.3g | Protein: 9.9g | Fat: 72.9g | Saturated Fat: 44.9g | Polyunsaturated Fat: 3.4g | Monounsaturated Fat: 19.1g | Trans Fat: 2.8g | Cholesterol: 292.3mg | Sodium: 793.4mg | Potassium: 173.4mg | Fiber: 2.1g | Sugar: 128g | Vitamin A: 2291.5IU | Calcium: 103.9mg | Iron: 1.5mg
Serving Ideas and Variations for Witches’ Brew Halloween Cake Jars
Witches’ brew Halloween cake jars are more than just a dessert—they’re a conversation starter. Their playful design makes them ideal for parties, especially when displayed on a Halloween-themed dessert table. Arrange them alongside pumpkins, candles, or cobweb decorations, and they’ll instantly become the centerpiece. Because they’re served in jars, they’re also practical. Guests don’t need plates or forks; just hand them a jar and a spoon, and the party continues without mess.
These jars also make great gifts. Secure a lid on top, tie with ribbon in festive colors like orange, black, or purple, and you have a homemade treat that doubles as a Halloween favor. Kids love taking them home, while adults appreciate the creativity and effort that went into such a unique dessert.
The recipe itself is easy to adapt. If you prefer a different flavor, swap the chocolate cake for vanilla or red velvet. The buttercream can also be tinted in other bold colors—think purple or neon orange—for a different take on the witchy theme. For an even spookier look, add candy eyeballs, gummy worms, or edible glitter to the layers.
You can also scale the recipe to fit the occasion. Smaller jars make perfect single bites for kids’ parties, while larger jars are ideal for adults who want a more indulgent serving. The witch legs, of course, remain the star no matter what size jar you use. They bring the whole theme together and guarantee smiles the moment they appear.
Whether you’re serving them at a Halloween bash, handing them out as favors, or enjoying them as a fun family project, witches’ brew Halloween cake jars bring both flavor and creativity to the table. They’re festive, adaptable, and memorable—a treat that truly feels like Halloween magic.
Tips, Storage, and Common Questions
Witches’ brew Halloween cake jars may look intricate, but a few simple tips make them easy to pull together. When baking the cake, make sure it cools completely before cutting out circles—warm cake can crumble and won’t hold its shape in the jars. Using a round cutter ensures neat layers, but if you don’t have one, the rim of the jar works just as well. For the buttercream, add food coloring a little at a time. Gel coloring is highly concentrated, so just a drop or two is enough to achieve that vibrant green.
When making the fondant witch legs, allow them to dry overnight before inserting them into the jars. This helps them stay firm and upright, preventing them from sagging once placed in the buttercream. If you live in a humid climate, add a bit of CMC powder to the fondant to strengthen it.
For storage, keep the jars covered and refrigerated for up to three days. The fondant decorations hold up well if they’ve been dried in advance. If making ahead for a party, you can prepare the cake and fondant legs a day early, then assemble the jars on the day of the event for the freshest taste and appearance.
Here are answers to some common questions:
Can I make witches’ brew Halloween cake jars without jars?
Yes, you can assemble them in cups or clear containers, but jars give the best layered look.
Can I skip the fondant legs?
Absolutely—the cake jars are still delicious with just the buttercream and sprinkles. The legs simply add a fun, whimsical touch.
Do these travel well?
Yes, as long as the jars are sealed. They make excellent party favors or gifts.
Witches’ brew Halloween cake jars combine creativity, fun, and rich flavor. With their playful design and decadent layers, they’re the kind of dessert that makes Halloween celebrations unforgettable.