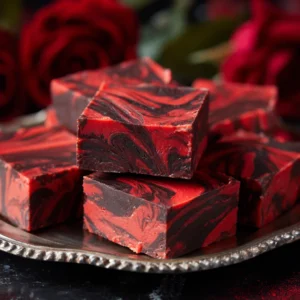
There’s something wildly fun about a dessert that looks straight out of a Halloween comic book—dark swirls, blood-red streaks, and enough sweetness to wake the dead. That’s the vibe vampire fudge brings to the table. This isn’t just any chocolatey bite; it’s dramatic, rich, and surprisingly effortless. In this post, we’ll walk through how to make vampire fudge from scratch, why it’s a showstopper at every spooky party, and how even non-bakers can pull it off without a single stovetop flame. If you’ve got a microwave and ten minutes, you’re just steps away from your own batch of vampire fudge.
My Spooky First Batch of Vampire Fudge
Halloween That Needed Saving
Two years ago, I was staring down a kitchen full of unopened candy bags, a half-finished costume, and a last-minute school reminder: “Don’t forget to bring a Halloween treat!” With barely an hour to spare, I needed something fast that didn’t scream store-bought. That’s when I remembered vampire fudge. I had candy melts, a tub of vanilla frosting, and the right colors. What came out of my microwave looked like something Dracula himself would serve—dark, crimson, dramatic, and absolutely delicious.
When I walked into the classroom with a tray of red and black swirled fudge cut into vampire fang shapes, the kids gasped. One of the teachers even asked for the recipe. No one could believe it took under 15 minutes to throw together. That was the moment I knew: this wasn’t just a dessert, it was a Halloween tradition in the making.
Why This Recipe Is So Popular
Vampire fudge isn’t just good—it’s genius. You don’t need candy thermometers or double boilers. No baking. No waiting for caramel to hit the “soft ball” stage. You melt, mix, color, and chill. It’s truly beginner-proof. And the visual? Red and black swirls that look like something out of a vampire movie.
The flavor is just as compelling as the appearance. Rich chocolate mingles with vanilla, and that soft, melt-in-your-mouth texture makes it kid-approved and adult-worthy. The beauty of vampire fudge is how easy it is to customize. Want extra red for a more “bloody” look? Go for it. Prefer more chocolate? Just tip the ratio slightly. It’s flexible, festive, and fabulously fast—everything a Halloween treat should be.
Vampire Fudge
Ingredients
- 1 ⅓ cup white candy melts
- 1 ⅓ cup dark chocolate candy melts
- 16 ounces vanilla frosting
- black oil food coloring
- red oil food coloring
Instructions
- Line a 8×8 baking dish with parchment paper or aluminum foil, extending pieces over sides for easy handling. If using foil, spray with cooking spray. Set dish aside.
- Place each color of candy melt in its own microwave-safe bowl. Microwave for 30-second intervals, stirring in between, until candy is smooth. Set bowls aside.
- 1 ⅓ cup white candy melts,1 ⅓ cup dark chocolate candy melts
- Remove lid and foil seal from vanilla frosting, then microwave on high for 35 seconds or until frosting has completely melted.
- 16 ounces vanilla frosting
- Divide and pour frosting evenly between each bowl of melted candy. Add red food coloring to white candy and black food coloring to dark chocolate, then mix well until combined. Add more food coloring as needed to achieve desired hue.
- black oil food coloring,red oil food coloring
- Alternating between two colors, pour fudge mixture into prepared baking dish. If desired, drag a toothpick or butter knife through colors once or twice to create a swirl pattern. Tap baking dish lightly on counter to level fudge mixture into an even layer.
- Cover dish with plastic wrap and chill in refrigerator for at least 1 hour or until set.
- Lift fudge out of baking dish by gripping excess paper/foil along sides, then transfer fudge to a work area. Peel back paper/foil from edges of fudge, then cut fudge into 2 inch squares or cut with festive cookie cutters.
- Serve as desired.
Notes
Room Temperature: Store fudge in a sealed container for 1–2 weeks. Keep in a cool, dark place to avoid softening. Layer parchment paper between pieces to prevent sticking.
Refrigerator: Store in the refrigerator for up to 3–4 weeks for a firmer texture. Note that refrigeration may slowly draw out moisture, resulting in a slightly crumbly texture over time.
Freezing Instructions
Freeze fudge as a whole block for best texture. Place block in an airtight container or freezer bag.
Wrap fudge (either individual pieces or the whole block) in plastic wrap or foil, then place in a freezer-safe container or bag.
Freeze for 2–3 months if stored properly.
To serve, thaw in the refrigerator overnight. Nutritional Information
Serving: 1square of fudge | Calories: 201kcal | Carbohydrates: 29g | Fat: 9g | Saturated Fat: 5g | Polyunsaturated Fat: 2g | Monounsaturated Fat: 1g | Sodium: 69mg | Potassium: 10mg | Sugar: 28g | Calcium: 1mg | Iron: 0.05mg
Ingredients & Colors That Create the Vampire Magic
What Goes Into Vampire Fudge
Vampire fudge keeps it simple with just five main ingredients, yet every one plays a vital role in the final look and flavor. It all starts with white candy melts and dark chocolate candy melts—they’re the foundation of the fudge, giving you those bold swirls and rich textures. Candy melts are better than standard chocolate for this type of recipe because they’re formulated to stay smooth and creamy, even when dyed.
Next comes vanilla frosting—the unsung hero of the recipe. It binds everything together and adds that irresistible sweetness. You’ll want to use a standard, store-bought variety (like Pillsbury or Duncan Hines) for the best results. Homemade frosting, though tasty, often lacks the structure needed to help the fudge set properly.
The visual drama of vampire fudge lies in its color. That’s where oil-based red and black food colorings come in. They’re designed to mix with fats (like those found in candy melts), allowing vibrant hues without ruining the texture. Using the wrong type—such as gel or water-based colorings—can cause your chocolate to seize, resulting in a grainy, clumpy mess. Stick to oil-based color for smooth, deep shades of crimson and obsidian.
Best Tools and Tips for Success
This recipe is easy, but using the right tools makes a difference. Start with an 8×8-inch square baking dish, lined with parchment or foil. Be sure to leave overhang on the sides so you can lift the fudge out cleanly later. If you’re using foil, don’t forget a light spray of cooking oil to prevent sticking.
Use two microwave-safe bowls for melting your candy—preferably glass or sturdy plastic—and stir with a silicone spatula for smooth, even blending. When mixing in the food coloring, add it a little at a time to control intensity. For swirls, a toothpick or butter knife works beautifully—just don’t overdo it or the colors will muddy.
When it’s time to slice, grab a sharp kitchen knife and dip it in hot water between cuts. This simple trick creates clean edges without pulling the soft fudge apart. And if you’re planning themed shapes, metal cookie cutters work best—press firmly while the fudge is cold and firm for the cleanest impressions.
With the right ingredients and a few handy tools, you’ll have rich, beautiful vampire fudge that looks like it took hours—but really came together in minutes.
Step-by-Step Guide to Perfect Vampire Fudge
From Melt to Swirl: Making the Base
This is where the real fun starts. The process of making vampire fudge is all about speed and simplicity—with just a microwave and a few bowls, you’re minutes away from a hauntingly good treat.
Start by lining your 8×8 baking dish with parchment paper or aluminum foil. Let the edges hang over the sides for easy lifting once your fudge sets. If you’re using foil, give it a quick spray with cooking spray to keep things non-stick.
Next, divide your white candy melts and dark chocolate candy melts into two microwave-safe bowls. Microwave each one in 30-second bursts, stirring in between, until they’re fully melted and silky smooth. Set them aside while you work on the frosting.
Take your vanilla frosting, remove the lid and foil seal, and microwave it for about 35 seconds—just until it’s pourable. Now divide that frosting evenly between your two bowls of melted candy. You’re halfway there.
Now comes the color. Add red oil-based food coloring to the white candy melt mixture, and black oil-based food coloring to the dark chocolate melt. Stir each bowl thoroughly to distribute the color. Keep adding a few drops at a time until you hit the perfect blood-red and pitch-black shades. Don’t rush—this step sets the entire look of your vampire fudge.
Chill, Slice, and Serve with Style
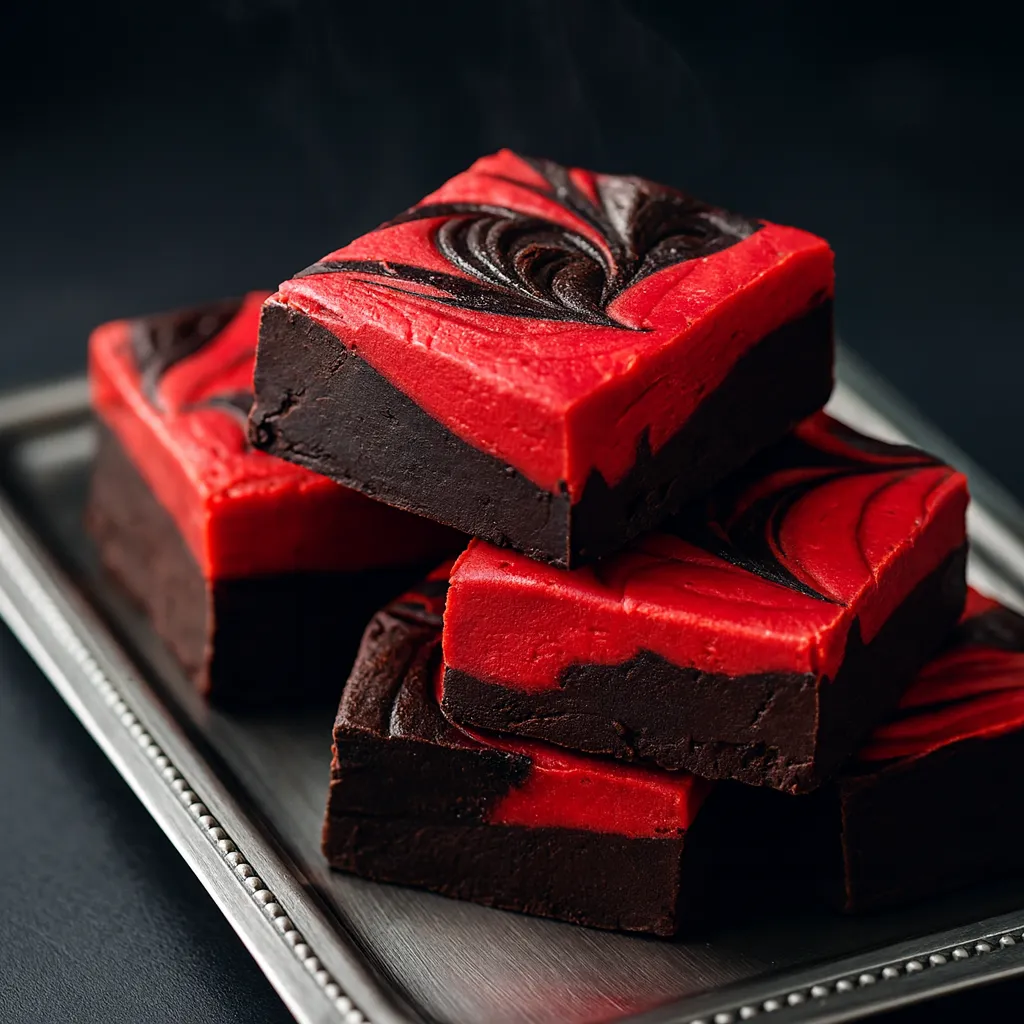
Once both mixtures are colored and smooth, it’s time to create your fudge masterpiece. Using a spoon, alternate pouring spoonfuls of each color into your prepared baking dish. This creates the signature swirled effect. Once all the mixture is in the pan, take a toothpick or butter knife and gently swirl through the surface to blend the colors—just once or twice is enough. Over-mixing will muddy the pattern.
Give the pan a few light taps on the counter to level everything out, then cover with plastic wrap and place it in the fridge. Let it chill for at least 1 hour, or until fully set.
When you’re ready to serve, lift the fudge out of the pan using the parchment or foil overhang. Place it on a cutting board and peel away the lining. For clean, sharp slices, dip your knife in hot water and wipe between each cut. You can cut it into traditional 2-inch squares—or take it up a notch by using spooky cookie cutters: bats, fangs, coffins—whatever screams Halloween.
Whether you’re serving this at a party or packaging it for gifts, the result is striking. Vampire fudge slices look like edible artwork—moody, mysterious, and just a little wicked.
Storage, Gifting, and Halloween Ideas
How to Store Vampire Fudge Properly
Once your vampire fudge is cut and ready, storage is key to keeping it fresh, soft, and striking. The good news? It keeps well, whether you’re making it ahead of a party or saving leftovers for a late-night bite.
Room temperature is perfect if you plan to enjoy it within a week or two. Just place the fudge in an airtight container, separating layers with parchment paper to prevent sticking. Keep it in a cool, dark spot—heat and light can cause it to soften or fade.
If you want a firmer texture, stash the container in the refrigerator. It’ll last up to three to four weeks, but note that fridge air can slowly pull out moisture. This might leave your fudge slightly crumbly over time, so always seal it tightly.
Want to plan even further ahead? Freezing works beautifully. Wrap the fudge tightly—either whole or in individual pieces—in plastic wrap, then place it in a freezer-safe container or bag. Stored this way, it’ll keep its shape and flavor for two to three months. When you’re ready to serve, transfer it to the fridge overnight to thaw gently without condensation ruining the surface.
No matter the method, avoid exposure to air and moisture, and your vampire fudge will stay as delicious as the day you made it.
Fun Ways to Serve or Gift
Vampire fudge doesn’t just taste great—it’s also fun to package and give. With its black and red swirls, it looks like something from a spooky storybook, making it the perfect edible gift for Halloween events, class parties, or October birthdays.
If you’re gifting, place individual squares in parchment wrappers or slide them into clear Halloween-themed treat bags. Tie them off with black and red ribbon, and you’ve got a simple but impressive favor. You can also arrange them in a decorative tin lined with tissue paper for a more polished gift box. Add a little tag that says “Bite me”—because, why not?
Planning a Halloween buffet? Arrange your fudge on a dark platter surrounded by plastic spiders, mini pumpkins, or dry ice fog for that extra creepy effect. You can also use vampire-themed cupcake toppers to dress up each piece.
And for those planning ahead, vampire fudge is ideal for make-ahead party trays. Prep it days in advance, refrigerate, then bring it out just before guests arrive. It travels well, holds its shape, and doesn’t melt at room temp—making it perfect for parties, potlucks, or trick-or-treat night.
FAQ: Vampire Fudge – Your Questions Answered
What is vampire fudge made of?
Vampire fudge is made with white and dark chocolate candy melts, vanilla frosting, and oil-based red and black food colorings. These ingredients are melted, dyed, swirled, and chilled to create a rich, spooky treat perfect for Halloween.
Can I make vampire fudge ahead of time?
Absolutely. This recipe is ideal for prepping in advance. You can make vampire fudge up to a week early and store it at room temperature, or refrigerate it for up to 3–4 weeks. If frozen properly, it will keep for up to 3 months.
Does vampire fudge need to be refrigerated?
Not necessarily. Vampire fudge can sit at room temperature in a sealed container for 1–2 weeks without issue. Refrigerating it will give it a firmer bite and extend its shelf life, but it’s not required unless your kitchen runs warm.
Can I use regular chocolate instead of candy melts?
It’s possible, but not recommended. Candy melts are specifically designed to work smoothly with frosting, while regular chocolate—especially chocolate chips—can seize when mixed with the high sugar and water content in frosting. For best texture and color control, stick with candy melts.
Conclusion
Vampire fudge isn’t just a treat—it’s an experience. It delivers rich flavor, bold visuals, and all the spooky charm a Halloween dessert deserves. Whether you’re whipping up a last-minute batch or planning out your party table with themed snacks, this recipe offers simplicity without sacrificing the wow factor. No stove, no stress—just melt, mix, swirl, and chill.
If you’ve got a microwave and a love for all things eerie and sweet, vampire fudge is your new October go-to. Try it once, and you’ll be making it every fall.