Brief Introduction
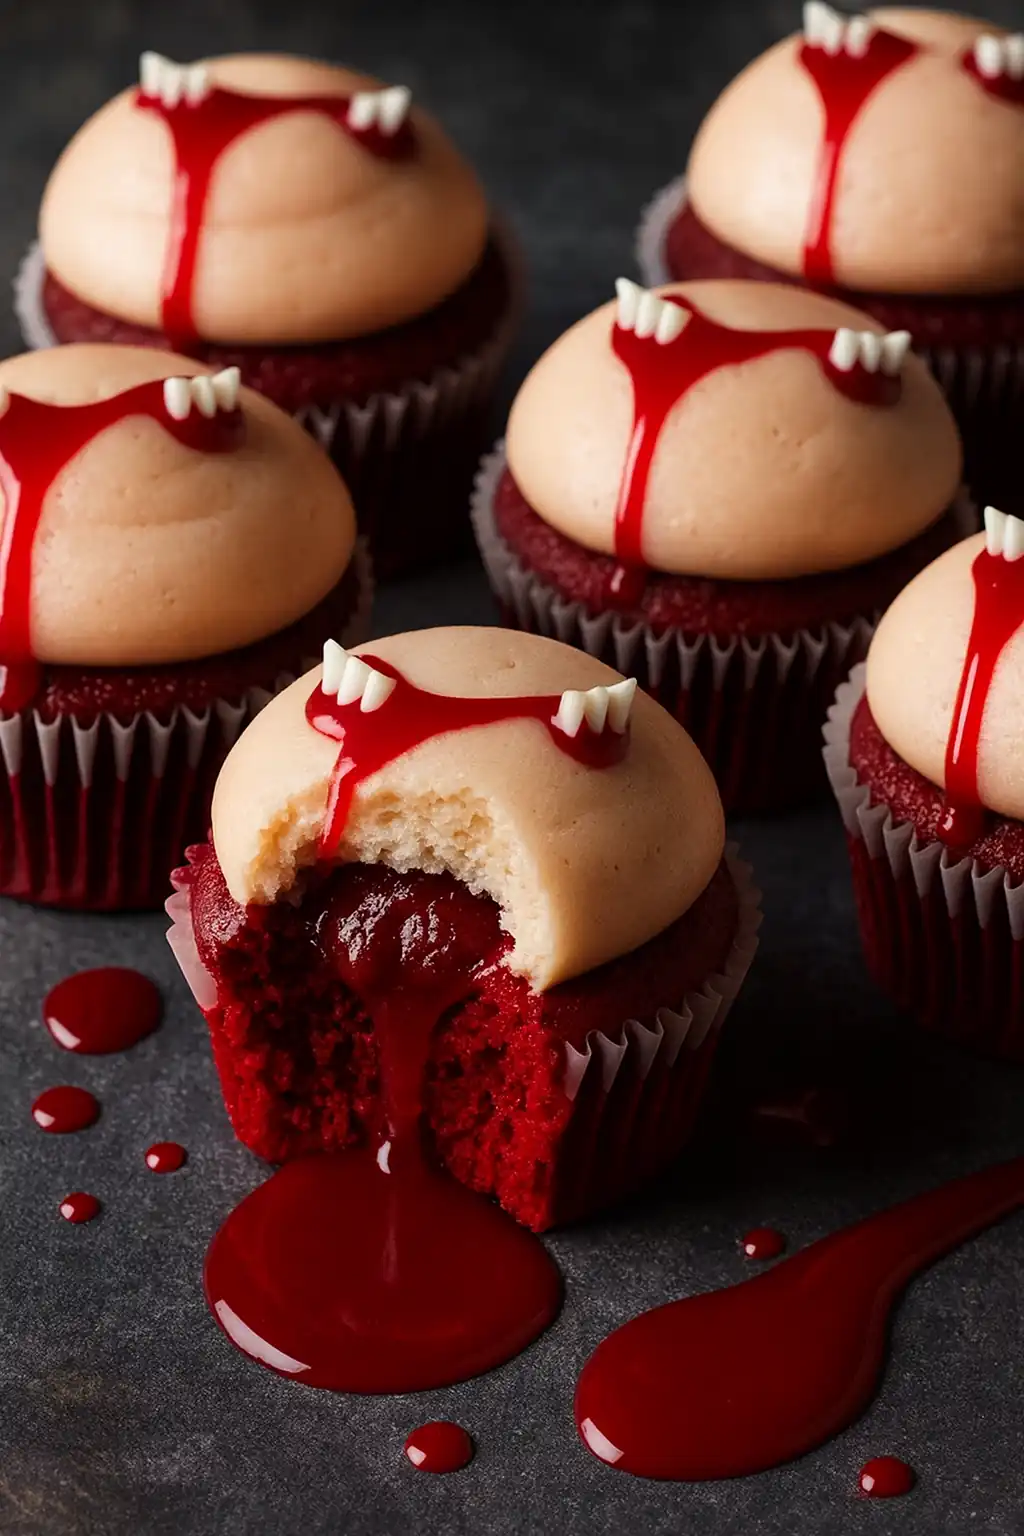
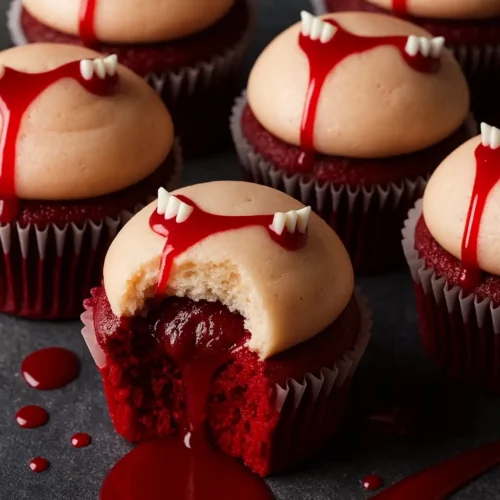
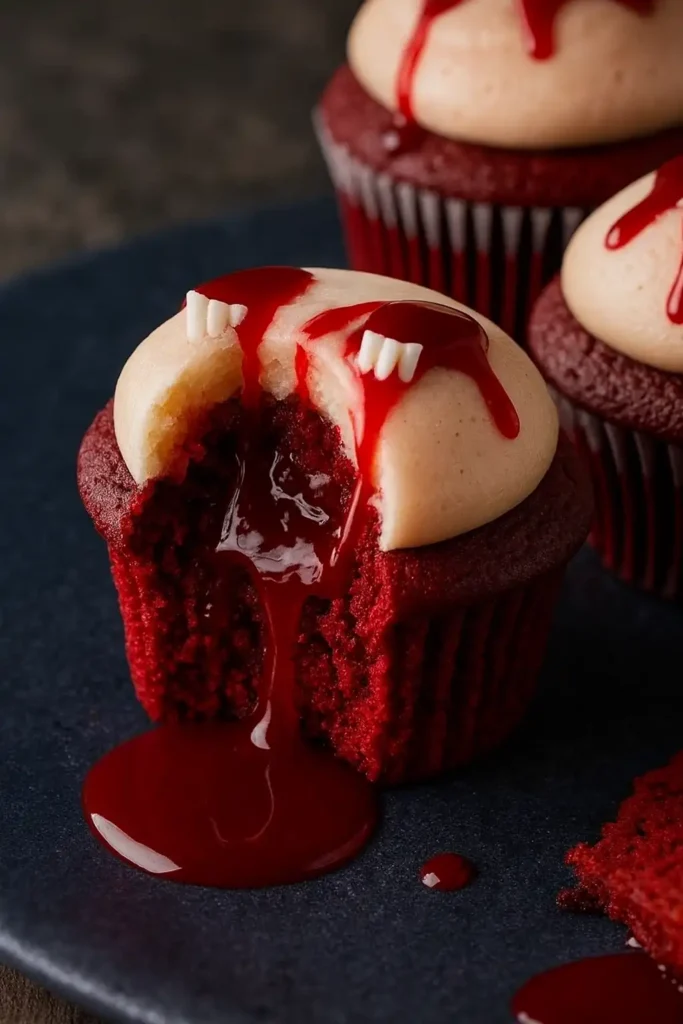
Ready to serve something spine-chilling this Halloween? These Vampire Bite Halloween Cupcakes are not just eye-catching—they’re horrifyingly good. With soft red velvet cake, creamy “blood” filling, and pale skin-tone frosting marked by eerie fang punctures, they deliver spooky elegance in every bite. Whether you’re hosting a monster mash or packing treats for a haunted school party, these cupcakes look like they’re fresh from Dracula’s kitchen. In this guide, I’ll show you how to create this festive dessert from scratch with pantry-friendly ingredients. Expect vivid colors, haunting details, and just the right amount of sweet-meets-scary drama.
From Kitchen to Crypt – The Inspiration Behind Vampire Bite Cupcakes
A Halloween Tradition, With a Bite
The idea for these Vampire Bite Halloween Cupcakes came to me during a rainy October night. My twins had just discovered a love for all things spooky—vampires, ghosts, and anything that glows in the dark. That year, instead of store-bought candy, I wanted to create a dessert that would thrill them as much as it would spook them. Something dramatic. Something bloody. Enter these terrifyingly fun red velvet cupcakes with a hidden surprise inside.
There’s something deeply satisfying about biting into what looks like pale skin, only to find it oozing with deep red “blood.” It’s theatrical, but also so easy to make with simple ingredients. Whether you’re prepping for a Halloween party, a school event, or just a cozy night of themed baking, these Vampire Bite Halloween Cupcakes add a cinematic element to your dessert table.
These aren’t your average Halloween cupcakes. They’re inspired by the thrill of horror movies, the elegance of red velvet, and the shock factor of edible blood. They look dramatic but are made using everyday tools: a muffin tin, a spoon, a piping bag (or even a plastic sandwich bag with the corner snipped off). And that’s part of their charm—you don’t need a fancy setup to create bakery-style Halloween treats at home.
Why Red Velvet and Buttercream Are the Perfect Pair
There’s a reason red velvet is the star here. It has just enough cocoa to feel rich, and the red color is ideal for mimicking blood. Plus, when combined with creamy, skin-toned buttercream, the contrast is instantly eerie—just what you want in a Vampire Bite Halloween Cupcake.
The buttercream isn’t just decoration—it’s texture, flavor, and visual drama rolled into one. When you top each cupcake with pale, flawless frosting and then pierce it with fang marks, the “skin” begins to bleed. The look is theatrical, the taste is classic.
Creating these Vampire Bite Halloween Cupcakes feels like telling a short horror story through dessert. They’re spooky, fun, and unforgettable.
Vampire Bite Halloween Cupcakes
Ingredients
- For the Red Velvet Cupcakes:
- 1 1/2 cups all-purpose flour
- 1 cup granulated sugar
- 1/2 cup unsalted butter softened
- 2 large eggs
- 1/2 cup buttermilk
- 2 tbsp cocoa powder
- 1 tbsp red food coloring gel-based for vibrant color
- 1 tsp vanilla extract
- 1/2 tsp baking soda
- 1 tsp white vinegar
- 1/4 tsp salt
- For the Creamy Spilling Red Velvet Filling:
- 1/2 cup red velvet cake crumbs from the cupcake centers
- 1/3 cup sweetened condensed milk
- 1 tbsp unsalted butter melted
- 1-2 tbsp red food coloring for a vibrant, glossy red hue
- For the Pale Skin-Tone Buttercream Frosting:
- 1 cup unsalted butter softened
- 3-4 cups powdered sugar sifted
- 2-3 tbsp milk or heavy creamA few drops of ivory or peach food coloring adjust for a pale, skin-tone effect
- 1 tsp vanilla extract
- A few drops of ivory or peach food coloring adjust for a pale, skin-tone effect
- For the Vampire Bite Decoration:
- Candy fangs or small dots of red gelatin for puncture marks
- Red syrup or edible red gel for “blood” drips
- Straws watch out – they are not eatable
Instructions
- Step 1: Preheat and Prepare
- Preheat your oven to 350°F (175°C) and line a 12-cup muffin tin with paper liners. This will be the canvas for your spooky creations.
- In a large mixing bowl, cream together the softened butter and sugar until light and fluffy, about 2-3 minutes. Add the eggs one at a time, beating well after each addition. Mix in the vanilla extract and red food coloring to achieve a deep, vibrant red hue.
- Tip: To ensure even color, mix the food coloring into the butter and sugar before adding the dry ingredients.
- Step 2: Mix and Bake 3. In a separate bowl, whisk together the flour, cocoa powder, and salt. Gradually add the dry ingredients to the wet mixture, alternating with the buttermilk, until just combined. Stir in the baking soda and vinegar mixture, which will help the cupcakes rise beautifully. 4. Spoon the batter into the prepared muffin tin, filling each cup about 2/3 full. Bake for 18-20 minutes, or until a toothpick inserted into the center comes out clean. Let the cupcakes cool in the pan for 5 minutes before transferring them to a wire rack to cool completely. Once cooled, carefully remove the paper liners to expose the deep red sides of the cupcakes.
- Tip: Allowing the cupcakes to cool completely before decorating ensures a smooth frosting application.
- Step 3: Prepare the Creamy Spilling Red Velvet Filling 5. In a small bowl, combine the red velvet cake crumbs with the sweetened condensed milk and melted butter. Stir until the mixture is smooth and slightly glossy. Add red food coloring to achieve an intense, vibrant red. The filling should be creamy but slightly runny, with a glossy finish that will spill out when the cupcake is cut or bitten into.
- Tip: Adjust the consistency of the filling by adding more sweetened condensed milk if it’s too thick.
- Step 4: Hollow Out the Cupcakes 6. Once the cupcakes are completely cool, use a small knife or cupcake corer to remove a small section from the center of each cupcake. Fill each hole with the creamy red velvet filling, ensuring it reaches the top of the cavity.
- Tip: Be gentle when removing the centers to avoid cracking the cupcakes.
- Step 5: Make the Skin-Tone Buttercream Frosting 7. In a large bowl, beat the softened butter until creamy. Gradually add the powdered sugar, one cup at a time, mixing well after each addition. Add the vanilla extract and 2 tablespoons of milk or cream. Beat until the frosting is smooth and fluffy. Add a few drops of ivory or peach food coloring to achieve a pale, skin-tone color. The frosting should be smooth and even, like flawless skin.
- Tip: If the frosting is too stiff, add more milk or cream until it reaches a spreadable consistency.
- Step 6: Frost the Cupcakes 8. Using an offset spatula or a piping bag, frost each cupcake with the pale buttercream. The surface should be smooth and even, resembling delicate skin.
- Tip: For an ultra-smooth finish, chill the frosted cupcakes for a few minutes before adding the vampire bite details.
- Step 7: Create the Vampire Bite Decoration 9. Use candy fangs or small drops of red gelatin to create two close-set puncture marks on the surface of each cupcake. Drizzle red syrup or edible gel from the puncture marks, allowing it to drip down the sides of the cupcakes. Use red straws if you want. Add a few extra drips of red gel around the base of the cupcakes on the serving platter to enhance the vampire theme.
- Tip: Experiment with the placement of the “blood” drips for a more realistic effect.
- Step 8: Final Touches 10. Arrange the decorated cupcakes on a dark serving platter, surrounded by additional red syrup drips for an extra spooky effect. The combination of the pale frosting, deep red velvet filling, and blood-like drips creates an irresistible and terrifyingly delicious treat.
- Tip: For added drama, serve the cupcakes on a black or red platter with spooky decorations like plastic bats or candles.
Building the Base – Crafting the Perfect Red Velvet Cupcake
Mixing Bold Color and Flavor
The foundation of any Vampire Bite Halloween Cupcake starts with the cake itself—and red velvet is the perfect choice. It’s rich, fluffy, and deeply tinted with just the right blend of cocoa and food coloring to create that deep, blood-red hue. But it’s not just about color; red velvet has a subtle chocolatey flavor with a tang from buttermilk and vinegar that balances the sweetness beautifully.
To get that vivid red color to pop, I use a gel-based food coloring. It’s more concentrated than liquid and doesn’t water down the batter. Mix it directly into the butter and sugar early in the process. This trick ensures even color distribution before the dry ingredients enter the mix. It’s a small step, but one that truly defines the bold look of your Vampire Bite Halloween Cupcakes.
You’ll want to cream the butter and sugar until fluffy—this introduces air for that soft, light crumb. Add eggs one at a time, blending thoroughly. Then, alternate your flour and buttermilk to prevent overmixing. Finally, stir in the baking soda and vinegar mixture for lift and structure.
Getting That Soft, Spongy Texture Right
The goal here is balance—your cupcakes should be moist enough to hold a filling, but strong enough to support the decorations. The key is not to overbake. Eighteen to twenty minutes at 350°F usually does the trick. A toothpick inserted should come out with just a few moist crumbs, not dry.
Let your cupcakes cool completely before hollowing them out. You want the centers soft but not sticky. This step is crucial because the red velvet filling will need a clean space to settle—and if the cakes are too warm, it’ll melt and pool instead of holding its shape.
When done right, your Vampire Bite Halloween Cupcakes are hauntingly beautiful even before the “blood” is added. They offer a classic cupcake flavor with a little extra drama just beneath the surface.
The Bite Effect – Filling, Frosting, and Fangs
Creamy “Blood” Filling That Spills Perfectly
Now for the spooky centerpiece of these Vampire Bite Halloween Cupcakes: the blood-like filling. It’s a simple but powerful surprise that transforms these treats from fun to fantastically gory. By mixing red velvet cake crumbs with sweetened condensed milk and a touch of melted butter, you get a thick, creamy mixture that mimics oozing blood with just enough structure to stay in place until bitten or cut.
Color matters here. A vibrant gel-based red food coloring gives the filling a glossy, realistic look. Start with a drop or two and build it up until the mixture looks intensely red, almost shiny. The consistency should be spreadable—not runny, but not stiff either.
Hollow out the center of each fully cooled cupcake using a knife or cupcake corer, and gently spoon in the filling until it reaches the top of the cavity. It’s okay if it slightly spills out—that adds to the drama. Just be sure to press it in without cracking the outer shell of your cupcake. This step gives your Vampire Bite Halloween Cupcakes their thrilling center.
Creating Skin-Tone Frosting and Realistic Vampire Bites
Buttercream is your frosting of choice, and to mimic pale vampire-bitten skin, you’ll need to tint it carefully. Start with softened butter, powdered sugar, and vanilla. Add just a few drops of ivory or peach food coloring until the color resembles fair skin. You can test it on parchment paper before frosting to see how it appears in natural light.
Once your frosting is smooth, fluffy, and tinted just right, apply a layer over the cupcakes using a spatula or piping bag. Smooth the surface to resemble untouched skin.
Then comes the fun. Using candy fangs or the tip of a straw, poke two puncture marks into each cupcake. Drip edible red gel or syrup from the marks, allowing it to slide down the sides. This small detail turns your simple red velvet cupcakes into striking Vampire Bite Halloween Cupcakes. The contrast of pale frosting and bright red “blood” is chilling—and delicious.
Serving Up Scares – Decorating and Displaying Like a Pro
How to Plate Your Cupcakes for Maximum Drama
Once your Vampire Bite Halloween Cupcakes are filled, frosted, and bitten, it’s time to set the scene. Presentation adds that final eerie flourish, and the right setup can elevate your cupcakes from festive to unforgettable. Use a dark slate or black serving tray to enhance the pale frosting and red drips. For extra gore, drizzle some of the red edible gel directly onto the tray to mimic pooled blood—it’s messy in the best way.
A few well-placed Halloween props—plastic bats, fake cobwebs, or small flickering candles—create atmosphere without distracting from the star of the show. Try adding red-tinted cupcake wrappers or toppers shaped like fangs for extra flair. If you’re serving at night or in dim lighting, consider a soft spotlight on your dessert table to make the “blood” shine.
Guests won’t just see cupcakes—they’ll feel like they’ve walked into a haunted bakery. The contrast between elegant design and gory details is what makes these Vampire Bite Halloween Cupcakes so captivating.
Tips for Party Prep, Storage, and Customization
These cupcakes are party-ready, but timing is everything. You can bake the cupcakes and prepare the filling a day ahead. Store the cakes (unfilled and unfrosted) in an airtight container at room temperature. The buttercream can be made in advance too—just re-whip it before frosting for that fluffy finish.
If you’re hosting a large crowd, consider offering mini versions. Use a mini muffin tin and reduce the baking time slightly. They’re just as dramatic in bite-size form and make for easier cleanup.
Customize the look by changing the “skin” tone of the frosting—add more ivory for warmer tones or a tiny dot of green for a ghostly pale finish. You can also mix in a bit of cocoa for a tanned undead vibe. Want more drama? Add shimmer powder to the frosting for a “vampire glam” touch.
Once served, these Vampire Bite Halloween Cupcakes become more than dessert—they’re a conversation starter, centerpiece, and crowd-pleaser all in one.
FAQ
What makes Vampire Bite Halloween Cupcakes unique?
Vampire Bite Halloween Cupcakes aren’t just cute—they’re creepy in the best way. What sets them apart is their theatrical presentation: pale buttercream frosting mimicking skin, vivid red velvet filling that oozes like blood, and fang-like puncture marks made with candy or tools. Unlike standard Halloween cupcakes, these tell a visual story. They shock and delight in the same bite, making them perfect for Halloween parties, haunted house events, or even horror movie marathons. If you want a dessert that screams Halloween without needing advanced baking skills, these cupcakes are your go-to.
How do I make edible fake blood for cupcakes?
For a realistic yet safe edible “blood,” the Vampire Bite Halloween Cupcakes use a creamy red velvet filling. It’s made from leftover cupcake crumbs, sweetened condensed milk, and a touch of melted butter. The secret lies in the food coloring—gel-based red dye delivers a bold, glossy color without thinning the mixture. Alternatively, you can mix corn syrup with red food coloring and a hint of cocoa powder for a more translucent blood effect. Either way, the goal is a thick consistency that drips slowly for a dramatic, freshly-bitten look.
Can I make these cupcakes ahead of time for a party?
Yes! Vampire Bite Halloween Cupcakes are great for make-ahead prep. Bake the cupcakes a day in advance and store them unfrosted in an airtight container at room temperature. You can prepare the blood filling and frosting the night before and refrigerate both—just let the frosting sit at room temperature and re-whip it before use. For best visual effect, do the decorating (frosting, bite marks, and drips) the morning of the event. That way, the frosting stays fresh, and the blood drips remain glossy.
What frosting color looks most like skin?
To achieve a convincing skin-like tone for your Vampire Bite Halloween Cupcakes, start with ivory or peach food coloring added to classic buttercream. You’re aiming for a smooth, pale hue that resembles human skin. Too much color, and it veers into orange or beige—go slowly and test often. Want to customize? Add a speck of cocoa powder for warmth or a tiny drop of green for a cool, undead effect. This small detail is what makes the “bite” look real and unsettling—in the best Halloween way.
Conclusion
These Vampire Bite Halloween Cupcakes are more than just dessert—they’re a spooky experience in every bite. From the rich red velvet base to the creamy blood-red center and eerie, skin-toned frosting, every detail has been crafted to thrill. Whether you’re baking for a party, making treats for the kids, or just satisfying your inner vampire, these cupcakes deliver big on flavor and Halloween flair. So go ahead—grab your spoon, your food coloring, and your imagination. Halloween has never tasted so wickedly sweet.