Before the pumpkins were carved and the costumes zipped up, our kitchen was already buzzing with anticipation. It started a few years ago when my twins were just old enough to start demanding spooky snacks with all the drama of a Halloween musical. But after too many sugar crashes and candy-fueled meltdowns, I knew we needed a better option—something fun but functional, festive but fuel-filled. That’s when spooky baked Halloween chips entered the scene.
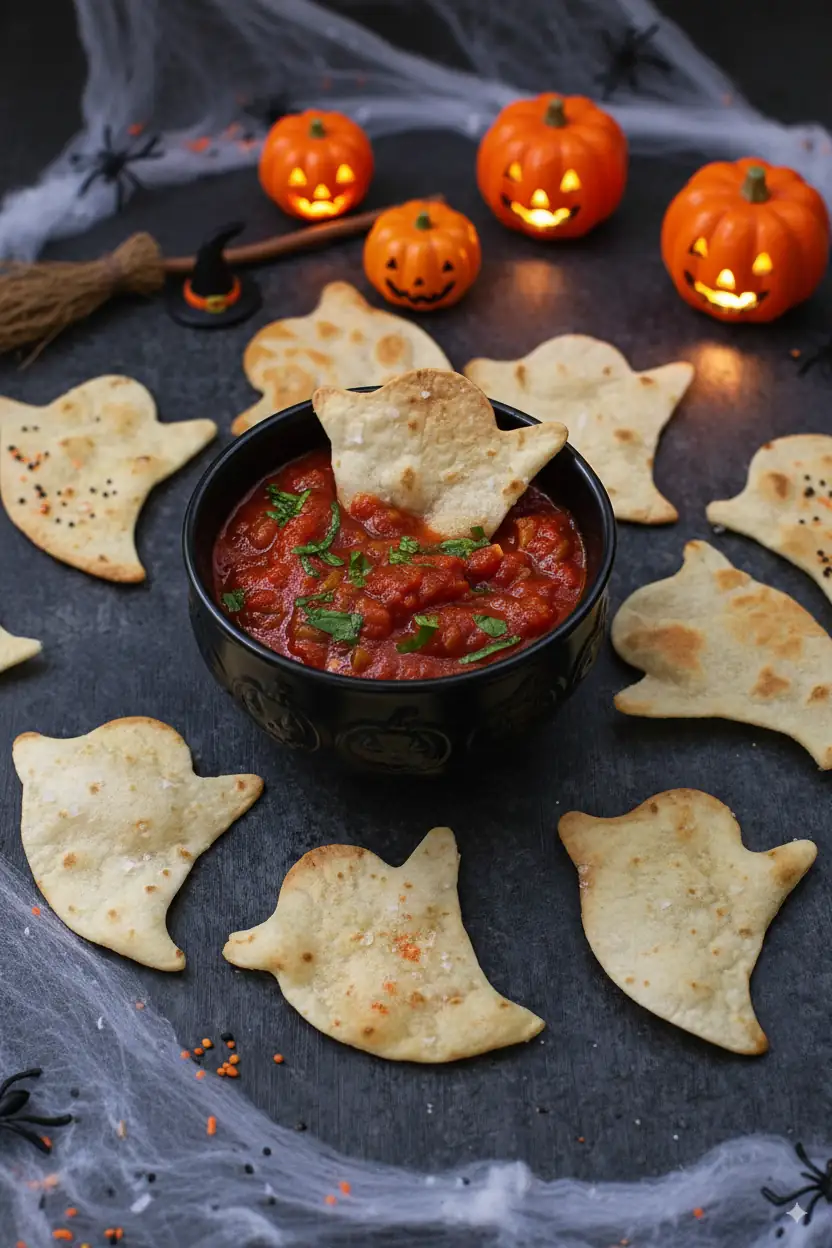
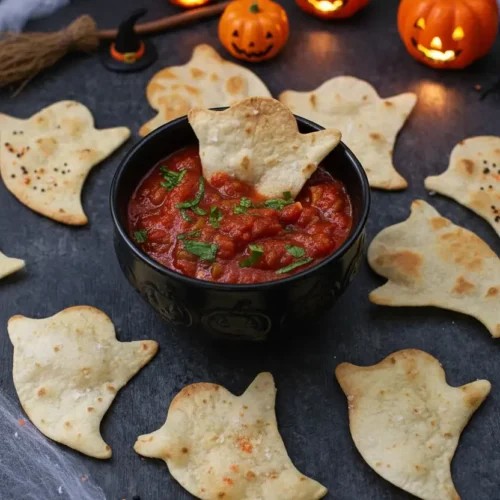
What began as a simple, shaped tortilla chip turned into a tradition we look forward to each October. The kids love cutting out little ghosts, and I love that they’re made from pantry staples I always have on hand. They come together in minutes, and unlike packaged treats, I know exactly what’s in them. Whether we serve them with a bubbling cauldron of pumpkin taco soup or a quick guacamole, they always disappear—faster than candy on Halloween night.
These chips aren’t just cute. They’re quick, easy, and a great way to get kids in the kitchen. Plus, they’re adaptable: gluten-free, grain-free, or classic flour tortillas all work. Whether you’re planning a spooky party, packing festive lunchbox surprises, or just craving a salty snack with seasonal charm, these spooky baked Halloween chips check every box. And don’t worry—there’s no deep frying or complicated prep. Just four ingredients, a cookie cutter, and an oven. Let’s make some memories (and chips).
The Halloween Snack That Saved My Sanity
October can be chaos. Between last-minute costume sewing, school parties, and trying to keep the dog from eating plastic spiders, my brain’s usually fried by week two. I needed a win—something festive that wouldn’t add to the to-do list. These spooky baked Halloween chips were it.
They’re just spooky enough to feel special but simple enough for a weeknight. My twins took one look at the ghost-shaped chips and squealed like they’d seen a real one. Win.
I’ll be honest: I didn’t invent this idea. I adapted it after seeing ghost-cut sandwiches and thought, “Why not chips?” That first batch was crunchy, salty, and instantly devoured. And now? We make them every year, often several times before Halloween actually arrives.
Why These Chips Work for Everyone
Spooky baked Halloween chips work for just about every dietary need. You can make them with gluten-free tortillas, grain-free options, or classic flour ones. No weird ingredients. No allergens (unless your tortillas include them). And because they’re baked, not fried, they feel a little lighter—though no less satisfying.
They’re also an incredible project for kids. It’s creative but not messy. It involves real kitchen tools (cookie cutters = major fun). And when they get to eat their creations right after? Total joy.
Whether you’re looking to impress at the classroom Halloween party or just want something seasonal to dip in salsa during a scary movie marathon, these chips do the trick (and treat).
Spooky Baked Halloween Chips
Ingredients
- 4 flour tortillas gluten-free or grain-free, as needed
- Spray avocado or olive oil*
- Salt
- Halloween cookie cutter
Instructions
- Preheat oven to 375 degrees F. Lightly grease a cookie sheet.
- Working one tortilla at a time, use a cookie cutter to cut out ghost shaped chips from your tortillas. I’m usually able to get 5-6 ghosts per tortilla. (Try to place your cuts as close together as possible to avoid waste.)
- Transfer cutouts to your prepared baking sheet. Lightly mist the chips with a little olive oil spray or avocado oil spray + sprinkle with salt.
- Bake at 375 degrees for 5-7 minutes, and serve with salsa, guacamole, or my favorite Pumpkin Taco Soup!
Notes
Simple, Spooky, and Totally Snackable
Choosing the Right Tortillas
Let’s talk tortillas—the true backbone of spooky baked Halloween chips. While the shapes and salt make them festive, it’s the tortilla that determines their crunch factor, flavor, and flexibility.
I’ve tested a variety over the years, and here’s the deal: flour tortillas work beautifully. They bake evenly and crisp up quickly without burning. If you’re gluten-free, gluten-free tortillas perform almost identically, especially the ones made with a blend of rice flour and tapioca starch. They hold their shape well during cutting and baking.
For those who need grain-free options, like almond flour or cassava-based tortillas, you’ll need to experiment a little. Some are more delicate and can tear easily with cookie cutters, while others bake softer than you’d expect. The trick? Use them fresh out of the package (not dried out), and cut slowly with firm pressure.
One tip I swear by: room temperature tortillas are easier to cut and less likely to crack. If yours are cold from the fridge, microwave them for 10 seconds under a damp paper towel to soften them before cutting.
Cutting the Perfect Creepy Shapes
Here comes the fun part—making them spooky. You don’t need fancy baking skills, just a set of Halloween-themed cookie cutters. Ghosts, bats, pumpkins, and even tiny skulls all work well. Aim for medium-sized cutters, about 2–3 inches wide. Smaller shapes tend to over-crisp or burn in the oven, while larger ones are harder to portion onto your baking sheet.
I usually get five to six cutouts per tortilla, but with careful placement and a little jigsaw patience, you can squeeze out more. Stack a few scraps together and re-cut if needed—no tortilla goes to waste in this house.
Once they’re all cut, line them up on a lightly greased or parchment-lined baking sheet. Make sure they’re not overlapping—these little guys need space to crisp. This part is perfect for little helpers. My kids love placing the “ghosts” in tidy graveyard rows before they hit the oven.
Up next, we’ll bake them to golden, spooky perfection—without a drop of deep fryer oil.
Crisping It Up the Healthy Way
The Magic of Spray Oils
When it comes to making spooky baked Halloween chips, oil is less about flavor and more about texture. The right spray ensures even crisping without weighing the chips down. I reach for avocado oil spray or 100% olive oil spray every time. Both coat the tortillas lightly and bake into a golden crunch that rivals fried chips.
Here’s the trick: don’t drown them. A light mist is all you need—just enough to give each shape a glossy sheen. Too much spray and they’ll turn soggy; too little and you’ll end up with dry, uneven chips. If you can’t find spray oil, a pastry brush dipped in plain olive or avocado oil works beautifully. Simply brush a thin layer across each cutout.
This tiny step makes a huge difference. It helps the salt stick, ensures that spooky golden glow, and prevents the chips from curling or cracking in odd spots while baking.
Baking Tips for the Best Texture
Temperature and timing are everything here. 375°F is the sweet spot. It’s hot enough to create that signature crunch without scorching the edges. Preheat your oven fully before sliding in the tray—don’t skip this step.
Arrange your chips in a single layer with just a little breathing room between each one. Bake for 5–7 minutes, keeping a close eye at the 5-minute mark. Ghost-shaped chips with thinner “arms” tend to brown faster than rounder pumpkin cutouts. If you’re baking a mix of shapes, you might want to pull some off early.
You’ll know they’re done when the edges just begin to turn golden and the surface feels firm to the touch. Remember, they’ll crisp up even more as they cool on the baking sheet. Pull them out too late, and you’ll end up with brittle, overdone chips that break apart in dips.
For the ultimate snap, let them cool for 2–3 minutes before transferring to a serving plate. It’s tough to wait, but totally worth it.
Serving & Storing Spooky Chips
Dips That Pair Like a Costume and Mask
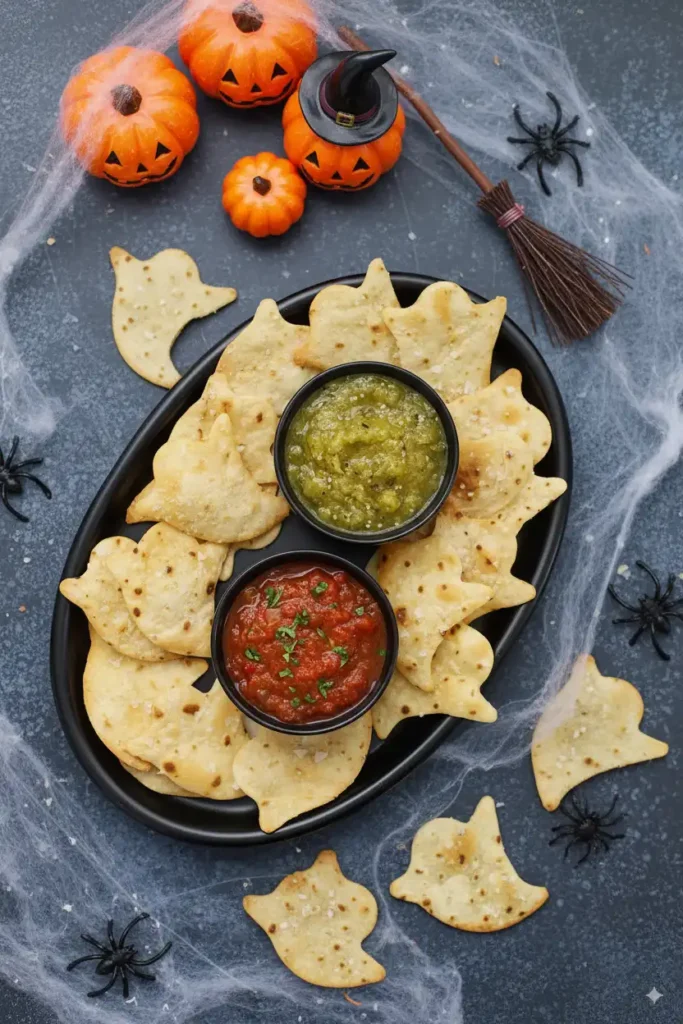
A tray of spooky baked Halloween chips is fun on its own, but the magic really happens when you add dips. The salty crunch pairs perfectly with bold, seasonal flavors. My family’s top pick is a warm bowl of pumpkin taco soup—a dip-meets-meal situation that makes the chips vanish in minutes. If you’re looking for lighter accompaniments, classic salsa and fresh guacamole are always safe bets. Their bright colors also pop beautifully against the pale golden chips, making your Halloween snack spread instantly festive.
For parties, I like to go big with a dip trio. Think smoky black bean dip, roasted red pepper hummus, and a spooky green guac made extra vibrant with lime and cilantro. Kids love the rainbow effect, and adults appreciate the variety. You can even set up a “haunted snack station” where everyone builds their own chip-and-dip combo.
How to Store Without Losing Crunch
The beauty of these chips is their simplicity, but storage can make or break the batch. The key rule? Cool completely before sealing. If you pack them up while still warm, steam gets trapped and softens the crispiness. Spread them out on a wire rack or baking sheet and let them rest until room temperature.
Once cooled, transfer the chips to an airtight container or a resealable bag. They’ll stay crunchy for up to 3 days at room temperature. If you want to prep ahead for a party, bake them the night before, cool, and seal them tight. Skip the fridge—humidity will make them chewy. For longer storage, you can re-crisp them in a 350°F oven for 3 minutes just before serving.
Serve them in a shallow bowl lined with parchment or a festive napkin, and watch as your spooky creations disappear faster than trick-or-treat candy.
FAQs About Spooky Baked Halloween Chips
What are spooky baked Halloween chips made of?
These festive chips are made with just a few basics: tortillas, a light mist of avocado or olive oil spray, a sprinkle of salt, and fun Halloween cookie cutters for shaping. The result is a crunchy, salty snack with all the festive spirit of October.
Can I make Halloween chips without a cookie cutter?
Yes! If you don’t have cutters, simply slice tortillas into triangles, strips, or squares. While they won’t be ghost- or bat-shaped, you’ll still get crispy, golden chips perfect for dipping.
How do I store baked tortilla chips for later?
Cool them completely after baking, then store in an airtight container at room temperature. They’ll stay crunchy for up to three days. If they soften, a quick reheat in a 350°F oven for a few minutes brings them back to life.
What dips go best with Halloween tortilla chips?
These chips shine with salsa, guacamole, and queso. For extra festive flair, pair them with pumpkin taco soup or a smoky black bean dip. Their neutral flavor makes them versatile with just about any dip you like.
Conclusion
Spooky baked Halloween chips are proof that sometimes the simplest ideas turn into the best traditions. With only four ingredients and a few minutes in the oven, you can whip up a batch that delights kids and adults alike. They’re healthier than candy, fun to make, and perfect for parties, movie nights, or lunchbox surprises. This Halloween, skip the sugar rush and serve up a tray of crunchy ghosts, bats, and pumpkins instead. They’ll bring festive fun to your table—and maybe even become your new October ritual.