Article Intro
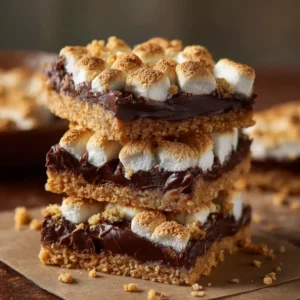
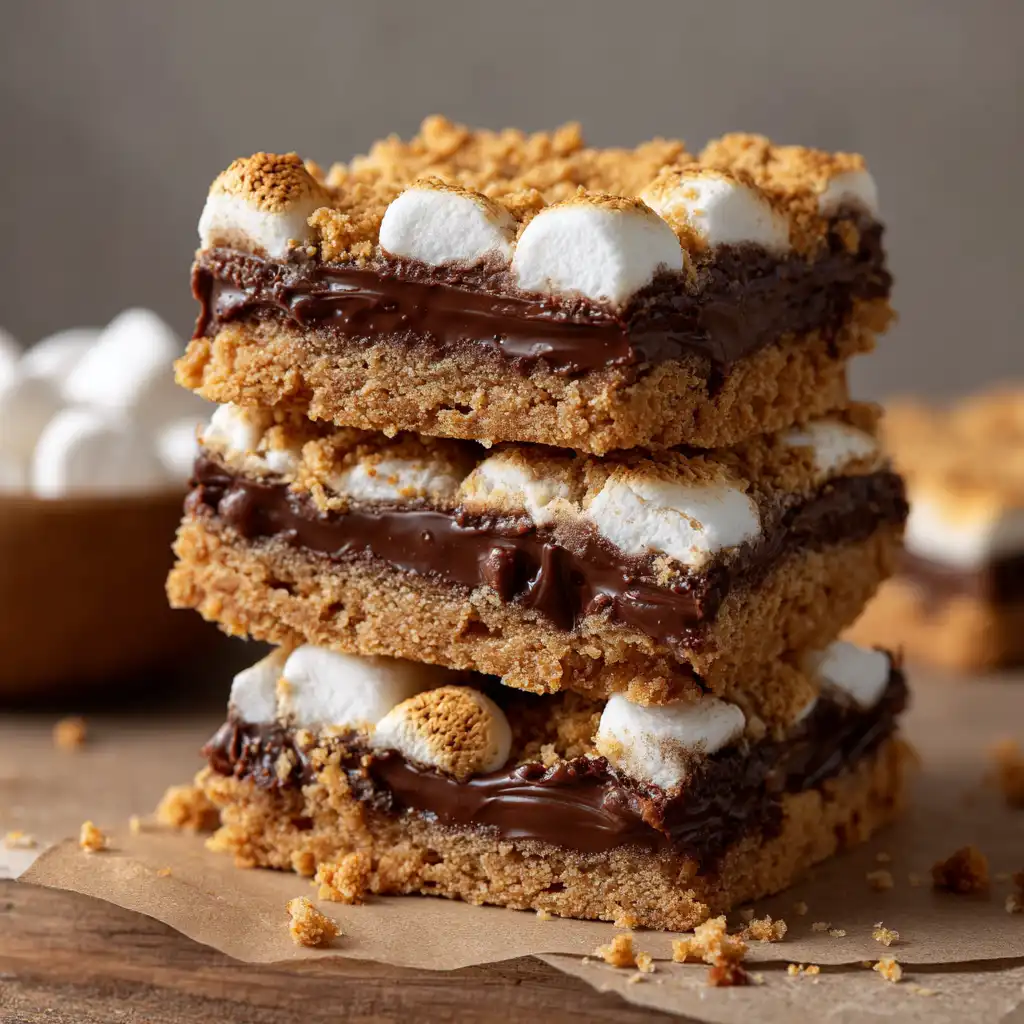
S’more bars are everything you love about a fireside treat—without the smoke or the mess. These layered dessert bars blend graham cracker crust, melted chocolate, and gooey marshmallows into one rich, nostalgic bite. Whether you’re baking for a weekend picnic, a school bake sale, or just craving something sweet on a rainy night, this recipe captures that cozy, toasted flavor of childhood campfires—right from your oven. In this article, we’ll cover how to make s’more bars from scratch, creative variations, pro tips, and answers to the most common questions about this timeless treat.
S’more Bars and the Magic of Melted Marshmallows
Memories baked in chocolate and graham
It all started on a weekend when my twins had friends over for a movie night. I didn’t want the mess of a campfire, but I still wanted something special. That’s when I pulled out the graham crackers, chocolate chips, and mini marshmallows and turned on the oven. The result? S’more bars that got devoured before the opening credits even finished.
Unlike the traditional campfire version, these bars stay compact, sliceable, and—let’s be honest—much more manageable indoors. The warm marshmallows toast up beautifully in the oven, giving you that golden, slightly crisp edge with a soft, stretchy center. Meanwhile, the chocolate melts just enough to ooze into the crust without turning into a puddle.
It’s not just about taste—it’s about simplicity. With just a handful of ingredients, s’more bars invite you to slow down and enjoy something handmade, no skewers required.
Why s’more bars deserve a spot in your dessert rotation
When it comes to quick, crowd-pleasing desserts, s’more bars are high on the list. They’re easy to prepare with pantry staples, they travel well, and they hit all the right notes: crunchy, chewy, melty, and sweet. The graham cracker crust sets the stage with its buttery base, followed by rich layers of chocolate and marshmallow that toast up like a dream.
What’s more, they’re super customizable. Swap chocolate chips for peanut butter chips, use dark chocolate for a richer flavor, or add crushed pretzels for a salty crunch. Whether served warm or chilled, these bars keep their shape and their charm—making them perfect for slicing, sharing, and storing for later (if there’s any left).
S’more Bars
Ingredients
- 2 cups Graham cracker crumbs
- ½ cup Melted butter
- 4 cups Chocolate chips
- 1 package Mini marshmallows
Instructions
- Preheat oven to 350F
- Grease 9×13 pan with cooking spray.
- Mix together the graham crackers and butter.
- Sprinkle into the baking dish and press firmly on bottom and up the sides of the pan.
- Bake 8 minutes.
- Remove from oven and sprinkle chocolate chips on top, followed by marshmallows.
- Bake for 20 minutes, until marshmallows turn brown.
- Let cool then place in fridge.
- Cut and serve
How to Make S’more Bars from Scratch
Classic ingredients, easy steps
At the heart of any great s’more bar is its base—and it doesn’t get simpler than graham cracker crumbs and melted butter. That combo forms the golden, buttery crust that anchors all the gooey goodness on top. You’ll press that mixture into a baking dish and give it a quick bake to firm it up. That eight-minute step is key—it ensures your crust doesn’t get soggy once the chocolate melts.
Next comes the chocolate layer. You can use semi-sweet, milk chocolate, or a mix of both. Sprinkle the chocolate chips generously over the warm crust so they begin to melt on contact. Then, add a fluffy blanket of mini marshmallows, which toast to perfection in the oven.
What really sets this recipe apart is its balance—crunch from the crust, sweetness from the chocolate, and that irresistible stretch from perfectly browned marshmallows. You bake it just long enough for the marshmallows to puff up and take on a golden hue—about 20 minutes. Let it cool, chill in the fridge for clean slicing, and it’s ready to serve.
S’more bars vs. traditional s’mores
If you’re wondering why not just make regular s’mores, the answer is simple: convenience and consistency. Traditional s’mores are delicious but a little chaotic—crumbly graham crackers, unevenly melted chocolate, and marshmallows that either burn or barely toast. S’more bars solve all of that.
By baking everything in one pan, you get even layers and a cleaner presentation. They’re also far more portable—no sticky fingers, no need for a fire pit, and no half-melted chocolate falling apart in your hands. And since the chocolate gets melted slowly in the oven, it melds beautifully into the crust without overpowering the marshmallow.
Whether you’re prepping for a party or a casual movie night, these bars bring all the flavor of classic s’mores with none of the fuss.
Variations and Custom S’more Bar Twists
Get creative with the base and toppings
Once you’ve mastered the classic s’more bar, it’s time to make it your own. The base recipe is incredibly flexible. Instead of graham crackers, try using crushed chocolate chip cookies, vanilla wafers, or even pretzels for a salty edge. Crushed gingersnaps add a warm spice that pairs beautifully with the sweetness of marshmallows.
And don’t stop there. Mix a few tablespoons of peanut butter into the melted butter before pressing your crust, or toss in a handful of mini chocolate chips to double the chocolate hit. Want a little crunch? Add chopped walnuts or pecans between the chocolate and marshmallow layers for texture and flavor.
You can also go bold with toppings. Drizzle melted white chocolate, caramel, or Nutella over the cooled bars for a decadent finish. Sprinkle with sea salt for contrast or crushed freeze-dried strawberries for a pop of color and tartness. Even a dusting of cinnamon or cocoa powder can take these from simple to bakery-worthy.
Make-ahead tips and storage hacks
S’more bars are the kind of dessert that actually gets better with time. Once baked, let them cool completely, then refrigerate for at least an hour—this helps everything firm up for clean slicing. If you’re short on time, pop the pan in the freezer for about 20 minutes to speed things up.
These bars keep well, too. Store them in an airtight container at room temperature for up to 24 hours, or in the fridge for up to five days. If you’re freezing, layer parchment between stacked bars and store in a zip-top bag. They’ll last for up to six months—and you can thaw them at room temp when the craving hits.
Having a stash of frozen s’more bars on hand? That’s just smart baking.
Serving S’more Bars Like a Pro
How to slice, plate, and present them
Once your s’more bars are cooled and chilled, slicing becomes a breeze. Use a sharp knife and wipe it clean between cuts for smooth edges. For extra precision, you can even warm the blade slightly under hot water—this helps it glide through the marshmallows and chocolate without dragging.
S’more bars are perfect for parties, potlucks, or just weeknight treats. Cut them into squares for a classic look or into thin strips for snack-size servings. Arrange on a platter or stack them like bricks on a wooden board for a rustic, campfire vibe.
If you’re serving to kids, pair a square with a glass of milk or hot cocoa. For adults, they’re a sweet finish after a casual dinner. These bars don’t need fancy garnishes, but if you want to dress them up, a tiny dusting of powdered sugar or a drizzle of melted chocolate never hurts.
When and where to serve s’more bars
S’more bars fit almost any occasion. They’re a go-to choice for school bake sales because they hold up well and don’t require refrigeration. They’re also perfect for summer parties when you want a campfire feel without the fire.
Hosting a backyard BBQ? Serve these chilled with fresh berries. Planning a fall gathering? Warm them slightly and serve with cinnamon-spiced coffee. They even work during the holidays, especially when topped with crushed peppermint or festive sprinkles.
And of course, these are a must for movie nights. They’re handheld, satisfying, and just a little bit nostalgic. Whether you serve them on a picnic table, dessert tray, or straight from the fridge, s’more bars deliver cozy charm in every bite.
FAQ: Everything You Want to Know About S’more Bars
What are s’more bars made of?
S’more bars are layered desserts made with a graham cracker crust, chocolate chips or melted chocolate, and a marshmallow topping. They’re baked until golden and gooey.
How do you keep s’more bars from getting too gooey?
Let the bars cool completely after baking, then refrigerate for at least 30 minutes. This helps the layers firm up for clean, mess-free slicing.
Can you make s’more bars ahead of time?
Yes! S’more bars are even better when made ahead. Chill overnight for the cleanest slices and store in an airtight container for up to five days.
Can I substitute graham crackers in s’more bars?
Absolutely. Try pretzels, vanilla wafers, gingersnaps, or chocolate cookies for a twist on the classic graham cracker base.
Conclusion
S’more bars are the kind of dessert that brings out smiles before the first bite. They’re simple to make, incredibly versatile, and offer all the classic campfire flavor without the need for an actual flame. Whether you stick with the traditional graham cracker and chocolate combo or put your own spin on it with creative crusts and toppings, these bars are sure to be a hit.
They’re more than just a treat—they’re a cozy, familiar moment you can bake anytime, anywhere. So preheat your oven, grab your marshmallows, and enjoy a little bite of nostalgia one gooey square at a time.