Peach pie isn’t just a dessert—it’s a memory in every bite. Whether you’re pulling fresh peaches from a backyard tree or grabbing a basket at your local farmers’ market, there’s something magical about transforming them into a bubbling, golden pie. In this article, we’re diving into the perfect peach pie recipe, breaking down each step so you can bake it confidently in your own kitchen. From flaky crust to juicy filling, you’ll learn how to keep it crisp on the bottom, sweet in the center, and pretty enough for any gathering.
Let’s begin with a story about why this recipe holds such a special place in our hearts.
A Pie That Feels Like Home
A kitchen filled with peaches
The first time I made peach pie from scratch, it was a July afternoon. My twins had just come back from helping their grandma pick fruit off her neighbor’s trees—sun-warmed, freckled, and smiling, each holding a plastic bag packed with peaches. They were fuzzy, fragrant, and just soft enough to know it was time to bake.
That afternoon, the kitchen became our hub of laughter and sticky fingers. I peeled the peaches with my thumb while the kids lined the slices like puzzle pieces. That memory stuck with me, and ever since, this perfect peach pie recipe has been our annual summer tradition.
Why it’s truly perfect
This pie isn’t overly fancy. There’s no need for advanced pastry skills—just a love for fresh ingredients and a willingness to get your hands a little messy. The peaches shine here, supported by just enough cinnamon and sugar to make them feel warm and cozy. If you’re feeling adventurous, a touch of ginger adds a zesty depth that balances the sweetness beautifully. And that buttery crust? It’s flaky, golden, and just firm enough to cradle the juicy filling without going soggy.
Whether you’re making this for a picnic, a potluck, or just a quiet Sunday treat, this recipe brings people together. It’s the kind of pie that disappears faster than you expect—and that’s the best sign of all.

Perfect Peach Pie
Ingredients
- Homemade Pie Crust or All Butter Pie Crust both recipes make 2 crusts, 1 for bottom and 1 for top
- 3 pounds 1.4kg peaches (about 8–9 medium)*
- 2/3 cup 135g granulated sugar
- 1/2 cup 63g all-purpose flour OR 1/4 cup instant tapioca
- 1 Tablespoon 15ml fresh lemon juice
- 1 –2 teaspoons peeled minced fresh ginger optional
- 1 teaspoon ground cinnamon
- 2 Tablespoons 28g cold unsalted butter, cut into small cubes
- egg wash: 1 large egg beaten with 1 Tablespoon 15ml milk
- optional: coarse sugar for sprinkling on crust
Instructions
- The crust: Prepare either pie crust recipe through step 5.
- Prep the peaches: Peel the peaches and then cut into 1-inch chunks. You need about 8 cups of peach chunks, which is around 1.4kg. You can peel and cut the peaches up to 1–2 days ahead of time. Cover and refrigerate until ready to make the filling.
- In a large bowl, stir the peach chunks, granulated sugar, flour, lemon juice, ginger, and cinnamon together until thoroughly combined. Set filling in the refrigerator while you roll out the dough. No need to cover it.
- Adjust the oven rack to the lower third position and preheat to 425°F (218°C). Place baking sheet on the bottom oven rack to catch any peach juices.
- Roll out the chilled pie dough: On a floured work surface, roll out one of the discs of chilled dough (keep the other one in the refrigerator). Turn the dough about a quarter turn after every few rolls until you have a circle 12 inches in diameter. Carefully place the dough into a 9-inch round pie dish. Tuck it in with your fingers, making sure it is smooth. Pour and spread filling evenly into pie dish. Dot the pieces of butter on top of the filling. Set aside at room temperature or in the refrigerator as you assemble the top pie crust.
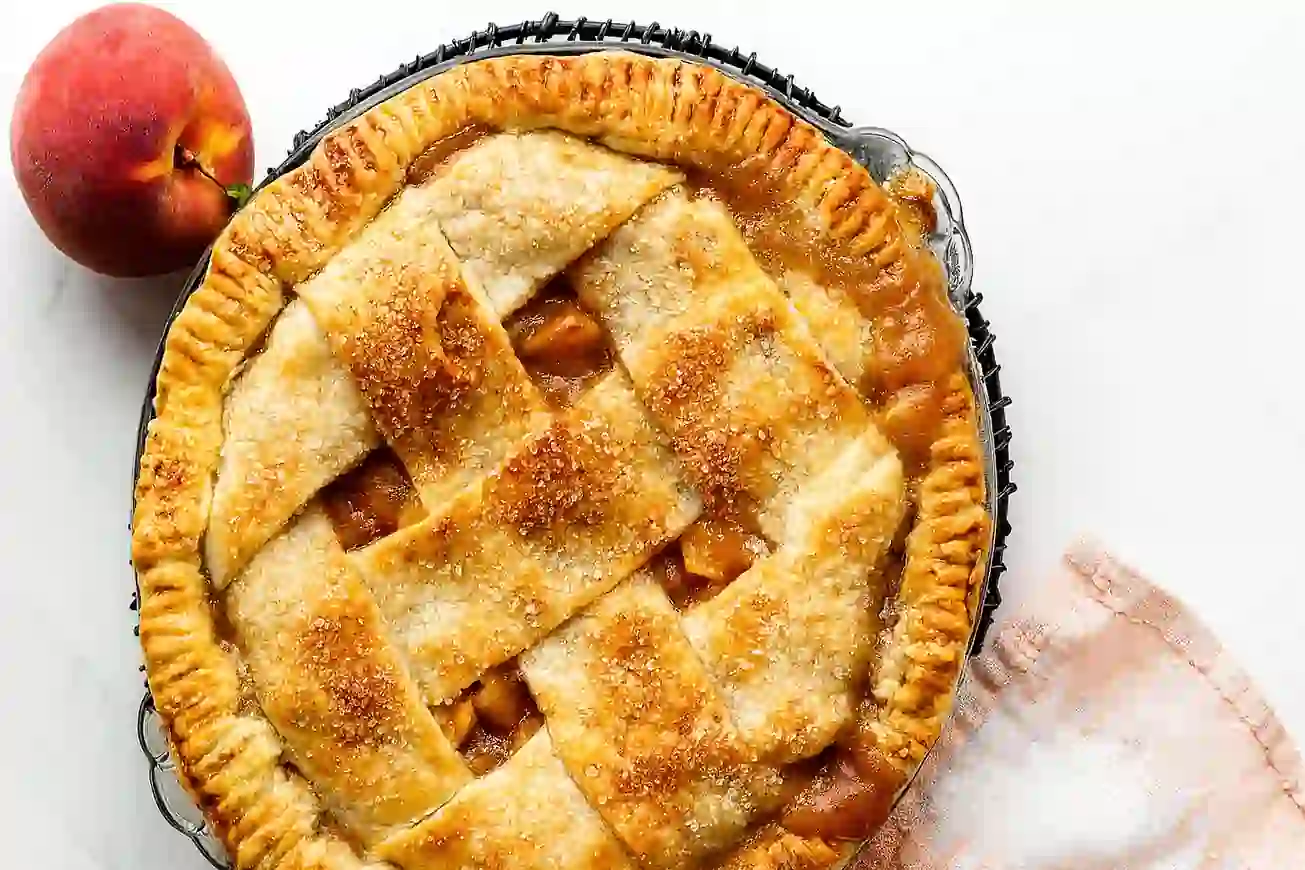
- Arrange the lattice: Remove the other disc of chilled pie dough from the refrigerator. Roll the dough into a circle that is 12 inches diameter. Using a pastry wheel, sharp knife, or pizza cutter, cut strips of dough; in the pictured pie, I cut 6 2-inch-wide strips. Carefully thread the strips over and under one another, pulling back strips as necessary to weave. (Here’s a lattice pie crust tutorial if you need visuals.) To seal the edges, use a small paring knife or kitchen shears to trim excess dough that extends more than 1.5–2 inches over the edge. Fold bottom pie dough edges back over and press/meld into the lattice edges to form a smooth, neat rim. Flute or crimp the pie crust edges with a fork.
- Lightly brush the top of the pie crust with the egg wash. Sprinkle the top with coarse sugar, if using.
- Bake the pie at 425°F for 20 minutes; then, keeping the pie in the oven, reduce the oven temperature down to 375° (190°C). Place a pie crust shield (see Note for homemade shield) on the edges to prevent them from over-browning. Continue baking the pie until the filling’s juices are bubbling everywhere, including in the center, 45–50 more minutes. This sounds like a long time, but under-baking the pie means a soupy, paste-like filling. If you want to be precise, the internal temperature of the filling taken with an instant read thermometer should be around 200°F (93°C) when done. Tip: If needed towards the end of bake time, remove the pie crust shield and tent an entire piece of foil on top of the pie if the top looks like it’s getting too brown.
- Remove pie from the oven, place on a cooling rack, and cool for at least 4 hours before slicing and serving. Filling will be too juicy if the pie is warm when you slice it.
- Cover leftovers tightly and store in the refrigerator for up to 5 days.
Notes
Special Tools (affiliate links): Pastry Blender | Pie Dish | Rolling Pin | Pizza Cutter for lattice pie dough strips | Vegetable/Fruit Peeler | Citrus Juicer | Pastry Brush | Sparkling Sugar | Pie Crust Shield
Peaches: You want slightly firm (not hard) peaches with zero bruises or soft spots. Your best bet is to purchase or pick about 9–10 firm peaches (about 3 pounds), then let them sit in a paper bag for 1–2 days to ripen. Some may have soft spots after this time, so that is why I suggest buying a couple more than you actually need. Fresh peaches are best for peach pie, though you can get away with unsweetened frozen peaches. If using frozen, thaw, chop, and blot them dry before using. Canned peaches are not ideal as they’re already too soft and mushy.
Ginger: 1–2 teaspoons of fresh minced ginger adds exceptional flavor. If you love ginger, use 2 teaspoons. If you don’t have fresh, use 1/4–1/2 teaspoon of ground ginger instead. If you don’t love ginger, leave it out.
Crumble Topping: Want to skip the top crust? Try this peach crumble pie recipe.
Aluminum Foil Pie Crust Shield: You can purchase a pie crust shield or make one from aluminum foil. Cut a 14-inch square of aluminum foil. Fold in half. Cut out a 5-inch semi-circle on the folded edge. Unfold. Carefully fit the aluminum foil over the pie crust edges, lightly securing down on the sides as best you can (careful, the pie is hot!), leaving the center of the pie exposed.
Braiding Pie Dough: Some photos in this post show a braided pie dough topping, which is an optional way to decorate your pie. To achieve the same look as the braided pie, you’ll need 3 pie crusts. 1 for the bottom crust and 2 for the strips/braiding. (You’ll have scraps leftover, simply mold into a disc, wrap in plastic wrap and freeze for another pie.) As you can see in the photos, I latticed with 6 braids and 7 strips total. The strips were about 1-inch thick. The braids were assembled with 3 1/2-inch strips. See my detailed How to Braid Pie Crust page for more tips. Calories: 375 kcal Carbohydrates: 56g Sugar: 30g Protein: 4g Fat: 16g Saturated Fat: 10g Cholesterol: 55mg Sodium: 180mg Fiber: 2g
Crafting the Ideal Peach Pie Crust
The foundation of the perfect peach pie recipe
A great pie starts with its crust—no shortcuts, no compromises. Whether you’re using a homemade pie crust or an all-butter variation, this step makes or breaks your dessert. The goal? Flaky, golden, and crisp, especially on the bottom. Nobody wants a soggy base, and that’s where the real work begins.
To get there, start by chilling your dough. Cold dough ensures those pockets of butter stay intact, creating that classic flaky texture. After preparing your dough and chilling it for at least 2 hours, you’ll roll out one disc to line your 9-inch pie dish. Always roll from the center out, turning the dough a quarter turn each time for even thickness. Aim for a 12-inch circle so it fits the pan with enough overhang to fold later.
Before you pour in your peach filling, remember this trick: place a baking sheet on the lower oven rack while preheating. It catches any dripping juices and helps the bottom crust cook more evenly thanks to the direct heat.
Keeping the bottom crust crisp and beautiful
One of the biggest questions bakers ask is how to keep the crust from going soggy, especially with a juicy filling like peaches. The secret is two-fold: oven placement and thickener choice. By baking your pie in the lower third of the oven, closer to the heat source, the bottom crust crisps up beautifully. Additionally, flour or instant tapioca help absorb excess juices without turning gummy.
Want to go a step further? Brush a very light layer of egg white over the base before adding the filling. It creates a barrier between the wet fruit and the dough.
Now that your bottom crust is prepped and sturdy, you’re ready for the filling—simple, juicy, and designed to thicken as it bakes without becoming gluey. That’s up next.

Peach Pie Filling That Holds Its Shape
What goes into the perfect peach pie filling
You’ve got your crust rolled and ready—now it’s time to make that golden, glossy filling the star of the show. The secret to a perfect peach pie recipe isn’t complicated—it’s balance. You want natural sweetness, a thick but juicy texture, and warm spices that highlight the fruit instead of overpowering it.
Start with fresh, ripe peaches—about 3 pounds or 8–9 medium ones. Slightly firm peaches hold their shape better during baking and don’t release too much liquid. After peeling and chopping them into chunks, toss them in a bowl with sugar, flour or instant tapioca, lemon juice, cinnamon, and—if you’re feeling bold—a little fresh ginger. That ginger twist adds a whisper of heat and brightness that makes each bite memorable.
Thickeners: flour vs. tapioca
Choosing the right thickener for peach pie can be the difference between a slice that stands tall and one that slumps into mush. All-purpose flour is classic and creates a soft, comforting texture. It blends smoothly and thickens as the pie bakes, making it a go-to for many home bakers.
But if you want a clearer, firmer filling, instant tapioca is the way to go. It creates a slightly glossy finish and stands up well to juicy fruit. Whichever you use, make sure the filling bubbles all the way through during baking. This is how you know the thickener has fully activated—look for bubbling in the center, not just the edges.
After mixing, let the filling sit while you prep your top crust. This short rest gives the sugar time to draw out some juices and helps the flour or tapioca start working before the pie even hits the oven.
Next, we’ll talk about sealing the deal with a stunning top crust and how to bake the pie to golden perfection.
Topping and Baking the Perfect Peach Pie
Lattice crust: classic look, practical purpose
Now that your filling is nestled in the crust, it’s time to crown your perfect peach pie recipe with a golden, flaky top. A lattice isn’t just pretty—it also lets steam escape, helping the filling thicken and the crust stay crisp.
Start by rolling your second dough disc into a 12-inch circle. Cut even strips—about 2 inches wide if you want that classic rustic look. Weave the lattice over the pie by laying half the strips in one direction, folding back every other one, and threading the remaining strips across. It’s easier than it sounds once you get going.
To seal the edges, trim any overhanging dough, fold the bottom crust over the ends of the strips, and press them together. Crimp with a fork or your fingers for a finished look.
Not into lattice? No problem. You can use a full top crust with a few slits for steam, or even try a braided design using a third crust for extra flair.
Bake it right, cool it slow
Before the pie goes into the oven, brush the top with egg wash (a mix of 1 beaten egg and 1 tablespoon of milk) for a glossy, golden finish. A sprinkle of coarse sugar adds sparkle and crunch.
Bake at 425°F for 20 minutes, then lower the temperature to 375°F and bake for another 45–50 minutes. The key is patience. The juices should bubble even in the center of the pie—that’s how you know the filling is thickened properly. If the crust edges begin to darken too soon, cover them with a pie shield or homemade foil ring.
Resist the urge to slice right away. Let the pie cool for at least 4 hours—yes, four. Cutting too soon will cause the filling to spill out. Once cool, the pie will slice neatly, the crust will hold its crisp edges, and the filling will have just the right set.

FAQ Section
Can you make peach pie with unpeeled peaches?
You can, but the texture won’t be as smooth. Peach skins can become tough or slightly chewy when baked. For the best mouthfeel and visual appeal, peeling them is worth the few extra minutes.
How do you keep the bottom crust of a peach pie from getting soggy?
Preheating a baking sheet in the oven and baking the pie on the lower rack helps crisp the bottom. You can also brush the bottom crust with egg white before adding the filling as a moisture barrier.
What is the best thickener for peach pie?
Flour is a traditional, reliable option for a soft, cozy filling. Instant tapioca offers a firmer, glossier texture and holds up better to juicy peaches. Both work well—it’s about preference.
How many peaches do you need for a pie with fresh peaches?
You’ll need about 3 pounds, or 8–9 medium peaches. That yields around 8 cups of chunks, perfect for filling a 9-inch pie dish without overflowing.
Conclusion
A homemade peach pie is the essence of summer in every slice—sweet, buttery, golden, and just a little messy. With the right peaches, thoughtful prep, and a few expert tips, you can bake a pie that’s both beautiful and bold in flavor. Whether shared at a picnic or savored on your porch with a scoop of vanilla ice cream, this perfect peach pie recipe delivers comfort and joy, one forkful at a time.