INTRO
There’s something incredibly satisfying about serving desserts that fit in the palm of your hand. Mini pumpkin pies are not just cute, they’re rich, flavorful, and easy to bake ahead of time. Whether you’re planning a cozy family gathering or prepping for a fall bake sale, these little pies pack all the warm spice and creamy texture of traditional pumpkin pie, without the hassle of slicing and serving.
In this post, I’ll show you exactly how to make mini pumpkin pies from scratch. From flaky crusts to silky filling, you’ll get step-by-step guidance plus tips to avoid soggy bottoms and cracked tops. Let’s get started.
A Bite-Sized Tradition Worth Keeping
Why Mini Pumpkin Pies Just Feel Special
Years ago, while prepping a Thanksgiving dinner for twelve, I realized I only had one pie dish and way too many dessert expectations. Out of pure desperation, I reached for my mini muffin pans. I rolled out pie dough, pressed in little crusts, filled them with spiced pumpkin mix, and hoped for the best.
What came out of the oven? Dozens of golden, bite-sized pumpkin pies that were devoured faster than the turkey. I’ve been making mini pumpkin pies every fall since. They’re the perfect solution when you’re feeding a crowd or just want a quick, satisfying treat without cutting into a full pie.
That’s the real magic of mini pumpkin pies. They bring all the cozy flavor of the classic dessert but in a more fun and portable form. Each one bakes with a perfectly golden edge, rich filling, and soft-set center. They cool fast, serve easily, and freeze beautifully.
The Best Crust and Filling Combo
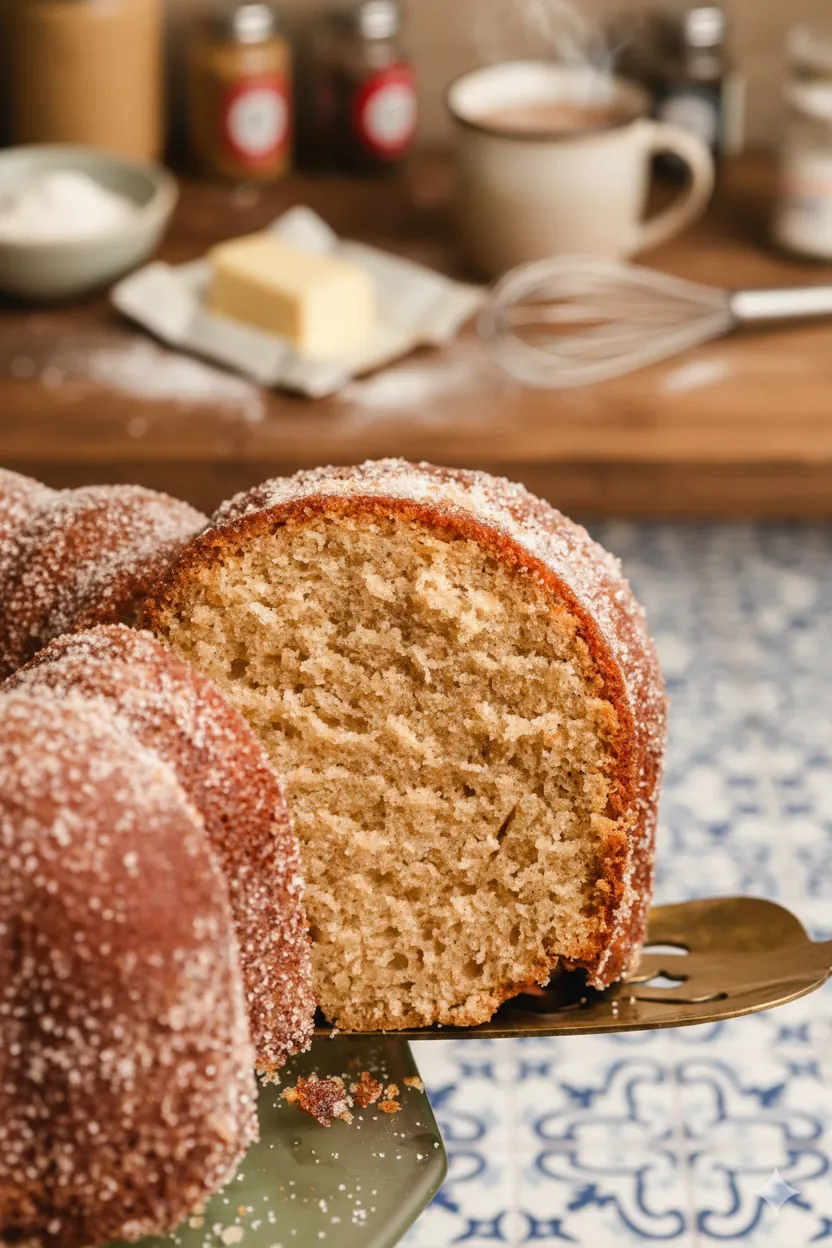
The base of a good mini pumpkin pie starts with a tender crust. You can use all-butter homemade pie dough, or a reliable store-bought version. Just make sure it’s chilled and firm before rolling out. Each 2.5-inch circle fits snugly into a mini muffin tin, creating the perfect little cup for the creamy pumpkin filling.
The filling is a simple mix of canned pumpkin, brown sugar, egg, spices, and a blend of whole milk and cream. A handheld mixer works great here, or a sturdy whisk if that’s more your style. Once it’s smooth and spiced, the mixture rests in the fridge while you prep the crusts. Cold filling helps the crust hold its shape and bakes more evenly.
Mini Pumpkin Pies
Ingredients
- 2 unbaked discs of Pie Crust what I used or All Butter Pie Crust*
- 1 and 1/4 cups 285g pumpkin puree*
- 3/4 cup 150g packed light or dark brown sugar
- 1/2 cup 120ml heavy cream
- 1/4 cup 60ml whole milk
- 1 large egg
- 1/4 teaspoon salt
- 1 teaspoon ground cinnamon
- 1 teaspoon store-bought or homemade pumpkin pie spice*
- small pinch black pepper optional—see note
Instructions
- Pie crust: I like to make sure my pie dough is prepared before I begin the mini pies. Make pie dough the night before because it needs to chill in the refrigerator for at least 2 hours before using.
- Prep the filling: In a large bowl with a handheld or stand mixer fitted with a whisk attachment—or simply using a whisk and mixing bowl—beat/whisk the pumpkin, brown sugar, heavy cream, milk, egg, salt, cinnamon, pumpkin pie spice, and black pepper together (on medium high speed if using a mixer) until completely combined, about 2 minutes. You’ll have about 3 cups of filling. Cover and refrigerate filling until step 6.
- Preheat oven to 375°F (191°C). Grease two 24-count mini muffin pans. Nonstick spray is best. (If you only have 1 mini muffin pan, bake these in batches. Roll out first pie dough, shape, fill, and bake then roll out the second pie dough, shape, fill, and bake.)
- Shape the mini crusts: Working with 1 chilled pie dough at a time, place the dough onto a floured work surface. Roll into a large 12-inch circle. Use your warm hands to mold any cracking edges back together if needed. From the circle, cut rounds using a 2.5 inch cookie cutter. (Sometimes I use my 1/3 cup measuring cup, which is 2.5 inches in diameter.) You’ll have to re-roll the dough scraps a few times. Work quickly, as the dough becomes much more delicate the longer it’s at room temperature. You’ll get about 24 rounds per pie crust. Repeat with 2nd chilled pie dough for a total of about 48.
- Place the dough rounds into greased 24-count mini muffin pan(s). Press the dough flat into the bottom of the crevice and up the sides.
- Evenly spoon cold filling into each unbaked crust, filling to the top.
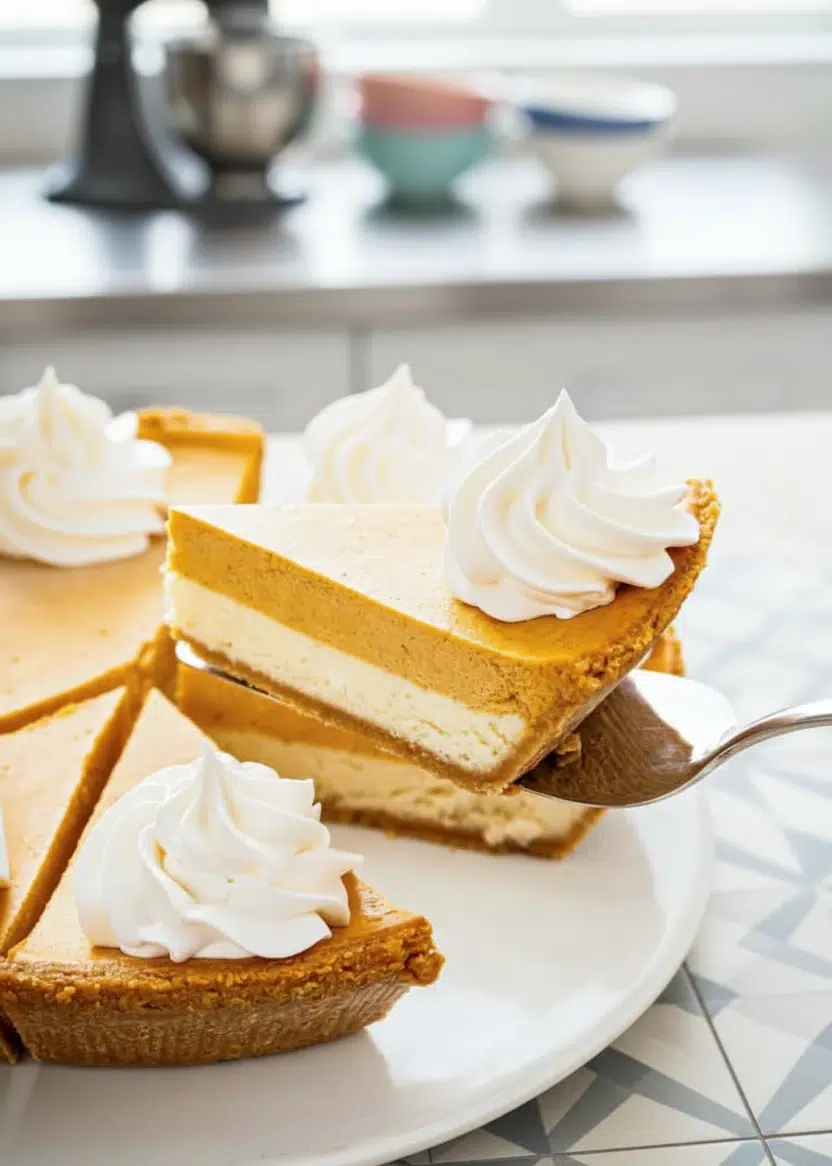
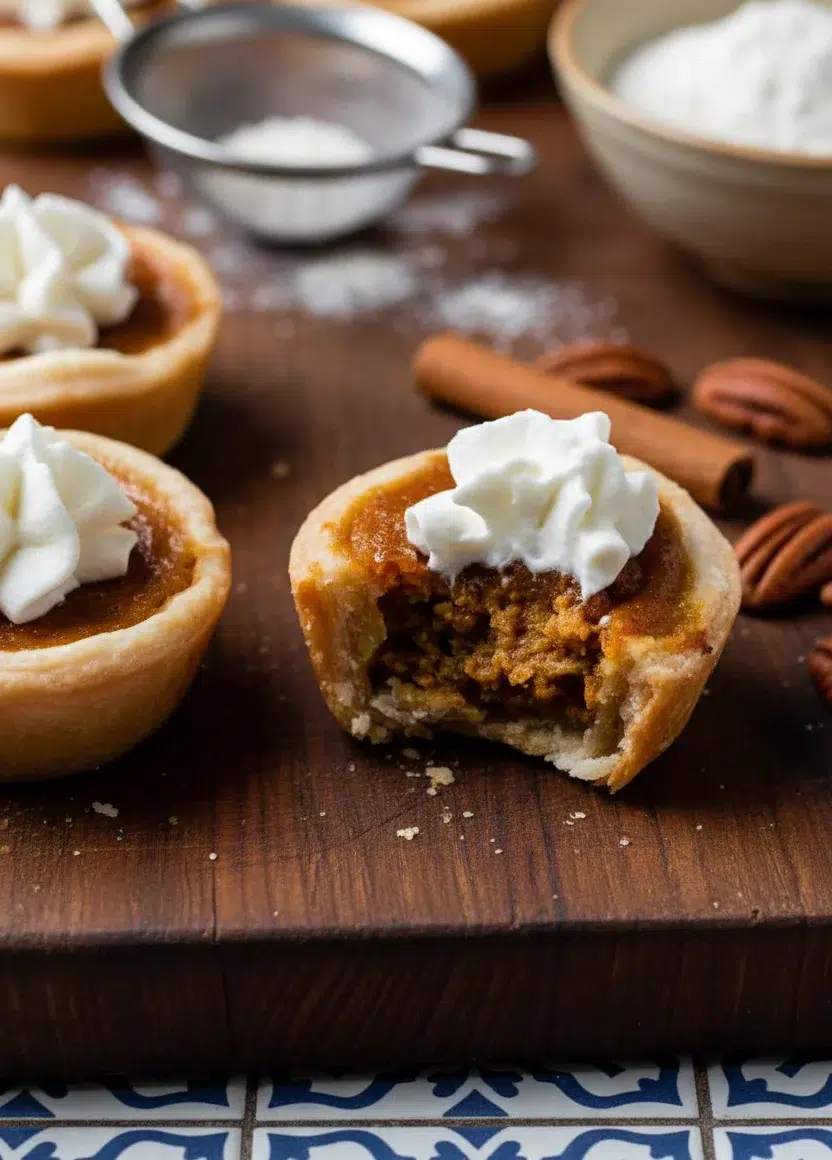
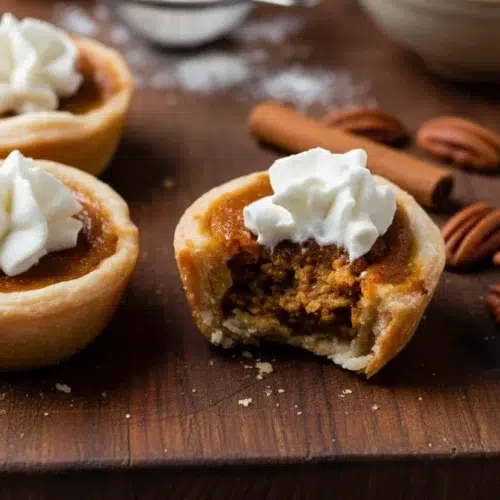
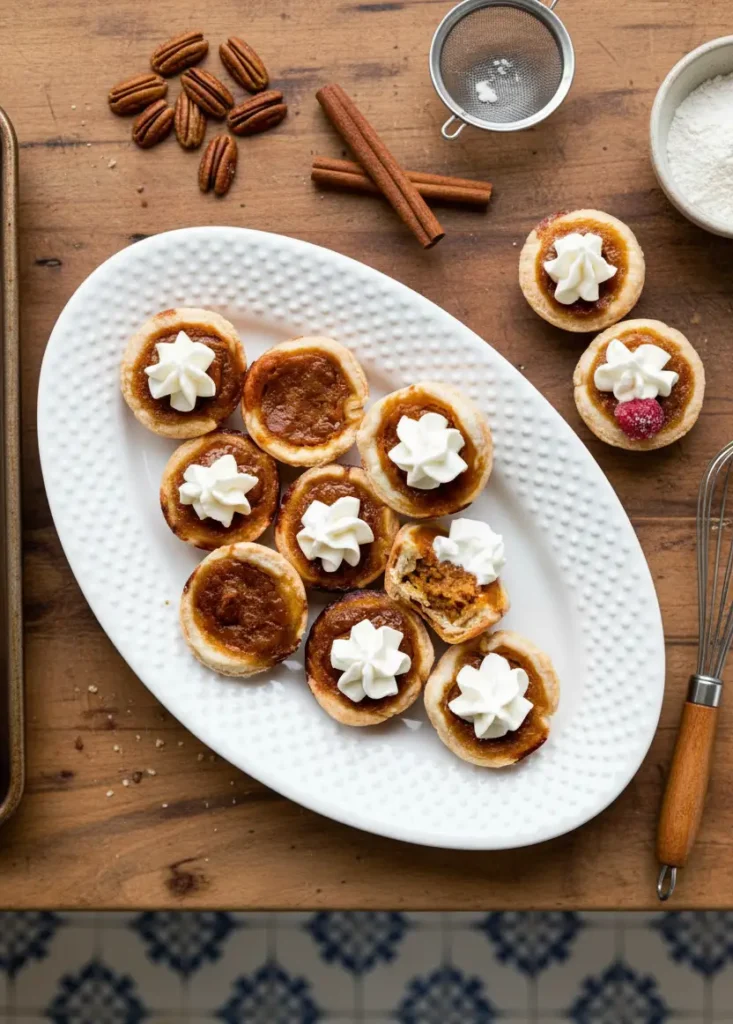
- Bake mini pies until the center is just about set and edges are lightly browned, about 21–25 minutes. Allow to cool for 5 minutes before removing from the pan. If greased well, the mini pies pop right out using a spoon to scoop them up. Cool, then serve at room temperature or refrigerate until chilled and serve cold. Filling deflates a bit as they cool. Top with whipped cream if desired. (Also pictured are sugared cranberries.)
- Cover leftover pies tightly and store in the refrigerator for up to 5 days.
Notes
Special Tools (affiliate links): Electric Mixer (Handheld or Stand) or Glass Mixing Bowl and Whisk | Wilton Mini Muffin Pan or Williams Sonoma Mini Muffin Pan | Rolling Pin | 2.5-inch Cookie Cutter
If using a 12-count standard muffin pan: Cut the pie dough into 3.5 inch circles. Other assembly instructions are the same using a 12-count muffin pan. Bake for about 30 minutes or until the centers are set and edges are lightly browned. Yields about 16.
Pie Crust: Both linked pie crust recipes make 2 crusts. You need 2 crusts for this recipe. You can use store-bought pie crust if desired. Make sure it is thawed.
Pumpkin: Canned pumpkin is best in this recipe. If using fresh pumpkin puree, lightly blot it before adding to remove some moisture. The filling will be thinner and the bake time may be a little longer.
Whole Milk & Heavy Cream: These are the best options to use to guarantee the filling sets up. In a pinch, use 3/4 cup (180ml) of full fat half-and-half.
Spices: You can use 1 teaspoon of store-bought or homemade pumpkin pie spice in this recipe. Instead of prepared pumpkin pie spice, though, you can use 1/4 teaspoon each: ground nutmeg, ground cloves, ground allspice, and ground ginger. (You will still want to use 1 teaspoon of ground cinnamon in the recipe, in addition to these spices.) A pinch of black pepper adds incredible spice flavor. If using my homemade pumpkin pie spice, you don’t need to add it again here since it’s included in that homemade spice blend.
Technique Tips for Flawless Baking
How to Shape the Perfect Mini Crusts
When it comes to mini pumpkin pies, the crust-to-filling ratio is everything. You want buttery, flaky edges that hold their structure without overpowering the filling. To get that balance, roll your chilled pie dough into a 12-inch round. Use a 2.5-inch cookie cutter or the rim of a small glass to cut even circles. Each round should be just large enough to press gently into the bottom and up the sides of a mini muffin cavity.
Don’t worry if the dough cracks while shaping. Use warm fingertips to patch it back together. After you fill one pan, cover the rest of the dough rounds with a damp towel to keep them from drying out. If you only have one mini muffin pan, bake in batches. That’s better than rushing and risking a soggy or underbaked crust.
For a cleaner finish, avoid over-flouring your surface. Too much flour toughens the crust. Lightly floured dough rolls out smoother and re-rolls better when you’re using scraps.
Getting the Filling Just Right
The pumpkin filling for mini pies should be silky, not runny. Start with canned pumpkin. It’s consistent, thick, and less watery than fresh puree. If you do use fresh pumpkin, make sure to blot it gently to remove extra moisture. This helps the pies set properly without baking too long.
Brown sugar adds depth, while a mix of cinnamon and pumpkin pie spice delivers that classic flavor. A small pinch of black pepper might sound unusual, but it wakes up the warm spices without making the pie spicy.
After mixing the filling, let it rest in the fridge. This keeps the fat from separating and makes it easier to spoon cleanly into each crust. Fill each crust to the top. Don’t worry—mini pumpkin pies puff up as they bake, then settle down perfectly once cool.
Baking, Cooling, and Serving Tips
How to Bake Mini Pumpkin Pies Evenly
Once your mini muffin pans are filled with crust and cold pumpkin filling, it’s time to bake. Set your oven to 375°F and make sure it’s fully preheated before the pies go in. An even, hot oven ensures the crust sets quickly while the filling firms up without cracking.
Bake the mini pumpkin pies for 21 to 25 minutes. You’ll know they’re done when the edges of the crust turn lightly golden and the centers no longer jiggle. If you tap the side of the pan gently, the filling should move just slightly but not ripple like liquid.
If you’re using a 12-count standard muffin tin, cut the dough into 3.5-inch rounds instead. Bake those larger pies for closer to 30 minutes. Keep an eye on them and use the same doneness cues as with the minis.
After baking, let the pies cool in the pan for 5 minutes. Then, use a small spoon to lift them out carefully. If the pan was well greased, they should release easily. Let them cool fully on a wire rack. The filling will deflate slightly and settle as they cool—that’s completely normal.
Serving Ideas for Any Occasion
Mini pumpkin pies are just as perfect for casual weekends as they are for festive gatherings. Serve them at room temperature or chilled, depending on your preference. A dollop of whipped cream adds a creamy contrast to the spiced filling. For extra flair, top each pie with sugared cranberries or a sprinkle of cinnamon sugar.
They also make a beautiful addition to dessert tables. Arrange them in rows or circles on a cake stand or wood board. Guests love the idea of grab-and-go pies, especially when forks and plates aren’t required. For kids, try topping them with a small candy pumpkin or chocolate leaf.
These little treats are rich, so one or two is usually plenty. But don’t be surprised if someone sneaks back for a third.
Make-Ahead, Storage, and Freezing Tips
Making Mini Pumpkin Pies in Advance
One of the best parts of baking mini pumpkin pies is how well they hold up. If you’re planning a holiday gathering or want to prep ahead for a bake sale, these little pies fit perfectly into your timeline. The filling can be mixed up to two days in advance. Store it in an airtight container in the refrigerator until ready to use. Give it a quick stir before filling your crusts.
Pie dough can be made five days ahead and kept chilled. It also freezes beautifully for up to three months. Just thaw in the fridge overnight before rolling it out. If you’re using store-bought crusts, keep them sealed and refrigerated until you’re ready to cut and shape.
Once baked, mini pumpkin pies should be cooled completely before storage. Letting them sit out too long while warm can cause the crust to soften. Once they’re room temperature, place them in a single layer in an airtight container. If stacking is necessary, use parchment between layers to prevent sticking.
How to Store and Freeze for Later
Mini pumpkin pies stay fresh in the refrigerator for up to five days. Keep them in a tightly sealed container and pull them out when you’re ready to serve. They taste great chilled but can also be served at room temperature if that’s your preference.
To freeze, place fully cooled pies in a single layer on a baking sheet and freeze until firm. Then transfer them to a freezer-safe container, using parchment paper between layers. They’ll keep well for up to three months. Thaw at room temperature for a few hours or overnight in the fridge. They’re just as delicious the second time around.
Want to get ahead for the holidays? Bake a batch now and freeze. That way, you’ll have a stress-free dessert ready whenever guests drop by or when you simply crave that warm, spiced flavor of pumpkin pie in bite-sized form.
Frequently Asked Questions About Mini Pumpkin Pies
Can I use store-bought crust for mini pumpkin pies?
Yes, store-bought pie crust works well and saves time. Just make sure it’s fully thawed before rolling it out. Use a 2.5-inch cutter to shape the crusts and press them into mini muffin tins as you would with homemade dough.
How do I keep mini pumpkin pies from getting soggy?
Start with cold dough and cold filling. Preheating the oven properly and not overfilling the crust also helps. Baking until the edges are lightly browned and the centers are just set ensures the filling doesn’t soak into the crust.
Can you freeze mini pumpkin pies after baking?
Yes, they freeze very well. Let them cool completely, then layer with parchment in a freezer-safe container. Freeze for up to three months. To serve, thaw at room temperature or in the fridge. The texture and flavor hold up beautifully.
What is the best way to serve mini pumpkin pies for a party?
Arrange the pies on a tray or tiered stand with small dollops of whipped cream on top. For extra color, add sugared cranberries or a dusting of cinnamon. They’re easy to eat, require no slicing, and look festive on any dessert table.
Conclusion
Mini pumpkin pies are the kind of dessert that makes people smile before they’ve even taken a bite. They’re charming, easy to prepare, and deliver all the cozy flavor of classic pumpkin pie in just a few bites. Whether you’re prepping for a holiday dinner, sharing with neighbors, or simply treating yourself on a fall afternoon, these little pies are a seasonal favorite worth keeping in your recipe box.
Make a batch. Freeze a few. Share them generously. You’ll find they disappear fast and leave everyone asking for the recipe.