Intro
When fall rolls in and Halloween creeps closer, there’s one dessert I know I’ll be making: Halloween brownies. Whether it’s for a classroom party or a late-night movie marathon with the kids, these spooky little treats are always a hit. The best part? They start with a classic fudgy brownie base, but a few fun add-ons turn them into edible graveyards—topped with tombstone cookies, candy pumpkins, and tufts of eerie green frosting. Halloween brownies aren’t just dessert; they’re a decorating activity, a conversation starter, and a whole lot of fun wrapped into one bite-sized square.
Halloween Brownies and the Story Behind These Spooky Treats
Why Halloween Brownies Became a Family Favorite
I still remember the first time I made Halloween brownies—it was the night before my twins’ kindergarten Halloween party. I’d totally forgotten to sign up for snacks, and the only thing in the pantry was a box of brownie mix. It was one of those chaotic fall evenings: decorations half up, costumes still being stitched, and the kitchen covered in orange sprinkles. Desperate for something festive, I grabbed a pack of Milano cookies and a tube of black gel, wrote “RIP” on each cookie, and stuck them into the brownies. With a few candy pumpkins and messy swirls of green icing, those simple Halloween brownies became a spooky hit.
Now it’s tradition. Every year, we bake a batch together—me frosting, the kids writing tombstones (and sneaking candy, of course). These brownies have turned into more than just dessert; they’re a family moment, a sugar-dusted memory we recreate every October.
What Makes Halloween Brownies So Fun to Bake?
Halloween brownies are the kind of treat that lets your creativity shine without any baking stress. Start with any brownie base you love—homemade or boxed—and then have fun decorating. It’s like edible arts and crafts. You get to play with frosting, press cookies into gooey chocolate, and add candy pumpkins like you’re planting a mini Halloween garden.
There’s no perfect shape or decoration style, and that’s the beauty of it. Messy becomes spooky. Imperfect becomes festive. And in the end, you’ve got a tray of Halloween brownies that look like a graveyard and taste like childhood joy.
Halloween Brownies
Ingredients
- For the Brownies:
- Prepared brownie batter for an 8” pan*
- 12 milano cookies
- Black decorating gel*
- 12 candy pumpkins
- For the Green Buttercream Frosting:
- 1 cup powdered sugar
- 1/4 cup butter salted or unsalted, softened
- 2 teaspoons milk
- green food coloring a few drops to reach your desired color
Instructions
- Line an 8” baking pan with parchment paper, leaving a little bit of overhang on the sides so that you’ll be able to easily pull the brownies out of the pan.
- Pour brownie batter into the prepared pan and smooth it into an even layer. Bake according to recipe instructions.
- Allow brownies to cool completely. Pull up on the parchment paper and transfer the brownies to a flat surface. Cut the brownies into rectangles. (I cut mine 4 x 3 to make 12 rectangle brownies).
- Mix all of the frosting ingredients together in a bowl. Mix for 2 minutes until light and fluffy. Add a little more powdered sugar to make the mixture thicker, or another dash of milk to make it thinner, as needed. Mix in a few drops of green food coloring. Set aside.
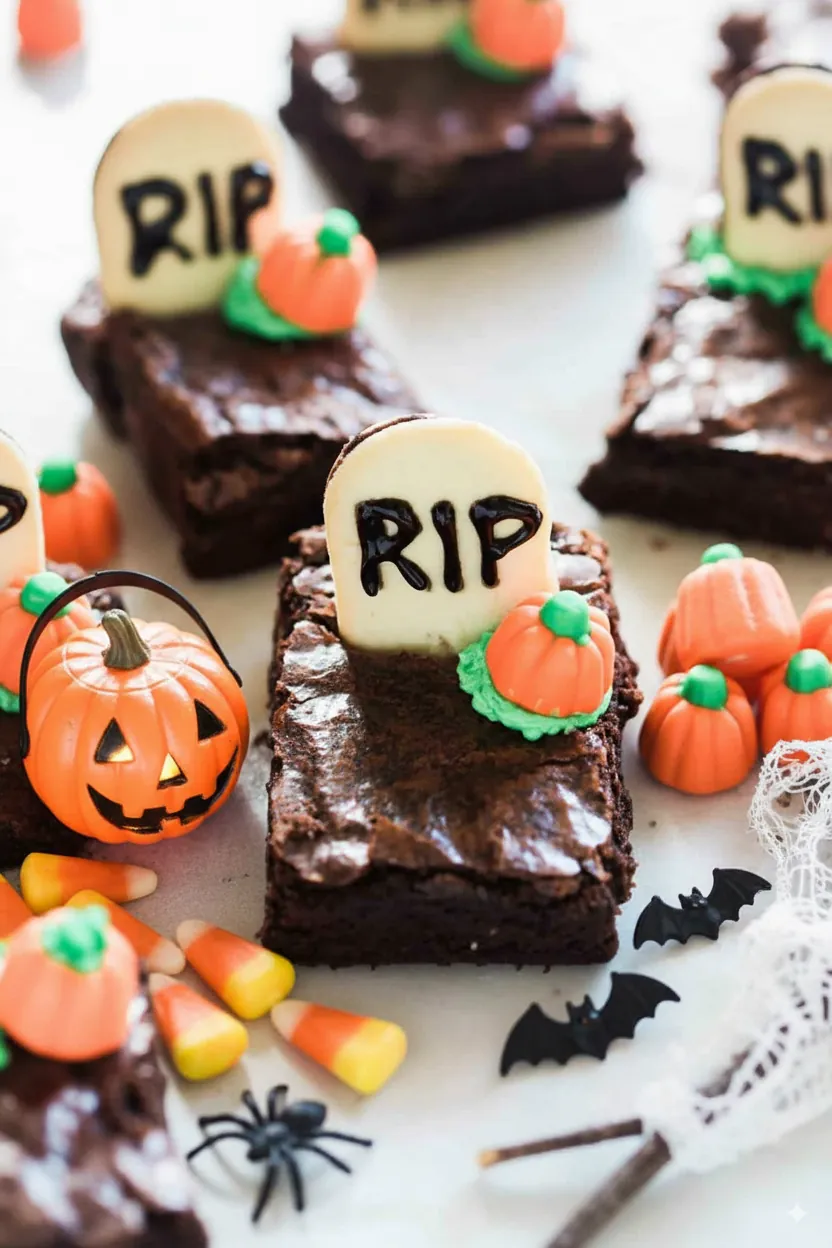
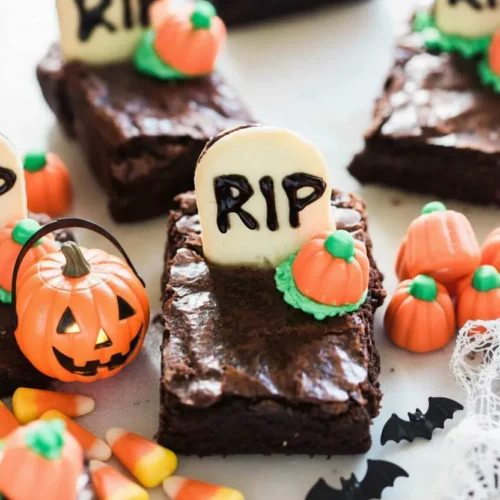
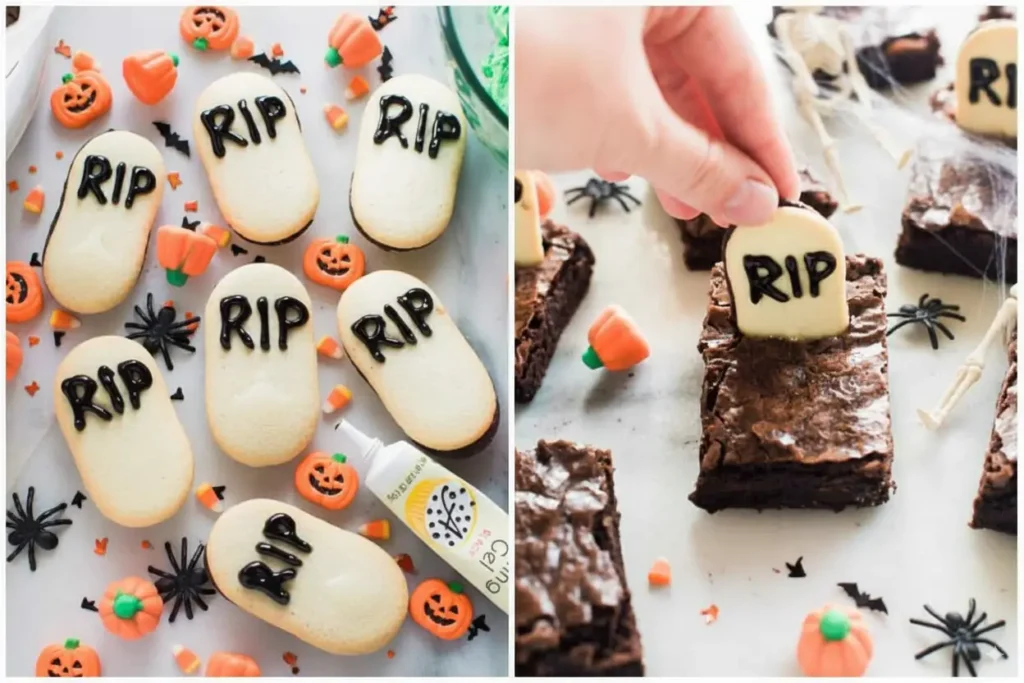
- Use the black (edible) gel pen to write the letter R-I-P on the top of each milano cookie. I also cut the very bottom edge off of my cookies to make the “headstones” a little shorter, but you don’t have to.
- Press each cookie into the top of the brownie, as if it were a grave headstone.
- Spoon a a little green frosting near the headstone and place a pumpkin candy on top.
Notes
If using a boxed brownie mix, I would suggest the Ghirardelli brand.
Black decorating gel should be easily found in the baking aisle (near the birthday candles etc.) at your local grocery store, or at Walmart. Nutrition
Calories: 132kcal | Carbohydrates: 18g | Protein: 1g | Fat: 6g | Saturated Fat: 3g | Polyunsaturated Fat: 1g | Monounsaturated Fat: 2g | Trans Fat: 0.2g | Cholesterol: 10mg | Sodium: 72mg | Potassium: 11mg | Fiber: 0.1g | Sugar: 14g | Vitamin A: 128IU | Calcium: 4mg | Iron: 0.3mg
How to Make Halloween Brownies from Scratch or a Box
Brownie Base: Homemade or Boxed—Which Works Best?
The beauty of Halloween brownies is how flexible they are. If you’ve got time and love baking from scratch, go ahead and whip up your favorite fudgy brownie batter. But if you’re short on time (or energy), a good boxed mix works just as well. I’ve used both over the years, and honestly, no one ever notices once the decorations go on. If you’re going boxed, I recommend the Ghirardelli brownie mix—it’s rich, chocolatey, and holds up well under frosting and toppings.
For this recipe, we’re baking in an 8×8-inch pan, which makes about 12 brownies. You can use a half batch of your favorite homemade recipe or the full amount of one boxed mix. The key is letting the brownies cool completely before decorating so everything stays neat and clean.
Once your brownie base is baked and cooled, that’s when the fun begins. The decorating takes center stage—and the kids love jumping in at this point.
Ingredients You’ll Need for Your Halloween Brownies
Here’s exactly what you’ll need to bring these Halloween brownies to life, graveyard-style:
| Ingredient | Amount |
|---|---|
| Prepared brownie batter | Enough for an 8” pan |
| Milano cookies | 12 |
| Black decorating gel | 1 tube |
| Candy pumpkins | 12 |
| For Green Buttercream Frosting: | |
| Powdered sugar | 1 cup |
| Butter (softened) | 1/4 cup |
| Milk | 2 teaspoons |
| Green food coloring | A few drops |
Now that the brownie base is prepped and you’ve got your spooky ingredients ready, let’s move on to the decorating magic in Part 3.
Step-by-Step Guide to Decorating Halloween Graveyard Brownies
Make Your Buttercream Grass and Tombstones Stand Out
Once your brownies are cooled and cut, it’s time to make them spooky. Start by cutting the brownies into 12 equal rectangles—4 rows by 3 works perfectly. Then whip up that fluffy green frosting. Mix powdered sugar, softened butter, milk, and green food coloring in a bowl. Beat it for about two minutes until light, smooth, and spreadable. You want the frosting to hold its shape like soft grass. If it’s too thin, add a spoonful of powdered sugar. Too thick? A splash more milk does the trick.
Now grab those Milano cookies—your edible tombstones. Use black decorating gel to write “RIP” on the top of each one. It doesn’t have to be perfect. Uneven lettering actually adds to the creepy charm. For a better fit, you can slice a small bit off the bottom of each cookie so it sits flat in the brownie.
Carefully press each cookie into the top edge of a brownie, standing upright like a gravestone. Don’t worry if it leans a little—it just makes it look older and spookier.
Tips for Foolproof Halloween Brownie Assembly
Keep a few helpful tips in mind for the cleanest, easiest decorating:
- Always let brownies cool completely before cutting or decorating. This keeps the edges sharp and prevents frosting from melting.
- Use parchment paper in your pan for easy lift-out and cleaner slices.
- When applying frosting, use a spoon or piping bag to create a grass-like swirl near the tombstone.
- Press one candy pumpkin gently into each swirl of frosting. If they’re too wobbly, add a dab of frosting to the bottom for grip.
By now, your Halloween brownies should look like a mini graveyard—cute, eerie, and totally irresistible.
Serving, Storage, and Variations of Halloween Brownies
How to Store Halloween Brownies for Maximum Freshness
After all that decorating, you’ll want your Halloween brownies to stay fresh and festive for as long as possible. The good news? They store beautifully.
Once the frosting has set and decorations are firm, gently place the brownies in a single layer in an airtight container. If you need to stack them, separate layers with parchment or wax paper to protect the tombstones and pumpkins.
You can keep Halloween brownies at room temperature for up to 2 days. If you’d like them to last a bit longer, store them in the fridge for up to 5 days. Just let them sit at room temperature for 10–15 minutes before serving so the brownie texture softens up again.
Planning ahead? These brownies also freeze well. Just leave off the pumpkins and frosting until you’re ready to serve. Wrap each brownie individually in plastic wrap, then store in a freezer-safe container for up to 2 months.
Creative Variations to Try Next Time
Once you’ve made Halloween brownies the classic way, it’s fun to play with the decorations. Here are a few ideas that bring spooky vibes with a creative twist:
- Zombie hands: Add gummy worms or green candy fingers poking out of the “dirt.”
- Eyeball brownies: Use candy eyeballs instead of pumpkins for a creepy stare.
- Spiderweb design: Pipe white chocolate in spiderweb patterns over the green frosting and top with a candy spider.
If you’re hosting a party, you could even set up a decorating station and let guests customize their own Halloween brownies. It’s messy, hilarious, and a guaranteed crowd-pleaser.
However you decorate them, these brownies always bring joy and just the right amount of spooky fun to the table.
FAQ: Halloween Brownies — Your Questions Answered
Q1: How do you decorate brownies for Halloween?
Decorating Halloween brownies is all about creativity and fun. Start with a cooled brownie base cut into squares or rectangles. Add tombstone cookies like Milanos with “RIP” written in black gel, pipe on green buttercream to look like grass, and top each piece with a candy pumpkin. You can also add gummy worms, candy eyeballs, or drizzle colored icing for extra spooky flair.
Q2: Can I use boxed brownie mix for Halloween brownies?
Absolutely. Boxed brownie mix works perfectly for Halloween brownies and saves time. Brands like Ghirardelli produce rich, fudgy results that hold up well under decorations. Just follow the box instructions, bake in an 8×8-inch pan, and let them cool before decorating.
Q3: What candy goes well with Halloween brownies?
Candy pumpkins are a classic choice, but you can also use candy corn, gummy worms, or chocolate eyeballs. Small M&Ms or Reese’s Pieces add fun color, while edible glitter or Halloween sprinkles give brownies extra sparkle.
Q4: How long do Halloween brownies last?
Halloween brownies last about 2 days at room temperature in an airtight container. For longer storage, refrigerate for up to 5 days. You can also freeze undecorated brownies for up to 2 months—just add toppings after thawing for the best texture and appearance.
Conclusion: Make This Halloween a Little Sweeter—One Brownie at a Time
Halloween brownies aren’t just a dessert—they’re a tradition in the making. Whether you go all-out with zombie hands and candy eyeballs or keep it simple with tombstone cookies and green frosting, these treats are guaranteed to impress. They’re easy to make, fun to decorate, and perfect for sharing at parties, school events, or cozy nights at home. So grab your brownie mix (or your best homemade recipe), gather a few spooky toppings, and create your own little graveyard in a pan. Trust me—once you make Halloween brownies, you’ll find a reason to bake them every October.