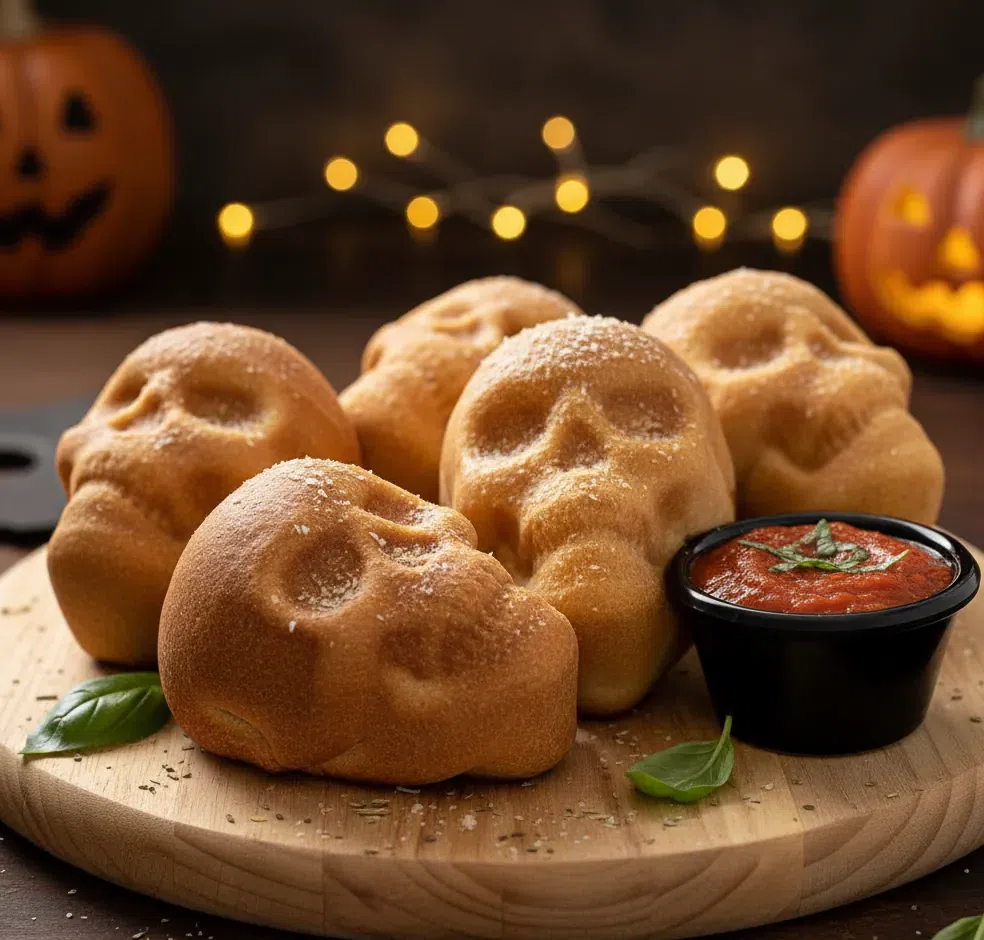
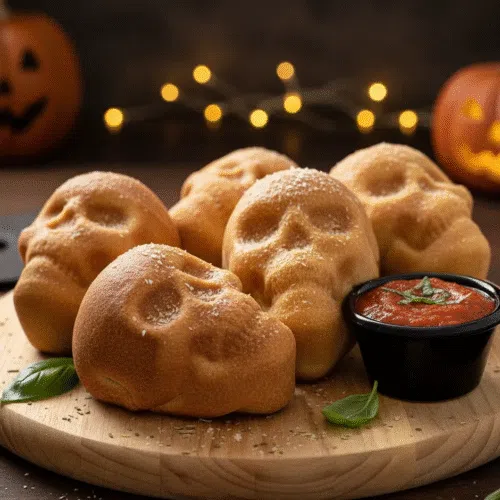
When Halloween rolls around, the treats don’t all have to be sugary. Some of the most memorable dishes are savory, cheesy, and just a little bit creepy—in the best way possible. That’s where cheesy Halloween pizza skulls come in.
Shaped like spooky skulls and bursting with gooey mozzarella, sauce, and your favorite pizza toppings, these are guaranteed to be the hit of any Halloween party. They’re easy to make, super customizable, and come together using store-bought pizza dough and a silicone skull mold. Let’s talk about how to make these terrifyingly tasty treats step-by-step.
The Doughy Foundation: Choosing & Shaping the Crust
What Kind of Dough Should You Use?
The beauty of these cheesy Halloween pizza skulls is that they’re incredibly flexible when it comes to dough. You can use a refrigerated rolled-out pizza crust or grab a bag of fresh dough from the bakery section of your grocery store. Either option works, but the key is thickness.
Roll the dough out to ¼-inch thick—not thinner. If it’s too thin, it will tear when filled. If it’s too thick, the outside will bake faster than the inside, leaving you with raw centers. You’re looking for that balance: sturdy enough to hold fillings, thin enough to get crispy.
To prep, lightly flour your surface and roll out the dough, then cut it into 6 rectangles. Don’t worry about perfect shapes—the dough will stretch a little to fit the mold. Imperfection adds to the eerie look, anyway.
Getting the Dough into the Skull Mold
Each dough rectangle will form the base and top of one pizza skull. Lightly press a rectangle into each cavity of the skull baking mold, letting the edges hang over the sides. This makes it easier to fold and seal once your fillings are added.
Grease the mold thoroughly before adding the dough. This is non-negotiable. Even nonstick pans can cause sticking with pizza dough, and you don’t want to lose your skull shape.
Once your dough is shaped in the mold, you’re ready for the fun part—stuffing them full of flavor.
Cheesy Halloween Pizza Skulls
Ingredients
- 13 to 16 ounces of pre-made pizza dough (you can get boxed rolled out dough or fresh pizza dough to roll (usually sold in a ball in bags.
- 3/4 to 1 cup pizza sauce
- 2 cups shredded mozzarella
- Parmesan cheese about 1/4 cup
- Choose your favorite toppings:
- Cooked sausage about 8 ounces for 6 pizza skulls
- Mini pepperoni about 6 ounces for 6 pizza skulls
- Black olives sliced
- Sliced ham chopped
- Crumbled crispy bacon Mini Italian meatballs
- Cooked corn kernels
- Baby spinach Fresh basil
- To serve:
- Marinara sauce for dipping
- Chopped parsley or basil
Instructions
- Spray the mini skull baking tin with cooking spray.
- Dust the counter lightly with flour to prevent the dough from sticking. Roll, pat, or stretch the dough out until it is roughly 1/4″ thick. Cut the dough into 6 rectangles. Don’t worry if they aren’t perfectly shaped or exactly equal in size.
- Working with one piece of dough at a time, lay each dough piece into the skull cavity and start filling it with sauce, mozzarella, a sprinkle of Parmesan cheese and your desired toppings. After adding the toppings, add a little bit of pizza sauce on top before sealing the dough (no more than a tablespoon).
- Fold the dough over the fillings, pinching the dough together to seal them (like a small pizza pocket). Continue until the 6 pieces have been filled and sealed.
- Refrigerate the skull pizza tray while you preheat the oven.
- Preheat the oven to 400 degrees Fahrenheit.
- Remove the tray from the refrigerator and bake for 16 to 20 minutes or until lightly golden brown (some pre-made doughs may need more or less time).
- Remove from the oven and allow it to cool for 5 minutes. Unmold and serve with marinara sauce and chopped parsley or basil (optional).
Notes
Be careful not to overfill the pizza pockets as they could open up and spill. Overfilled stuffed pizza takes longer to cook and could potentially get too dark on top while remaining doughy at the bottom. Nutrition
Calories: 270kcal | Carbohydrates: 32g | Protein: 13g | Fat: 10g | Saturated Fat: 5g | Polyunsaturated Fat: 1g | Monounsaturated Fat: 2g | Cholesterol: 29mg | Sodium: 839mg | Potassium: 130mg | Fiber: 1g | Sugar: 5g | Vitamin A: 385IU | Vitamin C: 2mg | Calcium: 193mg | Iron: 2mg
Stuff It Scary: Sauce, Cheese & Topping Combos That Slay
How to Layer Without Overflowing
Stuffing these cheesy Halloween pizza skulls is where all the fun begins—but there’s a method to the madness. Too much filling, and your skulls will burst at the seams. Too little, and they’ll fall flat (literally). Aim for balanced layers that include sauce, cheese, and a mix of toppings.
Start with a small spoonful of pizza sauce at the bottom, just enough to coat. Then add a generous pinch of shredded mozzarella. After that, drop in your toppings—think mini pepperoni, crumbled sausage, or sliced black olives. Finish with another layer of cheese and a light splash of sauce on top. The final sauce helps everything stick together and adds flavor all the way through.
Keep each skull to around 2 to 3 tablespoons total filling. That might not sound like much, but it’s just right to ensure a sealed, cook-through pocket that still stretches and oozes like pizza should.
Best Halloween-Inspired Toppings for Skull Pizza
This recipe is incredibly versatile—perfect for picky eaters, creative cooks, or anyone throwing a Halloween bash.
Here are some top spooky topping ideas:
- Mini meatballs or crumbled bacon for texture
- Sliced black olives as creepy “eye sockets”
- Corn kernels for a golden, candy-corn pop
- Chopped ham for a smoky contrast
- Fresh baby spinach or basil for color and freshness
Want to go meatless? Use roasted mushrooms, vegan pepperoni, or smoky tempeh crumbles instead. Add a dash of hot sauce or red pepper flakes if your crowd loves heat.
Don’t forget to sprinkle a little Parmesan over everything before sealing—it adds richness and helps the filling stay creamy and thick rather than watery.
Once stuffed, gently fold the dough flaps over the fillings and pinch the seams tightly. The goal is a secure seal so the cheese melts inside instead of leaking out.
Once all six skulls are stuffed and sealed, refrigerate the tray while the oven preheats. This chill time helps the dough firm up and prevents blowouts during baking.
Baking & Unmolding: From Raw Dough to Golden Skulls
Oven Time and Temperature
Once your filled skulls have chilled in the fridge for a few minutes, it’s time to preheat your oven to 400°F (204°C). That chill time is key—it helps the dough hold its shape, especially with those filled pockets and detailed molds.
Every oven is a little different, but the sweet spot for these cheesy Halloween pizza skulls is usually between 16 and 20 minutes. The tops should turn a light golden brown, and you might see a bit of bubbling sauce around the edges—that’s your cue they’re nearly done.
If you’re using a thicker dough or added heavier fillings (like meatballs or extra cheese), check around the 18-minute mark and give them an extra minute or two if needed. Undercooked skulls might look done on top but feel doughy at the base.
Use a toothpick or skewer inserted through one of the seams to check—if it comes out clean and hot, you’re good to go.
How to Unmold Without Losing the Shape
This is the moment of truth. Done right, your skulls will pop out of the mold in one creepy, glorious piece. Here’s how to do it:
- Let them cool in the mold for 5 minutes. This helps the dough firm up and prevents tearing.
- Use a silicone spatula or offset knife to gently loosen the edges, especially if you see cheese trying to escape.
- Invert the mold over a wire rack or parchment-lined tray and tap it lightly. The skulls should slide out. If they don’t, give each one a gentle push from the bottom.
Silicone molds release more easily than metal, but both work well if greased thoroughly before baking. Don’t skip that step!
If your skulls have extra dough hanging off the back (from where you sealed them), you can trim it slightly for a cleaner shape—or leave it for extra crunch.
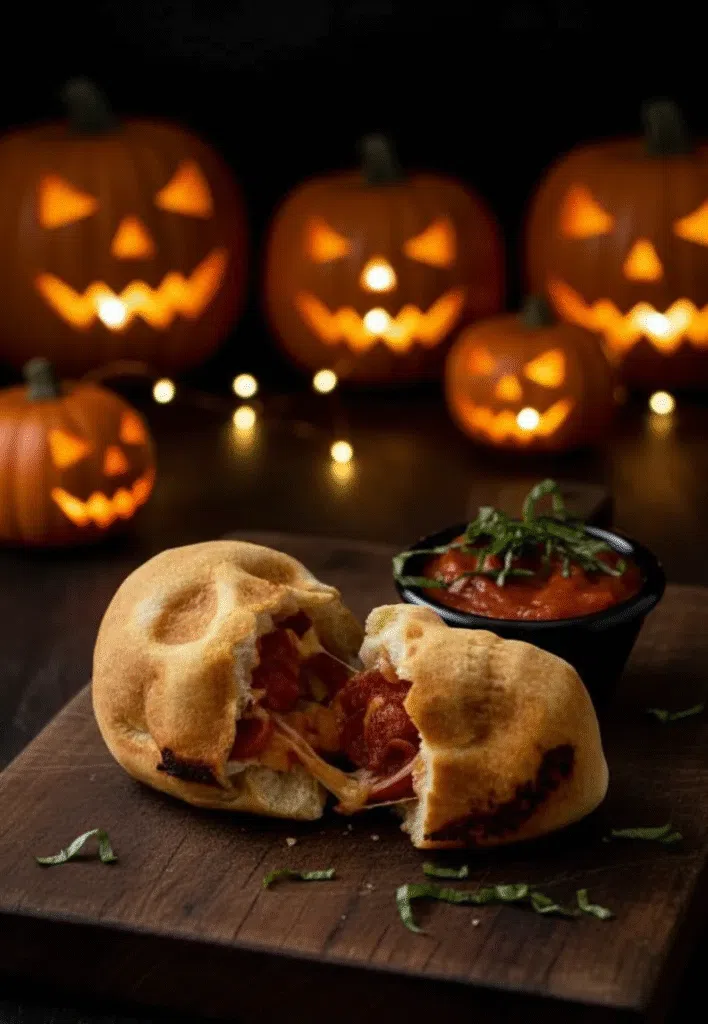
The finished result? A batch of eerie, grinning skulls with crispy edges, gooey centers, and endless Halloween charm.
Serve, Dip & Store: The Final Bite of the Halloween Feast
How to Serve Pizza Skulls Like a Pro
Fresh out of the oven, your cheesy Halloween pizza skulls are practically begging to be served. But don’t just toss them on a plate—make them the centerpiece of your Halloween spread.
Here’s how to turn these skulls into showstoppers:
- Place them on a dark slate or black platter to play up the Halloween vibe.
- Serve with small bowls of warm marinara sauce for dipping. The contrast of red sauce oozing from the mouth of a skull? Genuinely spooky—and delicious.
- Sprinkle chopped parsley or basil over the top just before serving. It adds color and a fresh aroma, plus it makes the dish feel more complete.
- Want a little heat? Offer crushed red pepper flakes or a spicy garlic oil on the side.
These are perfect for parties, kids’ lunches, or spooky movie nights. They’re hand-held, filling, and endlessly fun to eat. If you’re serving a crowd, double the recipe—people always go back for seconds.
Make-Ahead & Storage Tips
Got leftovers? Lucky you.
Here’s how to keep your cheesy Halloween pizza skulls tasting just as good the next day:
- Fridge: Store cooled skulls in an airtight container in the refrigerator for up to 3 days.
- Reheat: To keep the crust crispy, reheat in a toaster oven or regular oven at 350°F for 8–10 minutes. Microwaving works, but the crust will soften.
- Freezer: Want to freeze them? Go ahead! Wrap each skull tightly in foil or plastic wrap, then place in a freezer bag. They’ll keep for up to 2 months. Reheat from frozen at 375°F for about 20–25 minutes.
Want to make them ahead of time for a party? Bake them fully, let them cool, then refrigerate. Reheat them on a baking sheet just before serving.
FAQ: Cheesy Halloween Pizza Skulls
Can you make Halloween pizza skulls ahead of time?
Yes! Assemble and refrigerate them raw, or bake them in advance and reheat before serving. They’re freezer-friendly, too.
What type of dough works best for pizza skulls?
Pre-made pizza dough (rolled or fresh in a ball) works great. Just roll it to ¼-inch thickness to ensure it cooks evenly.
How do you keep cheesy pizza skulls from sticking to the mold?
Grease your skull pan thoroughly with cooking spray or oil before adding the dough. Let skulls cool slightly before unmolding.
What are the best fillings for Halloween pizza skulls?
Mozzarella, pizza sauce, pepperoni, sausage, olives, mushrooms, or mini meatballs. Vegetarian and spicy combos work well too!
Conclusion
Cheesy Halloween pizza skulls are the perfect savory twist on spooky-season baking. Easy to make, fully customizable, and endlessly fun to serve, they bring together everything you love about pizza—with just the right amount of fright.
Whether you’re throwing a haunted house party or just looking for a fun kitchen project with the kids, these little skulls deliver major flavor with minimal fuss. And once you see them disappear from the table, you’ll know they’re officially part of your Halloween tradition.