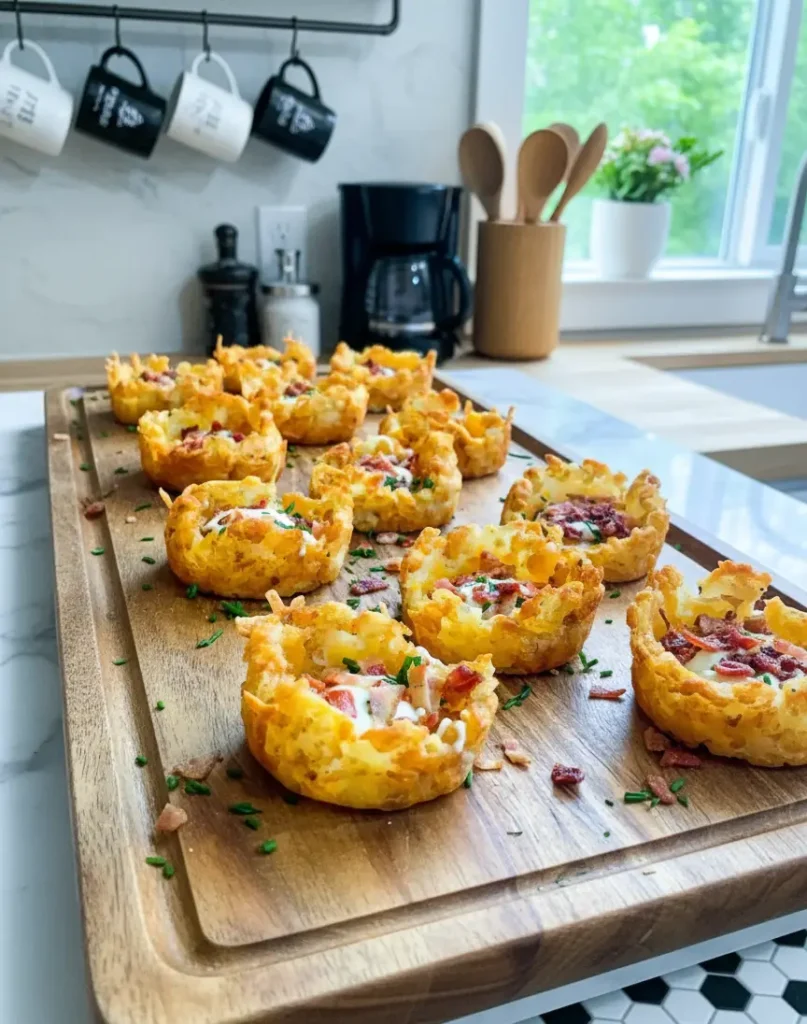
There’s something instantly comforting about the combination of crisp potatoes, melted cheese, and smoky bacon. These tater tot appetizer cups aren’t just another party snack—they’re a bite-sized upgrade that disappears fast at any gathering. Whether you’re hosting game night or looking for a quick fix that feels a little fancy, this recipe nails the sweet spot between effortless and impressive. We’ll walk you through how to get those crispy cups just right, how to fill them with bold flavor, and how to keep guests coming back for more.
From Snack Hack to Star Appetizer
When Crispy Meets Cheesy
One snowy Friday night, I was scrounging through my freezer for anything remotely snackable. All I had was a half-used bag of frozen tater tots and some leftover cheese. Rather than pile them onto a tray, I tossed a few into a muffin tin and hoped for the best. Ten minutes in, an idea struck: what if I shaped them into cups? I grabbed a juice glass, gave each pile a press, and before long, I had a golden crust just begging to be filled. A little cheese, a few bacon crumbles, and a dollop of sour cream later—bam! Tater tot appetizer cups were born. The kids inhaled them. My neighbor asked for the recipe. And just like that, a leftover rescue mission became my go-to party bite.
Why Tater Tot Appetizer Cups Are a Win
They’re crispy on the outside, soft on the inside, and loaded with savory toppings. What’s not to love? These cups turn frozen tater tots into something totally new—something you can prep ahead, serve warm, and top however you like. The muffin tin gives structure, while the oven crisps each cup into a perfect handheld shell. And because they’re made with just a handful of basic ingredients, they’re friendly on your time and budget too. Whether you’re feeding picky kids or impressing adult guests, these appetizer cups check all the boxes: simple, delicious, and downright addictive.

Tater Tot Appetizer Cups
Equipment
- muffin pan
- non-stick cooking spray
- shot glass
Ingredients
- 48-60 frozen tater tots 16-oz bag
- ¾ cup cheddar cheese shredded
- ½ cup sour cream
- 4 slices bacon cooked and crumbled
- 2 green onions sliced (green part only)
Instructions
- Preheat oven to 450ºF. Spray muffin pan cups with cooking spray.
- For mini-sized muffin pan: Place 2-3 tots in each muffin cup. For regular sized muffin pan: Place 4-5 tots in each muffin cup.
- Place muffin pan on bottom rack of the oven and bake 10 minutes. Remove the pan from the oven.
- Spray bottom of shot glass or small juice glass with cooking spray.
- Leave a small gap between the glass and cupcake pan opening. Twist the glass or container until the edges of the potatoes are close to the top of the muffin tin opening to create a potato cup. See video below for a demostration.
- Return to oven; bake additional 15 minutes or until deep golden brown.
- Add 1 tablespoon of cheese to each potato cup. Bake for 4-5 minutes, or until the cheese has melted. Transfer to platter and let cool for 5 minutes.
- Garnish and top the loaded tater tot appetizer cups with sour cream, bacon, and green onions. Serve warm.
Notes
Store leftovers in an air-tight container in the refrigerator for up to 5 days.
Reheat in the oven or air fryer at 350ºF for 10 minutes or until warmed.
Make Ahead Instructions:
Prepare the recipe as directed in steps 1-5, then refrigerate. Before serving, cover the muffin tin with foil and bake the tater tot cups at 400ºF for 10 minutes or until crispy and golden. Garnish with toppings (step 6) and serve.
This recipe was inspired by a Kraft foods recipe. Nutrition
Serving: 1serving | Calories: 115kcal | Carbohydrates: 10g | Protein: 3g | Fat: 8g | Saturated Fat: 3g | Cholesterol: 13mg | Sodium: 208mg | Potassium: 122mg | Fiber: 1g | Sugar: 1g | Vitamin A: 150IU | Vitamin C: 3mg | Calcium: 68mg | Iron: 1mg
Building the Perfect Tot Cup
Tools and Tips for Foolproof Cups
If you’ve ever made tater tots in a single layer on a baking sheet, you know how easily they crisp up. But to transform them into edible cups, you’ll need one simple but effective kitchen hack: a muffin pan and a shot glass. Mini muffin pans work best for bite-sized portions, while regular ones give you a more filling option. The goal is to fit 2–3 tots per mini cup or 4–5 in a standard one.
Here’s the trick: after a short bake on the bottom rack, press the semi-softened tots down into the muffin wells with the bottom of a sprayed shot glass or small cup. Twist gently as you press—this helps push the tots up the sides without tearing. Leave a little gap at the top so the edges crisp properly. It takes just a few seconds per cup but makes a big difference in structure and texture.
Use non-stick cooking spray generously. You want easy release and an even golden crust. Once the cups are shaped and back in the oven, the heat takes care of the rest. In just 15 more minutes, you’ll have a base that holds together beautifully and stands up to gooey toppings without falling apart.
Customizing for Any Gathering
One of the best things about tater tot appetizer cups is how flexible they are. Hosting brunch? Swap the cheddar for gruyère, add crumbled sausage, and top with a scrambled egg. Going vegetarian? Ditch the bacon and pile on black beans, corn, and pepper jack for a Tex-Mex twist.
You can even go full party mode with a bar-style setup. Bake the cups in advance, then let guests choose their own toppings—cheese, sour cream, hot sauce, diced pickles, or jalapeños. This makes them a fun, interactive option for family nights or casual get-togethers. And if you’re keeping it kid-friendly, a simple combo of cheese and bacon always hits the mark.
Bake, Fill, Garnish, Serve
The 3-Phase Cooking Process
What makes these tater tot appetizer cups so craveable is how each step builds layers of crispness, flavor, and texture. The process may sound detailed, but it’s totally beginner-friendly once you get into the rhythm.
Phase 1: Bake and Soften
Start by preheating your oven to 450ºF. Spray your muffin pan generously with non-stick cooking spray, then place frozen tots into each well—about 2–3 for a mini pan, or 4–5 if you’re using standard size. Slide the tray onto the bottom rack and bake for 10 minutes. This softens the tots just enough so they’re easy to mold.
Phase 2: Shape and Crisp
After baking, remove the pan from the oven and grab your prepared shot glass (sprayed with cooking spray to prevent sticking). Press the tots gently down and outward to form a “cup” shape. The twisting motion helps bring the edges up the sides, giving you a sturdy potato base. Return the pan to the oven and bake for another 15 minutes, until the edges are golden and crisp.
Phase 3: Fill and Finish
Once the cups are done, sprinkle about 1 tablespoon of shredded cheddar into each. Slide the pan back in for 4–5 minutes—just long enough to melt the cheese. Remove, let them rest for 5 minutes, then gently lift each cup out. Top with sour cream, crumbled bacon, and a pinch of sliced green onion.
Serving Suggestions & Pairings
These tater tot appetizer cups are best served warm, when the edges are still crunchy and the cheese is perfectly gooey. Arrange them on a platter for easy grabbing. If you’re feeding a crowd, consider doubling the recipe—they disappear fast.
Pair them with simple dips like ranch or spicy aioli for an extra hit of flavor. They also work well with casual drinks: think cold beers, hard seltzers, or even sparkling lemonade for a family-friendly spin. Whether you’re hosting a game-day bash, birthday party, or just Tuesday night snacks, these cups fit right in.
Got picky eaters or guests with food sensitivities? Leave some cups plain or with just cheese, and set out toppings buffet-style. This small-bite format makes it easy to please everyone without extra work.
Make-Ahead and Storage Hacks
Prepping Ahead for Parties
Entertaining shouldn’t mean being stuck in the kitchen while everyone else is having fun. That’s where these tater tot appetizer cups really shine—they’re perfect for prepping in advance without losing their crunch factor.
To get a head start, follow steps 1 through 5 of the recipe: bake the tots, press them into cups, return to the oven, and shape them until golden brown. Once cooled slightly, just pop the whole muffin tin into the fridge. You can store the pre-baked, unfilled cups this way for up to 24 hours.
When it’s time to serve, preheat your oven to 400ºF. Cover the muffin pan with foil and reheat for about 10 minutes until the cups are hot and crisp again. Then add your cheese and toppings as usual, giving them a final short bake to melt everything perfectly. This approach keeps the cups fresh while saving you time during party prep.
Hosting a large group? You can easily scale this recipe by using multiple muffin tins or baking in batches. These cups are a great fit for brunch buffets, potlucks, and even tailgates—just reheat them on-site in a toaster oven or air fryer.
Reheating for Maximum Crispness
Got leftovers? You’re lucky if they last long enough. Store any extra tater tot cups in an airtight container in the fridge for up to 5 days. For best results, avoid microwaving—they’ll turn soggy fast. Instead, reheat them in the oven or air fryer at 350ºF for about 10 minutes.
The air fryer works especially well for bringing back that crispy, just-baked texture. If you’re reheating in the oven, line a tray with foil and avoid stacking the cups. You want hot air circulating around each one.
Avoid adding toppings like sour cream or green onions before storing—keep those fresh and add them after reheating. That way, the toppings don’t wilt, and the cups stay picture-perfect.
Frequently Asked Questions
How many tater tots are in a cup?
On average, one cup holds about 8–10 tater tots, depending on their size and how tightly they’re packed. For this recipe, when using a standard muffin tin, you’ll use 4–5 tots per cup, which equals roughly half a cup. Mini muffin tins hold about 2–3 tots, closer to a third of a cup.
What are tater tots called in British?
In the UK, tater tots aren’t as commonly known by that name. They’re typically referred to as “potato croquettes” or “mini hash browns.” While the shape and crisp texture may be familiar, the term “tater tots” is an American brand name that hasn’t caught on the same way overseas.
What exactly are tater tots made of?
Tater tots are made from grated or finely chopped potatoes that are seasoned, shaped into small cylinders, and then deep-fried or baked until crispy. Most store-bought versions contain oil, salt, and a touch of flour or starch to help them hold their shape.
Are tater tots highly processed food?
Yes, commercially frozen tater tots are considered a processed food. They often contain additives like preservatives, stabilizers, and oils to maintain texture and shelf life. That said, they can still be enjoyed in moderation—especially when paired with whole ingredients like fresh toppings or homemade dips.
Conclusion
Tater tot appetizer cups are the kind of recipe that turns everyday ingredients into something a little more exciting. With just a muffin tin and a bag of frozen tots, you get crunchy, cheesy bites that are easy to prep, easy to serve, and even easier to love. Whether you’re feeding a crowd or just treating yourself, these tot cups prove that big flavor really can come in small packages. Keep it simple, make them ahead, and get ready for everyone to ask you for the recipe.