Article Introduction
Dirt pudding cups are the kind of dessert that instantly makes people smile. With layers of creamy chocolate pudding, crushed cookies, and wiggly gummy worms, they’re part treat, part nostalgia. Whether you’re planning a birthday bash, Halloween party, or just want something playful after dinner, this recipe is for you. Today, we’ll walk through exactly how to make dirt pudding cups that taste as good as they look. Plus, we’ll answer the most common questions like how to store them and whether cream cheese is really necessary. Let’s dive in.
Why Dirt Pudding Cups Are the Perfect Party Treat
Childhood Memories in a Cup
I still remember the first time I had a dirt pudding cup. It was at a summer potluck, and I was probably seven. Someone handed me a plastic cup filled with what looked like actual dirt, topped with gummy worms. I thought it was a joke—until I took a bite. Chocolatey, creamy, crunchy… it was perfect. That moment stuck with me. Now, as a mom of twins, I love recreating that memory with my own twist on this classic.
These dirt pudding cups have become our go-to for birthdays and classroom parties. They’re easy to prep in advance, kid-approved, and just messy enough to be fun without causing chaos. Best of all, they never fail to get a laugh.
The Magic Behind This No-Bake Dessert
There’s no baking involved, no complicated tools, and no risk of anything flopping. This recipe is foolproof. That makes it ideal for beginners, kids in the kitchen, or anyone short on time. In fact, all you need is about 20 minutes, a few bowls, and some everyday ingredients like instant pudding mix, milk, and cookies. The real fun happens when you decorate the tops with gummy worms, chocolate rocks, or even edible flowers.
The visual appeal? It’s irresistible. Especially for kids. But let’s be honest—adults love them just as much. There’s something about the surprise of “dirt” that brings out the inner child in everyone.
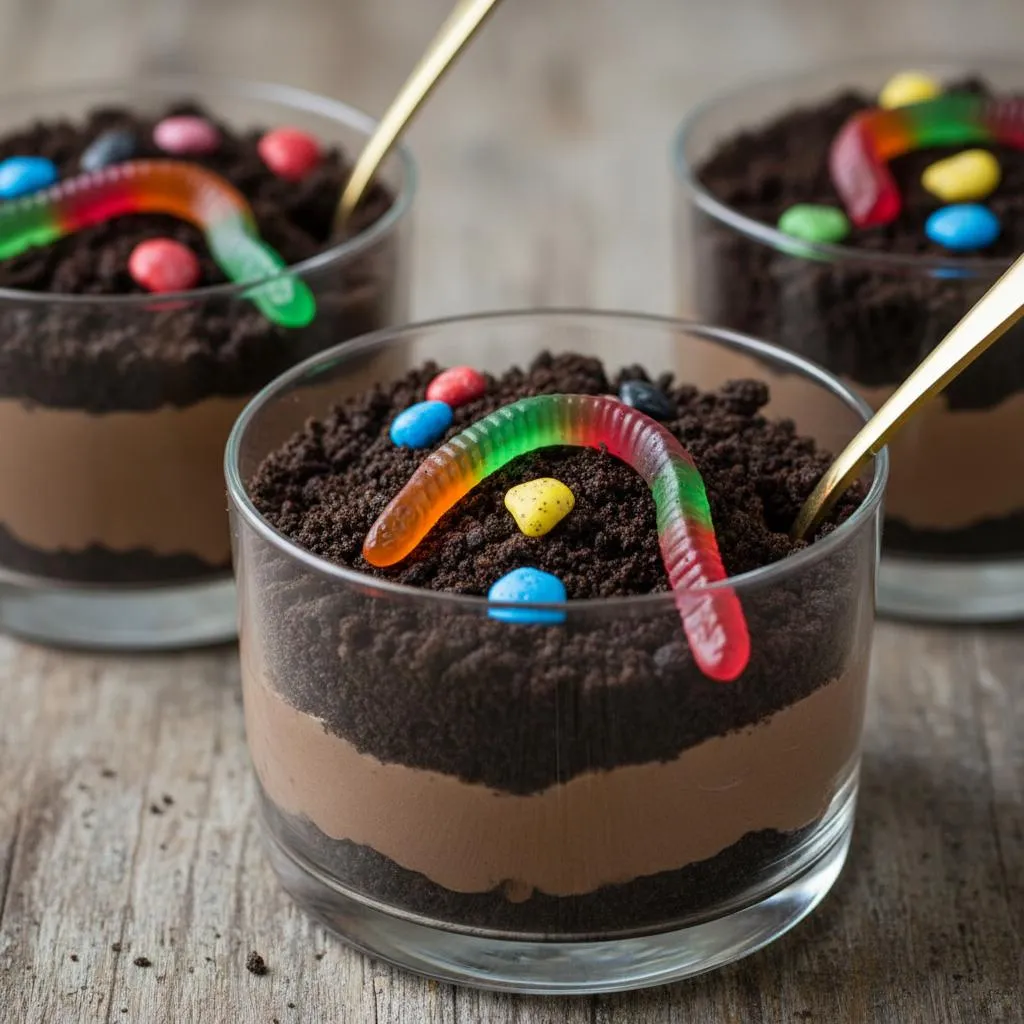
Dirt Pudding Cups
Ingredients
- ▢1 package chocolate sandwich cookies (15 oz), like Oreos, about 30 cookies
- ▢1 package chocolate instant pudding (3.9 oz)
- ▢16 fl oz milk (2 cups), cold
- ▢12 fl oz heavy cream (1 ½ cups)
- ▢24 gummy worms
- ▢Chocolate rocks optional
Instructions
- Place the cookies in a food processor, and pulse in long bursts until the cookies are in fine crumbs.
- If you don’t have a food processor, place all the cookies in a heavy-duty gallon zip-top bag. Roll over the cookies with a rolling pin, pausing to adjust the bag and shift the cookies around as necessary. Smash/pound/roll them until they are mostly fine crumbs, with some small chunks remaining.
- In a large bowl, whisk together the instant pudding and milk, and whisk until it’s smooth and free of lumps. Let the pudding set for 5-7 minutes, until it has a thick, pudding-like texture.
- While you wait, whip the heavy cream to medium firm peaks.
- Once the pudding is set and the cream is whipped, gently fold the cream into the pudding.
- Add three-quarters of the cookie crumbs and stir them in to the pudding.
- Divide the pudding between eight 8-oz cups or jars.
- Stick 3 worms into the top of each cup.
- Spoon the remaining cookie crumbs on top of each cup and spread them out into an even layer. Top with chocolate rocks, if you have them.
- Enjoy immediately, or refrigerate until ready to serve. Cover leftovers with plastic wrap, and store in the refrigerator for up to a week.
Notes
Our recipes are developed using weight measurements, and we highly recommend using a kitchen scale for baking whenever possible. However, if you prefer to use cups, volume measurements are provided as well. PLEASE NOTE: the adage “8 oz = 1 cup” is NOT true when speaking about weight, so don’t be concerned if the measurements don’t fit this formula.
How to Build the Perfect Dirt Pudding Cup
Choosing the Right Ingredients for Flavor & Fun
To make unforgettable dirt pudding cups, start with the basics: chocolate sandwich cookies, instant chocolate pudding, cold milk, heavy cream, and of course, gummy worms. Stick with a classic like Oreos—they crumble beautifully and balance sweetness without overpowering the pudding.
You’ll need about 30 cookies for a full batch. Blitz them in a food processor or crush them by hand in a sturdy zip-top bag. You’re looking for a mix of fine crumbs and small chunks. Too powdery, and you’ll lose that satisfying bite.
For the pudding, instant chocolate pudding mix is your best bet. It sets quickly, and when combined with cold milk and whipped cream, you get that luscious mousse-like texture that’s rich without being heavy.
Now let’s talk cream. Some recipes call for Cool Whip, but if you have a few extra minutes, whip your own heavy cream. It’s fresher, fluffier, and tastes miles better. Fold it gently into the pudding—don’t rush it, or the mixture could turn runny.
Getting the Texture Just Right
The magic of dirt pudding cups is in the layering. The pudding should be silky, thick, and chocolatey. The cookie crumbs should be crumbly—not dusty—and the gummy worms should peek out like they’re crawling through soil.
Want to get fancy? Add chocolate rocks or candy flowers for an extra-special touch. Serve in clear cups so you can see the layers. It’s part of the fun.
Chill the cups for at least 30 minutes if you’re not serving them right away. The rest time helps the pudding firm up and makes scooping even more satisfying.
In the next section, we’ll cover creative ways to serve and customize your dirt pudding cups for any occasion—from Halloween to baby showers.
Creative Ways to Serve Dirt Pudding Cups
Seasonal Twists for Every Celebration
Dirt pudding cups are incredibly versatile. Once you’ve got the base recipe down, you can dress them up for nearly any event. Hosting a Halloween party? Use green pudding (just add a drop of food coloring), candy eyeballs, and bone-shaped sprinkles. For Easter, mix in pastel-colored candies and chocolate eggs. And during the summer, add gummy frogs, flowers, or mini umbrellas for a garden or camping theme.
For baby showers or birthdays, match the topping colors to the theme. Swap gummy worms for pink and blue candies, edible glitter, or even tiny fondant animals. If you’re entertaining adults, top them with chocolate shavings or espresso dust and skip the worms altogether. The dessert still wows—just in a more refined way.
Need a last-minute dessert? This recipe scales up beautifully. Make a big trifle dish of layered pudding and cookie crumbs for a crowd-pleaser. Guests can scoop their own servings.
Make-Ahead and Storage Tips
One reason dirt pudding cups are a favorite in our house? You can make them ahead. In fact, they’re even better after a short chill. Make them the night before and keep them in the fridge, covered tightly with plastic wrap. They’ll stay fresh for up to a week.
If you’re prepping for a party, assemble everything except the top layer of cookie crumbs. Add that just before serving to keep the texture crisp. Gummy worms can go in early, though—they hold up well.
Planning to take them on the go? Use jars with lids or lidded plastic cups to prevent spills. They’re portable, neat, and still totally fun to eat.
Now, let’s walk through the most common questions people ask about making dirt pudding cups—because if you’re wondering, chances are others are too.
FAQ: Your Dirt Pudding Cup Questions Answered
What is dirt pudding made of?
Dirt pudding is made with crushed chocolate sandwich cookies (like Oreos), instant chocolate pudding, cold milk, whipped cream or Cool Whip, and gummy worms. The cookies create the “dirt,” and the pudding forms the creamy base.
Can I make dirt cups ahead of time?
Yes, dirt pudding cups can be made ahead! In fact, chilling them for a few hours (or overnight) improves their texture. Just keep them covered in the refrigerator and add the top layer of cookie crumbs right before serving to keep them crisp.
How long do dirt pudding cups last in the fridge?
When stored properly with plastic wrap or in airtight containers, dirt pudding cups can last up to 7 days in the refrigerator. The texture holds up well, though the cookies may soften slightly over time.
Can I make dirt pudding without cream cheese?
Absolutely. This recipe skips the cream cheese entirely and still delivers a rich, creamy texture. The combo of instant pudding and freshly whipped cream gives it a smooth and fluffy consistency—no cream cheese needed.
Common Mistakes and Easy Variations
Mistakes to Avoid for Better Results
Even though dirt pudding cups are easy, a few simple missteps can affect the result. First, don’t use warm milk. Instant pudding won’t set correctly unless the milk is very cold. Also, don’t skip the wait time after mixing the pudding. It needs 5–7 minutes to thicken.
Another common error? Overmixing the whipped cream into the pudding. Be gentle. You want to fold it in slowly to keep the mousse-like texture light and fluffy.
Make sure your cookie crumbs aren’t too fine—they’ll turn dusty and disappear into the pudding. A mix of crumb sizes gives you that classic dirt look and adds texture.
Fun Variations Worth Trying
Once you’ve mastered the classic, try giving your dirt pudding cups a twist. Chocolate lovers can stir mini chocolate chips or chunks into the pudding. For a mint version, use mint Oreos and a touch of peppermint extract in the pudding.
Looking for something lighter? Swap the chocolate pudding for vanilla or banana, and use vanilla cookies for “sand cups.” Top with teddy grahams or sour candy sea creatures for a beach-themed version.
Another idea: Make layered parfaits using alternating layers of chocolate pudding, crushed cookies, and whipped cream. It adds more visual contrast and gives each bite more variety.
For allergy-friendly versions, try gluten-free cookies or dairy-free pudding and cream substitutes. With the right ingredients, everyone can enjoy this playful dessert.
Conclusion
Dirt pudding cups are more than just a dessert—they’re a memory-maker. Whether you’re whipping them up for a classroom party, a weekend treat, or a fun project with your kids, they always hit the sweet spot. With just a few ingredients and a bit of layering, you get a dessert that’s playful, chocolatey, and surprisingly satisfying.
This version skips the cream cheese, keeps things light and fluffy, and adds just enough crunch from those cookie crumbs. Don’t be afraid to mix things up with your own creative toppings and variations. The joy is in the making—and the giggles that come with gummy worms peeking out of “dirt.”
So grab your mugs, roll up your sleeves, and get a little messy. These pudding cups prove that fun and flavor can go hand in hand.