There’s something almost magical about fall. The crisp air, the warm drinks, and the scent of cinnamon drifting through the kitchen. One chilly October afternoon, my twins came home from school asking for pie. I hadn’t even preheated the oven—but I did have marshmallows, cereal, and a jar of pumpkin pie spice.
That’s when these Pumpkin Pie Rice Krispies Treats were born—sweet, spiced, no-bake goodness shaped like a festive dessert. It’s pie… without the pie plate.
Whether you’re throwing together a last-minute Thanksgiving treat or just need a playful after-school snack, this recipe has your back. And trust me, these sliceable, handheld wedges with their creamy whipped topping? They’re always the first to disappear.
Let’s dive into how to make this fun fall dessert with minimal effort—and maximum joy.
Why Pumpkin Pie Rice Krispies Treats Are a Must-Make This Fall
A nostalgic twist with seasonal flavor
Rice Krispies Treats were a constant in my house growing up—quick, crunchy, and so satisfyingly chewy. But when pumpkin spice season hits, you know I can’t resist giving them an autumn upgrade. The combination of gooey marshmallows, cozy spices, and that signature cereal crunch makes these treats feel festive and familiar at the same time.
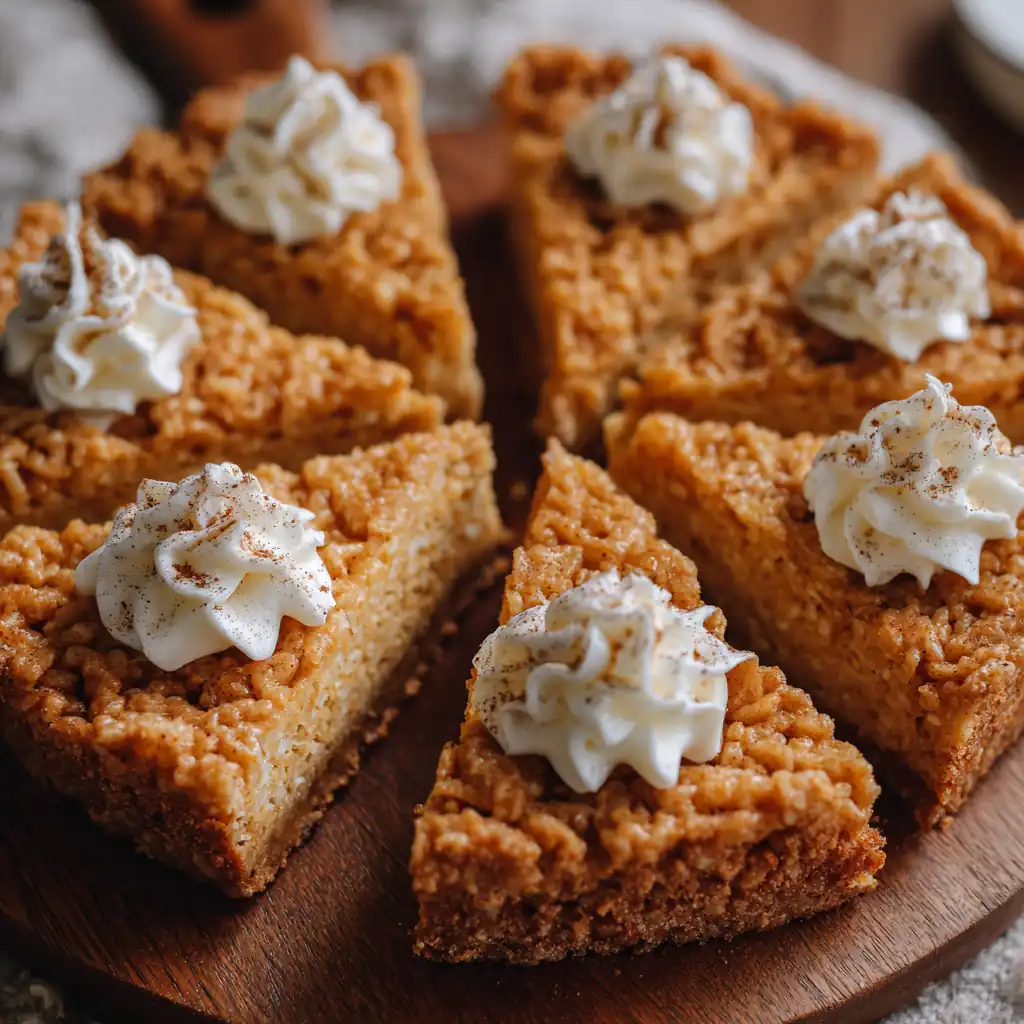
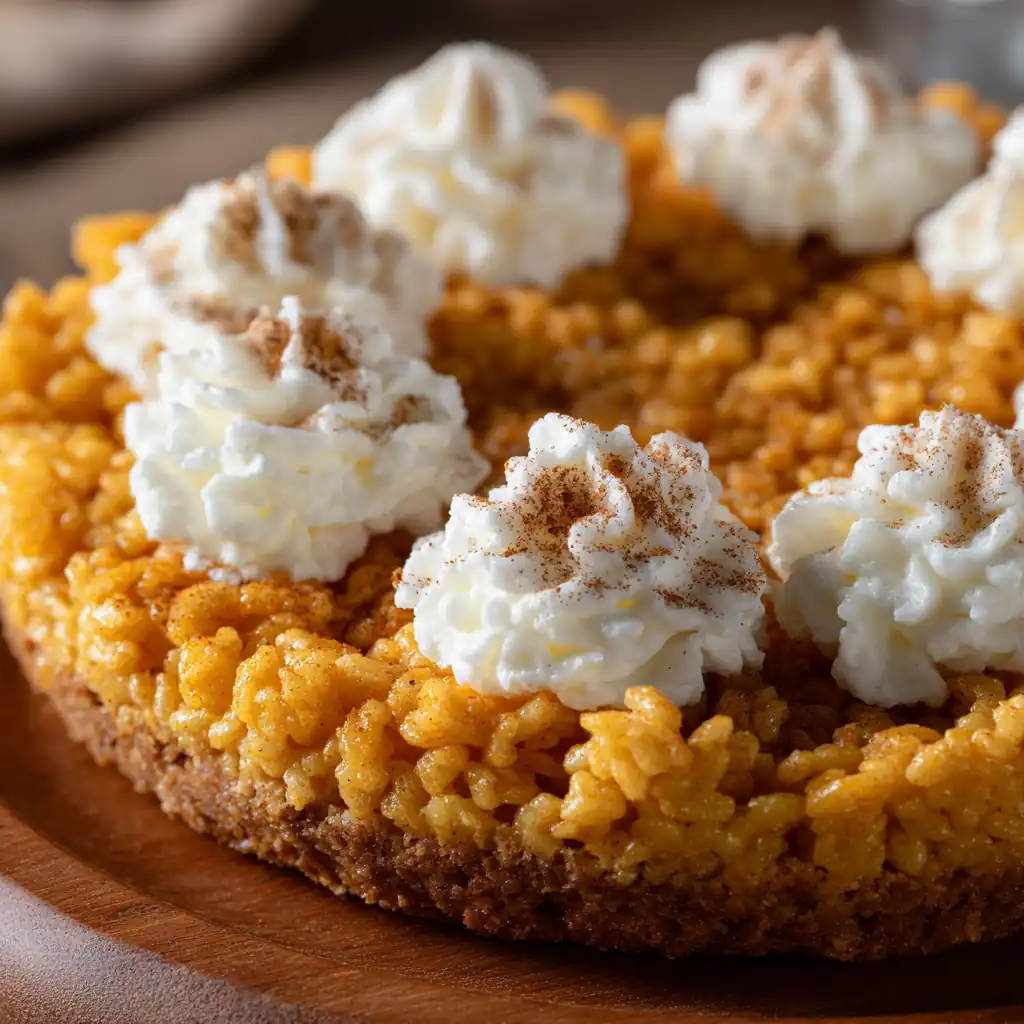
Instead of a traditional pie crust, the outer shell is made from classic vanilla-flavored crispy rice treats, molded into a round cake pan. It’s the perfect base for the spiced filling—tinted orange and packed with pumpkin pie flavor. No baking, no chilling, no oven mitts. Just melt, mix, and mold.
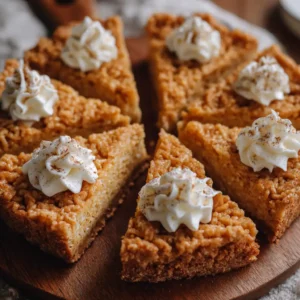
What makes this dessert really fun is its presentation. Shaped like a sliceable pie, each wedge is soft, slightly sticky, and layered with texture. It’s playful, it’s practical, and it satisfies those pumpkin cravings without turning on your oven. Plus, if you’re someone who loves the idea of baking but not the stress of crusts and timers, this is your dessert.
Perfect for kids, parties, and no-bake bakers
These treats are hands-down one of my workshop favorites with local families, especially during pumpkin season. Kids can help mix the cereal or press the filling into the crust. The ingredients are pantry-friendly, budget-friendly, and the whole process takes under 30 minutes from start to slice.
The final result is a crowd-pleaser, great for potlucks, bake sales, or cozy evenings at home. Want to level them up? A star-shaped swirl of whipped cream on top adds that perfect pie illusion. I often keep a piping bag ready when the kids invite friends over—it turns snack time into celebration.
They’re also easy to prep ahead. Make the crust and filling in the same pan, let them set, and you’re ready for slicing. No refrigeration needed unless it’s super hot out. And if you need a portable dessert, these travel beautifully. Just wrap wedges in wax paper or stack them in a tin. Instant fall cheer, wherever you go.
Pumpkin Pie Rice Krispies Treats
Ingredients
- For the Rice Krispies crust:
- ▢1 1/2 Tablespoons unsalted butter
- ▢2 cups about 16 marshmallows
- ▢1/2 teaspoon vanilla extract
- ▢3 cups Rice Krispies cereal
- For the Rice Krispies filling:
- ▢2 1/2 Tablespoons unsalted butter
- ▢1 teaspoon pumpkin pie spice
- ▢3 cups about 24 marshmallows (See Kelly’s Note)
- ▢2 teaspoons orange food coloring
- ▢4 cups Rice Krispies cereal
- ▢Whipped cream for decorating (optional)
- ▢Equipment: 8-inch round cake pan; Piping bag; Star-shaped piping tip
Instructions
- Make the Rice Krispies crust:
- Coat an 8-inch round cake pan with cooking spray. Set it aside.
- Add the butter to a medium saucepan set over medium-low heat. Once the butter has melted, add the marshmallows and cook, stirring constantly, until the marshmallows are melted. Stir in the vanilla extract and then the Rice Krispies cereal until the cereal is well coated.
- Transfer the mixture into the prepared cake pan an press it firmly against the inside edge of the pan to form about a 1-inch crust. Let it cool while you prepare the filling.
- Make the Rice Krispies filling:
- Add the butter and pumpkin pie spice to a medium saucepan set over medium-low heat. Once the mixture has melted, add the marshmallows and cook, stirring constantly, until the marshmallows are melted. Stir in the orange food coloring then stir in the Rice Krispies cereal until the cereal is well coated.
- Press the mixture firmly inside the crust border, pushing it down to compact it, and allow it to cool completely in the pan. Once cooled, place a serving plate on top of the pan and invert the pan. Slice the pie into wedges and top with a dollop of whipped cream (optional).
Notes
Grease your baking dish and any utensils (spatulas or hands) you’ll be using with a thin layer of butter or cooking spray to prevent sticking.
Once you’ve melted the marshmallows, work swiftly when folding in the cereal. The mixture can set rapidly, so have everything ready before you start.
When pressing the mixture into the baking dish, aim for a uniform thickness.
I know it’s tempting to dig into these right away, but patience is key when it comes to marshmallow crispy treats. To ensure they retain their perfect shape and don’t crumble into a gooey mess, allow them to cool completely in the pan before cutting.
Use a sharp knife, dipped in hot water or buttered, to cut your treats. This will help you achieve perfect pie wedges.
To keep your treats fresh, store them in an airtight container at room temperature for up to 4-5 days.
★ Did you make this recipe? Don’t forget to give it a star rating below!

How to Make Pumpkin Pie Rice Krispies Treats Step-by-Step
Simple ingredients, big autumn flavor
These Pumpkin Pie Rice Krispies Treats start with two easy layers: a vanilla-scented crust and a pumpkin-spiced filling. The crust uses the classic trio—butter, marshmallows, and crispy rice cereal—with just a hint of vanilla. It forms the outer edge of the pie, giving structure and that nostalgic crunch.
The filling is where the magic happens. Pumpkin pie spice and orange food coloring transform the mixture into a sliceable centerpiece. It smells like Thanksgiving morning and tastes like cozy afternoons with your favorite blanket. If you can find Pumpkin Spice Mallows, you can skip the spice step—but I personally love customizing the flavor with my own blend.
Here’s what you’ll need:
For the Crust:
- 1 ½ tablespoons unsalted butter
- 2 cups (about 16) marshmallows
- ½ teaspoon vanilla extract
- 3 cups Rice Krispies cereal
For the Filling:
- 2 ½ tablespoons unsalted butter
- 1 teaspoon pumpkin pie spice
- 3 cups (about 24) marshmallows
- 2 teaspoons orange food coloring
- 4 cups Rice Krispies cereal
Optional: Whipped cream for topping
Equipment: 8-inch round cake pan, piping bag, star tip
Easy assembly, no oven required
Start by greasing your 8-inch cake pan with cooking spray. For the crust, melt butter in a saucepan over medium-low heat. Stir in the marshmallows until smooth, then add vanilla. Fold in cereal and quickly press the mixture against the inside edge of your pan, creating about a 1-inch border. Let it set while you make the filling.
For the center, melt butter again and stir in pumpkin pie spice. Once fragrant, add the marshmallows and orange coloring. Mix until smooth, then fold in the cereal. Press this mixture firmly into the center of the crust. Flatten the top with a spatula or greased hands for an even finish.
Let the pie cool completely in the pan before slicing—this is key. The marshmallow mixture needs time to firm up, or your wedges may fall apart. Once set, flip the pie onto a serving plate, slice, and (if you like a little drama) pipe a dollop of whipped cream on top of each wedge.
This method is flexible, too. If you want to prep ahead, just keep the pie covered at room temperature for up to 5 days. And if you’re in a hurry, you can even use pre-made spice blends or flavored marshmallows for the filling.
Pro Tips for Perfect Pumpkin Pie Rice Krispies Every Time
Get the texture right every single time
The secret to great Pumpkin Pie Rice Krispies Treats? Timing and texture. Marshmallows can go from gooey to stiff in a blink, so it’s all about working quickly and confidently. Before you melt a single cube of butter, prep everything—your cereal, your food coloring, your pan. Have it all within arm’s reach.
Once the marshmallows are melted, act fast. Fold in the cereal while it’s still warm so it coats evenly. Use a greased spatula or lightly buttered hands to press the mixture into place. It’s a little sticky, but that’s part of the fun. You’re aiming for compact but not crushed—press firmly, but don’t pack the life out of it.
Another tip? Let the pie cool completely before slicing. I know it’s tempting to dig in (my kids always hover by the counter), but give it time. A cooled pie holds together better and slices cleanly. If you’re in a rush, pop it into the fridge for 15–20 minutes. Not too long—you don’t want it to harden, just set.
And when it’s time to cut? Use a sharp knife dipped in hot water or wiped with butter. It’ll slide right through without dragging the cereal. This technique makes picture-perfect wedges every time.
Storage, substitutions, and flavor variations
These treats are naturally low-stress, but you can tweak them depending on your pantry or preferences. Can’t find pumpkin pie spice? Make your own with cinnamon, nutmeg, ginger, and a pinch of clove. Don’t want food coloring? Leave it out. The flavor still shines.
Want a deeper pumpkin flavor? Mix a tablespoon of pumpkin puree into the marshmallow mix (just keep it minimal to avoid sogginess). You can also swap in Pumpkin Spice Mallows and skip the added spice.
Here’s a quick tip table for easy reference:
| Challenge | Quick Fix |
|---|---|
| Treats won’t hold shape | Let cool completely, press mixture more firmly into pan |
| Mixture sticking to hands | Grease hands or spatula with butter or spray |
| Color not bright enough | Use gel food coloring, not liquid |
| No pumpkin spice on hand | Mix cinnamon, nutmeg, ginger, clove |
When storing, keep the pie in an airtight container at room temp. It’ll stay fresh for 4–5 days. If stacking, use wax paper between layers to avoid sticking. These treats also make adorable gifts—wrap slices in parchment, tie with twine, and deliver a little fall joy to friends and neighbors.
Serving Ideas and Fun Fall Presentation Tips
Make your treats party-ready
These Pumpkin Pie Rice Krispies Treats don’t just taste like fall—they look like it too. One of my favorite ways to present them is like a real pie, sliced into neat wedges on a cake stand or ceramic pie plate. If you want that wow factor, pipe whipped cream onto each slice with a star-shaped tip. It’s simple but adds such charm, especially for gatherings or bake sales.
Want to go mini? Use a muffin tin to press in individual portions. Each cup becomes a personal pumpkin “pie,” ready for whipped topping and a sprinkle of cinnamon. Great for classroom treats or harvest parties where guests can grab and go—no slicing needed.
You can even add candy corn or fall sprinkles on top for a kid-approved finish. When I make these for Halloween, I pop in little candy eyeballs or mini pumpkin candies right before they set. Easy, festive, and always a conversation starter.
Presentation is all about the small details. Serve them on a wood board, line a tray with parchment, or layer them between paper doilies for a touch of vintage fall charm. These treats may be simple, but they dress up beautifully for any occasion.
A creative centerpiece for your fall dessert table
Let’s face it—pumpkin pie is a classic, but not everyone wants to bake (or eat) a heavy slice after a big holiday meal. That’s where this version shines. It’s light, easy to eat, and still delivers on the seasonal flavor your guests crave.
Serve alongside apple cider, hot chocolate, or even coffee for adults. Add a bowl of maple whipped cream or cinnamon sugar for dipping. You can even turn this into a dessert board: slice the Rice Krispies pie, then surround it with pumpkin cookies, mini donuts, and chocolate bark for a cozy autumn display.
These treats don’t just belong at kids’ tables either. I’ve served them at grown-up fall potlucks, and every time, someone grabs a slice with a grin and says, “Okay, this is genius.” That’s the beauty of this dessert—it surprises, delights, and disappears fast.
FAQs About Pumpkin Pie Rice Krispies Treats
Can I use pumpkin puree in Pumpkin Pie Rice Krispies Treats?
Yes, but only in small amounts. Stir about 1 tablespoon into the marshmallow mix for flavor. Too much can make the treats soggy.
What type of food coloring makes Pumpkin Pie Rice Krispies orange?
Gel-based orange food coloring gives vibrant results without thinning the mix. You can also blend red and yellow coloring to create your desired shade.
How long do Pumpkin Pie Rice Krispies Treats stay fresh?
They stay fresh for 4–5 days when stored in an airtight container at room temperature. Keep them away from heat and moisture.
Can I make Pumpkin Pie Rice Krispies Treats ahead of time for Thanksgiving?
Definitely. Make them 1–2 days in advance. Keep them wrapped tightly or in a sealed container for best results.
Conclusion
Pumpkin season flies by fast—but these Pumpkin Pie Rice Krispies Treats are one way to make every moment (and every bite) count. With just a few pantry staples and a little creativity, you can whip up a dessert that’s festive, fun, and totally stress-free.
Whether you’re prepping for Thanksgiving, hosting a classroom party, or just craving something cozy after dinner, this recipe checks all the boxes. It’s playful enough for kids, nostalgic enough for grown-ups, and easy enough for any skill level.
If you try this recipe, don’t forget to let it cool completely before slicing—it makes all the difference in texture. And feel free to put your own spin on it with toppings, decorations, or flavor tweaks. That’s what makes these mug-cake-style treats so lovable: they’re endlessly customizable.
From my kitchen in Asheville to yours, I hope this simple no-bake pie becomes a new fall favorite. Now go grab your marshmallows—it’s treat time.