Halloween baking should be all about fun—and nothing says fun quite like creepy-cute Halloween spider cookies. Whether you’re planning a kid-friendly party, prepping classroom treats, or just love themed baking, these cookies will steal the show.
This article walks you through the story behind this festive favorite, the ingredients and how-tos, plus decorating tips and common questions. With a soft, chewy base and those signature Malteser spiders on top, these cookies are deliciously spooky without being too complicated. Ready to stir up something sweet and seasonal?
Why These Halloween Spider Cookies Became a Favorite in My House
I never planned to make Halloween cookies a tradition. It started a few years ago when a late-October storm kept us indoors. My twins were disappointed about missing their costume parade, so I decided to lift the mood with an impromptu baking session. I had cookie dough ingredients, a bag of Maltesers, and just enough white icing left from another recipe. Halloween spider cookies were born—quite literally out of a sugar-fueled brainstorming session.
The results were better than I expected. Soft-baked cookies, melty chocolate legs, and those funny little eyes staring back from the cooling rack made my kids laugh until they cried. And just like that, these cookies became a seasonal must-have.
What I love most about these Halloween spider cookies is how approachable they are. No piping skills needed, no complicated steps. Just simple ingredients, a microwave, and a ziplock bag for decorating. It’s a spooky bake that anyone—even a baking beginner—can pull off.
Now each year, we bake them together, sometimes swapping Maltesers for peanut butter cups or using candy eyes instead of icing. But the magic stays the same: soft, chewy cookies with a little Halloween mischief on top. Perfect for little hands—and big imaginations.
The Sweet Science: Ingredients That Make Halloween Spider Cookies Work
Every great cookie starts with a balanced dough. These Halloween spider cookies keep it classic with a buttery, chewy base that holds its shape—perfect for decorating with chocolate “legs” and candy “eyes.” The ingredients are likely already in your pantry, making this a no-fuss, high-reward kind of recipe.
The butter is melted, not creamed, which helps keep the cookies soft in the center and saves time. Using both brown and white sugar adds depth of flavor and that slight crisp edge. Cornflour (or cornstarch) is the secret weapon—it keeps the texture tender and thick without making the dough too crumbly.
| Ingredient | Why It Matters |
|---|---|
| Butter (150g) | Adds richness and helps with the soft texture |
| Brown & White Sugar | Brown sugar adds moisture; white sugar helps crisp edges |
| Cornflour (2 Tbsp) | Creates thickness and softness without heaviness |
| Maltesers | Perfectly round for spider “bodies” |
The dark chocolate and white icing are purely for decoration—but that’s where the Halloween fun begins.
Step-by-Step: Making the Cookie Dough and Baking It Right
Start by melting the butter in a large glass bowl—just enough to soften it without making it hot. Add both sugars, the egg, and vanilla, then whisk until smooth. Sift in the dry ingredients: flour, baking soda, salt, and cornflour. Fold it all together until the dough comes together.
If the dough feels too soft, chill it briefly before rolling. Use about two tablespoons per cookie, pressing each one slightly on the baking sheet. Bake at 170°C fanbake for 12 to 15 minutes. You want the edges to be golden while the centers stay soft.
As soon as they’re out of the oven, gently press two Maltesers into each cookie—one for the head, one for the body. Let them cool slightly before moving to a rack.
This simple base sets the stage for the fun part: decorating your spider army.
Halloween Spider Cookies
Ingredients
- 150 g butter
- ½ cup brown sugar 100g
- ½ cup white sugar 110g
- 1 egg
- 1 tsp vanilla essence
- 2 cups plain flour 300g
- ¼ tsp salt
- 1 tsp baking soda
- 2 Tbsp cornflour
- Decorations
- 140 g bag Maltesers
- 100 g dark chocolate melted
- 1 small tube white icing
Instructions
- In a large glass bowl melt butter in the microwave for 30 to 50 seconds.
- Whisk, then add the brown and white sugar, egg and vanilla. Mix everything together until smooth with no lumps.
- Sift flour, salt, baking soda and cornflour over the bowl then fold everything together until combined. The dough will be very soft but thick. If the mixture is quite warm and soft: chill it in the fridge or freezer until it is cool enough to roll into balls.
- Pre-heat the oven to 170°C fanbake.
- Roll the dough into balls about 2 tablespoons (30-40g) each and place on a lined baking tray. Push down slightly.
- Bake the cookies for 12-15 minutes until turning golden on the outside but still very soft in the centre. Remove from the oven.
- While the cookies are still warm push two Maltesers into each one. Remove from the tray after 10 minutes to a wire rack too cool.
- Melt the chocolate then add to a small ziplock bag. Cut a tiny hole in the corner of the bag.
- Pipe 4 chocolate legs to each side.
- Use some white icing to add two dots for the eyes then add a small dots of chocolate inside each eye to make eyeballs.
- Once the chocolate legs and eyes have hardened the cookies are ready to serve.
- Store in an airtight container for up to 1 week.
Notes
To make chocolate chip cookies, add a cup of chocolate chips to the mixture and combine well before refrigerating.
You could also use candy eyeballs – available from specialty cooking stores. Nutrition
Yield: 20 Serving Size: 1
Amount Per Serving: Calories: 211Total Fat: 10gSaturated Fat: 6gTrans Fat: 0gUnsaturated Fat: 3gCholesterol: 27mgSodium: 156mgCarbohydrates: 28gFiber: 1gSugar: 17gProtein: 2g
Nutritional values are approximate. Please use your own calculations if you require a special diet.
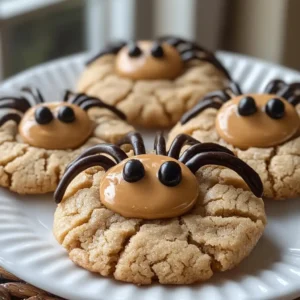
Decorating Halloween Spider Cookies with Just a Ziplock Bag
Once the cookies are baked and cooled slightly, it’s time to bring those spiders to life. This step is where the magic happens—and the kids usually jump in. The best part? You don’t need fancy tools. A ziplock bag with the corner snipped works just fine.
While the cookies are still warm, press two Maltesers gently into each one. These become the spider’s body and head. Make sure they’re secure but not sunken. Let the cookies cool fully before decorating with melted chocolate.
Melt dark chocolate (about 100g) in short bursts in the microwave until smooth. Pour it into a small ziplock bag, then snip a tiny hole in one corner. You’re aiming for thin lines, like spider legs.
Pipe four little chocolate legs on each side of the body. They don’t have to be perfect—wiggly legs actually add to the charm! You’ll quickly see the spiders “take shape,” and that’s when the Halloween vibes really hit.
This method is so simple, but the results look like they came straight out of a themed bakery.
The Eyes Have It: Simple Tricks for Spider Eyes That Pop
After the legs are set, it’s time to finish each spider’s face. You can use a tube of white icing to pipe two small dots on the front Malteser. These dots make perfect base eyes.
For pupils, add a dot of melted chocolate inside each white circle. Use a toothpick or a piping bag if you have one—but even a clean bobby pin will work in a pinch.
If you’re short on time (or patience), store-bought candy eyes work just as well and save time. Just press them into the cookie while the chocolate is still soft. Either way, once the eyes are in place and the chocolate has hardened, your spiders are ready to crawl onto your Halloween table.
And don’t worry if they look a little goofy or lopsided. That’s the whole point—they’re supposed to be fun, not perfect.
Keeping Halloween Spider Cookies Fresh for the Big Night
After you’ve decorated your spooky cookie crew, you might wonder: how long will they last? The good news is, Halloween spider cookies store beautifully and can be made ahead of your party or trick-or-treat night.
Let the chocolate decorations harden completely before storing. Place the cookies in a single layer in an airtight container, using parchment paper between layers if you need to stack them. They’ll stay fresh for up to one week at room temperature—though they rarely last that long in my house.
If you want to bake ahead, you can refrigerate the dough for up to three days or freeze the unbaked cookie balls for longer. Just defrost and bake fresh when ready. The only thing I don’t recommend freezing is the fully decorated cookies—the chocolate legs and eyes can smudge or crack once thawed.
Fun Variations: Customizing Your Spider Cookies for Any Crowd
Part of the charm of Halloween spider cookies is how easy they are to adapt. No Maltesers? Use mini peanut butter cups, Rolo candies, or even chocolate truffles. You could also dip the “spider body” in colored sanding sugar before placing it on the cookie for a sparkly effect.
Want to go full candy-crazy? Add chocolate chips or chopped candy bars to the dough before baking. Just reduce the cookie size slightly to keep the decorations proportional.
You can also swap the vanilla extract for almond or orange to add a seasonal twist. For little ones who love color, a drop of food coloring in the white icing can make “monster eyes” instead of spiders.
Don’t be afraid to get creative—the goal isn’t perfection, it’s playfulness. Whether you stick to the classic look or create rainbow mutant spiders, the result is always the same: fun, festive, and totally Halloween-worthy.

Frequently Asked Questions About Halloween Spider Cookies
1. Can I make Halloween spider cookies without Maltesers?
Yes! If you don’t have Maltesers, use chocolate truffles, Rolos, mini peanut butter cups, or any round candy that holds its shape. The key is to keep the candy body solid enough to support the spider legs and eyes.
2. How do I keep the chocolate spider legs from melting?
Let the cookies cool completely before piping the legs. Use melted dark chocolate and allow it to set in a cool room or fridge. Avoid stacking the cookies until the legs are fully hardened to prevent smudging.
3. Can I use premade cookie dough for spider cookies?
Yes, store-bought dough can work if it holds its shape while baking. Stick to thick-style doughs (like chocolate chip base) and avoid those that spread too thin or crisp too much. The decorations need a soft surface to anchor.
4. How far in advance can I make Halloween spider cookies?
You can bake and decorate them up to 5–7 days ahead of time. Store them in an airtight container in a cool, dry place. You can also freeze the unbaked cookie dough and decorate fresh cookies closer to your event.
Conclusion
Whether you’re planning a Halloween bash or a quiet night of trick-or-treating, these Halloween spider cookies bring just the right mix of fun, flavor, and spooky charm. They’re simple enough to bake with kids and eye-catching enough to steal the spotlight at any treat table.
With buttery dough, melty chocolate legs, and goofy candy eyes, these cookies aren’t just a recipe—they’re a memory in the making. From our haunted kitchen to yours, may your Halloween be deliciously creepy and full of giggles.