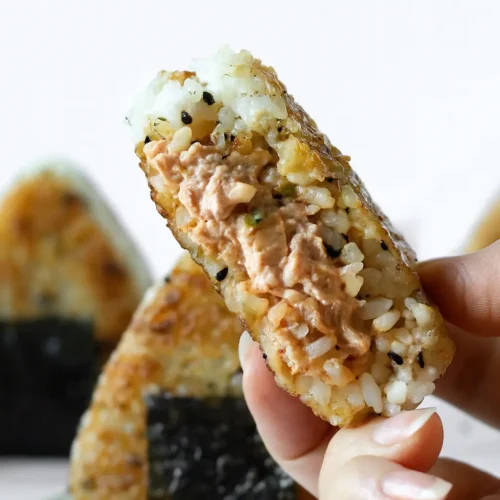
Spicy Tuna Yaki Onigiri with Kimchi
These spicy tuna yaki onigiri are both cute and super delicious. The crispy rice exterior gives way to a burst of tangy, umami goodness from the filling, made with canned tuna, kewpie mayo, gochujang and kimchi. With every bite, you'll experience a satisfying crunch and a delightful explosion of taste.
Ingredients
- rice
- ▢4 rice cooker cups uncooked sushi rice | equals 600g / 1.3 lb uncooked sushi rice Note 1
- ▢6 tbsp furikake
- ▢4 tbsp soy sauce
- ▢2 tbsp mirin
- ▢cooking oil
- ▢nori sheets cut into thin strips | optional
- spicy tuna
- ▢150 g canned tuna in water or oil, drained | equals 1 can of tuna
- ▢80 g kewpie mayo
- ▢1 tsp gochujang | Korean red pepper paste
- ▢80 g kimchi chopped (here is my kimchi recipe)
- ▢1 tsp sesame oil
Instructions
- Prepare the rice – Be careful not to overcook the rice. For more details on how to cook the perfect rice, check my guide here. Allow the rice to cool a little before shaping the yaki onigiri.
- In a bowl, mix together the cooked rice and the furikake. Set aside.
- Prepare the tuna – In another bowl, combine tuna, kewpie mayo, gochujang, kimchi and sesame oil. Mix well.
- Shape the yaki onigiri – Wet your hands before shaping the onigiri, or alternatively wear some gloves so that the rice doesn’t stick (Note 2).
- Using an onigiri mould, place some rice at the bottom of the mould, add the tuna filling in the centre (Note 3) and top it with more rice (be sure to add some rice on the sides to prevent the filling from slipping away). Press it down firmly to shape the onigiri. If you don't have a mould, you can shape it by hand. Start by shaping a large rice ball, flattening it a little, and making a hole in the middle. Add the filling, then close the ball and shape it into a triangle with soft edges.
- Repeat for all onigiri.
- Pan-fry the onigiri – In a small bowl, mix soy sauce and mirin.
- Heat a large pan over medium heat and add a generous amount of cooking oil to prevent the rice from sticking or burning. Add the onigiri to the pan and fry for 2-3 minutes on each side or until golden brown and crispy (Note 4).
- Turn the heat on low and lightly brush the top of the onigiri with the soy sauce mixture. Turn it around and cook for 1 minute. Repeat on the other side.
- Garnish (optional) – to wrap the nori strip around the onigiri, place the strip on a flat surface and position the onigiri in the centre. Fold the ends of the nori strip underneath the onigiri and press lightly to seal. The strip should wrap around the bottom half of the onigiri, leaving the top half exposed. If the nori strip doesn't stick, you can add a small amount of kewpie mayo to both ends to help it adhere.
- Serve hot or cold.
Notes
1. Rice – make sure you use short-grain sushi rice for the rice to stick properly.
2. Shape the onigiri while the rice is still slightly warm. Do not place the rice in the refrigerator or shape the onigiri with cold rice. It will be harder to make it stick together.
3. Filling – do not overcrowd the center with filling or the filling may slip away or you may not be able to close the onigiri.
4. Pan-frying – according to the strength of your stove, adjust the heat to prevent the onigiri from turning dark or burnt. Keep an eye on the onigiri as they cook, and adjust the heat as necessary to ensure they cook evenly and don’t become overcooked or charred. Calories: 258kcal | Carbohydrates: 43g | Protein: 7g | Fat: 6g | Saturated Fat: 1g | Polyunsaturated Fat: 3g | Monounsaturated Fat: 1g | Trans Fat: 0.01g | Cholesterol: 7mg | Sodium: 666mg | Potassium: 96mg | Fiber: 2g | Sugar: 2g | Vitamin A: 150IU | Vitamin C: 1mg | Calcium: 14mg | Iron: 1mg